Copper Coil Lamp Built With 3D Printed Tools

3D printing is a great way to create complex geometric forms. However, it can be very slow, and parts may lack strength compared to other alternatives. There are other ways to take advantage of this technology however, as shown in the build of this tidy voronoi lamp. 

The lamp is so-called for its voronoi-patterned base, named after the mathematical concept. 3D printing is used to create the base, which would be very difficult to create with traditional subtractive machining methods. A copper coil is then used to give the lamp some height, as well as act as protection for the filament bulb. Here, 3D printing helps out in a different way, being used to create a jig to allow the copper to be quickly wound into an accurate coil shape. The coil also serves to act as a conduit for the mains wiring, giving the lamp a neat finished appearance.

The project goes to show that even if 3D printing is appropriate to produce your final parts, it may be of help to create useful jigs or tools to get the job done. We’ve even seen similar applications before in the microcontroller space!

Monochrome CRT And Liquid Crystal Shutter Team Up For Color Video

If you were tasked with designing a color video monitor, it’s pretty clear how you’d go about it. But what if you’d been asked to do so 20 years ago? Would it have been a cut and dried from an engineering standpoint? Apparently not, as this hybrid LCD-CRT video monitor demonstrates.

We’d honestly never heard of this particular design, dubbed “LCCS”, or liquid crystal color shutter, until [Technology Connections]’ partial teardown of the JVC monitor and explanation of its operation. The idea is simple and hearkens back to the earliest days of color TV in the United States, when broadcasters were busy trying to bring color to a monochrome world in a way that would maximize profits. One scheme involved rotating a color wheel in front of the black-and-white CRT and synchronizing the two, which is essentially what’s happening in the LCCS system. The liquid crystal panel cycles between red, blue, and green tints in time with the CRT’s images behind it, creating a full-color picture. “But wait!” you cry. “Surely there were small color CRTs back in the year 2000!” Of course there were, but they kind of sucked. Just look at the comparison of a color CRT and the LCCS in the video below and you’ll see why this system carved out a niche in the pro video market, especially for video assist monitors in the days before digital cinematography. A similar system was used by Tektronix for color oscilloscopes, too.

As usual, [Technology Connections] has managed to dig up an interesting bit of the technological fossil record and present it in a fascinating way. From video on vinyl to 1980s copy protection to the innards of a toaster, we enjoy the look under the hood of forgotten tech.

Continue reading “Monochrome CRT And Liquid Crystal Shutter Team Up For Color Video”

A Retro Gaming Console For The New Generation

Ostensibly the ESPboy is an open-source hackable game engine built as an IoT platform for STEM education and play, but there’s no way [RomanS] could have been inspired by anything other than retro gaming consoles from the near past. For anyone who grew up playing with Tamagotchi pets or Palm Pilots, this project is going to be a major throwback.

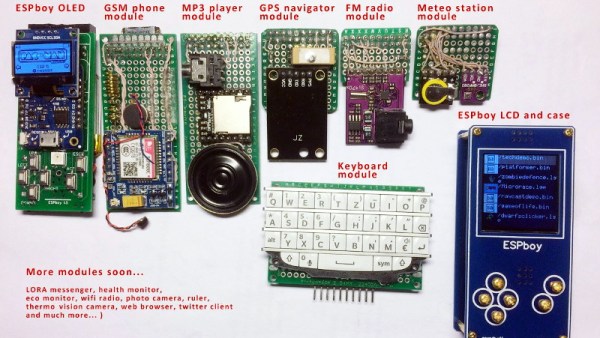
The Saint Petersburg-based microcontroller hobbyist utilizes a ESP8266 microcontroller to build a series of modules for different game play modes, including a TFT display, GSM phone, MP3 player, GPS navigator, FM radio, and keyboard module. He has plans to build even more modules, including a LoRa messenger and thermal camera, to really expand the system’s capabilities.

Since the board has built-in WiFi, firmware can be uploaded to the device without a wired connection and compiler. The nature of the project makes the board compatible with the Arduino IDE and Micropython, which makes hacking the software even easier.

A TP4056 battery charging module charges the LiPo, although depending on the battery capacity, the charging current (set by the R3 resistor on the controller) does require some change. A MCP4725 I2C DAC is used for smooth driving the LCD’s backlight. In order to extend the battery life, the battery controller uses sleep mode to periodically wake up to measure and send data, which allows it to extend its battery life without external power. There’s also transistor driven buzzers that provide a little extra feedback to the user when playing games, complete with a variable resistor to adjust the sound volume.

A number of free pins run along the periphery for connecting to other modules, including pins for GPIO extension, sensor adapters, connectors to addressable LEDs, and an extension slot for actuators. For anyone interested in making their own version of the ESPboy, the PCB schematics are accessible online.

Projects like the Arduboy have shown that a small microcontroller-based game system can be equal parts fun and educational, so we’ve been excited to see more of these types of projects popping up during the course of the 2019 Hackaday Prize.

Continue reading “A Retro Gaming Console For The New Generation”

Fried Desk Lamp Reborn: How To Use ESP8266 To Build Connected Devices

Some hacks are born of genius or necessity, and others from our sheer ham-fisted incompetence. This is not a story about the first kind. But it did give me an excuse to show how easy it is to design WiFi-connected devices that work the way you want them to, rather than the way the manufacturer had in mind.

It started out as a sensible idea – consumer electronics in Vietnam have many different electric plug types for mains AC power: A, C, G, F, and I are fairly present, with A and C being most common. For a quick review of what all those look like, this website sums it up nicely. There are universal power adapters available of course, but they tend to fit my most common type (C) poorly, resulting in intermittent power loss whenever you sneeze. So I figured I should replace all the plugs on my devices to be A-type (common to those of you in North America), as it holds well in all the power bar types I have, mainly leftover server PDUs.

This was very straightforward until I got to my desk lamp. Being a fancy Xiaomi smart lamp, they had opted to hide a transformer in the plug with such small dimensions that I failed to notice it. So instead of receiving a balmy 12 volts DC, it received 220 volts AC. With a bright flash and bang, it illuminated my desk one final time.

Continue reading “Fried Desk Lamp Reborn: How To Use ESP8266 To Build Connected Devices”

A Useless Tomb Of Eternal Doom

It’s officially October, and that means we can start unleashing the Halloween hacks. Take for example this restless skeleton that master automaton maker [Greg Zumwalt] has doomed to spend eternity inside of a useless box. If that wasn’t enough to wake the dead, every time some joker pushes the button, these blinky lights come on. Hey, at least there’s no opera music.

The ironic thing about useless machines is that there are a ton of ways to make them. This spooktacular Halloween-themed do-nothing box doesn’t use a microcontroller, or even a 555 — it’s purely electromechanical. When the button is pressed, two AAAs power a small gear motor that simultaneously lifts the lid, raises the dead, and twists him a quarter turn so he can close the lid and put himself back to eternal rest.

The intricately-printed skeleton doesn’t really push the button — he’s far too dead and frail for that. The gear motor also turns a dual-lobe cam that activates a pair of roller switches that handle the candles and lower Mr. Bones back into his crypt. Clear as blood? Skitter past the break for a closer look at the mechanism.

Halloween or not, we love a good useless machine around these parts. Here’s one that incorporates a real candle and who could forget this octo-switched beast?

Continue reading “A Useless Tomb Of Eternal Doom”

Ask Hackaday: Does Your Car Need An Internet Killswitch?

Back in the good old days of carburetors and distributors, the game was all about busting door locks and hotwiring the ignition to boost a car. Technology rose up to combat this, you may remember the immobilizer systems that added a chip to the ignition key without which the vehicle could not be started. But alongside antitheft security advances, modern vehicles gained an array of electronic controls covering everything from the entertainment system to steering and brakes. Combine this with Bluetooth, WiFi, and cellular connectivity — it’s unlikely you can purchase a vehicle today without at least one of these built in — and the attack surface has grown far beyond the physical bounds of bumpers and crumple zones surrounding the driver.

Cyberattackers can now compromise vehicles from the comfort of their own homes. This can range from the mundane, like reading location data from the navigation system to more nefarious exploits capable of putting motorists at risk. It raises the question — what can be done to protect these vehicles from unscrupulous types? How can we give the user ultimate control over who has access to the data network that snakes throughout their vehicle? One possible solution I’m looking at today is the addition of internet killswitches.

Continue reading “Ask Hackaday: Does Your Car Need An Internet Killswitch?”

A Web API For Your Pi

There are many ways to attach a project to the Internet, and a plethora of Internet-based services that can handle talking to hardware. But probably the most ubiquitous of Internet protocols for the average Joe or Jane is the web browser, and one of the most accessible of programming environments lies within it. If only somebody with a bit of HTML and Javascript could reach a GPIO pin on their Raspberry Pi!

If that’s your wish, then help could be at hand in the form of [Victor Ribeiro]’s RPiAPI. As its name suggests, it’s an API for your Raspberry Pi, and in particular it provides a simple web-accessible endpoint wrapper for the Pi’s GPIO library from which its expansion port pins can be accessed. By crafting a simple path on the address of the Pi’s web server each pin can be read or written to, which while it’s neither the fastest or most accomplished hardware interface for the platform, could make it one of the easiest to access.

Security comes courtesy of Apache password protected directories via .htaccess files, so users would be well-advised to consider the implications of connecting this to a public IP address very carefully. But for non experts in security it still has the potential to make a very useful tool in the armoury of ways to control hardware from the little single board computer. It’s not the first try at this idea as we’ve seen a PHP example early in the Pi’s lifetime as well as one relying upon MySQL, but it does seem to be a simpler option than the others.