This goes back to Bach: if you want to change the sound an organ makes, you have to pull on some drawbars. This design didn’t change for 300 years, and in the 20th century with the advent of ‘tonewheel’ organs, you still had small bars to pull to change what sounds came out of the organ. While this was a simple solution for air-powered organs of the 1700s, when it comes to MIDI, rotary pots are a lot less expensive than linear pots. Given the lack of drawbar MIDI controllers, [Stefano] decided to build his own. It has nine drawbars and eight buttons, all connected to MIDI.
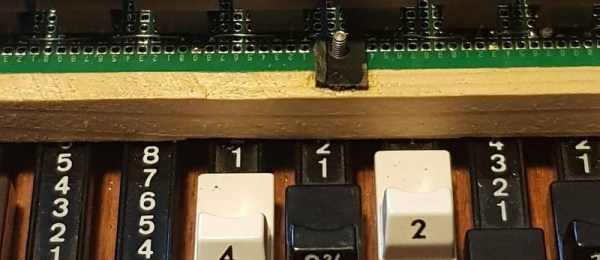
The interesting electromechanical part of this build, the drawbars themselves, are ripped from a Hammond organ. Don’t worry, plenty of these were made and only a handful actually sound good. To that, [Stefano] added a few pushbuttons soldered onto a piece of perfboard, and everything is wired up to a Teensy LC, the microcontroller platform that’s becoming the standard for everything from MIDI controllers to computer keyboards. MIDI over DIN and MIDI over USB are supported, and all the buttons and drawbars are individually programmable. You can even do that through SysEx messages, because that’s how things were done back in the day.
While there are a few MIDI-controlled organs that still use drawbars — the double manual Nord comes to mind imminently — this is a great solution to putting drawbars into anything that speaks MIDI, VSTs included.