Litar: LiDAR air guitar

Litar: An Air Guitar Using LiDAR

This year, [Blecky’s] Hackaday Prize Entry is an air guitar which uses multiple LiDAR sensors to create the virtual strings. What’s also neat is that he’s using his own LiDAR sensor, the MappyDot Plus, an enhanced version of his 2017 Prize Entry, the MappyDot.
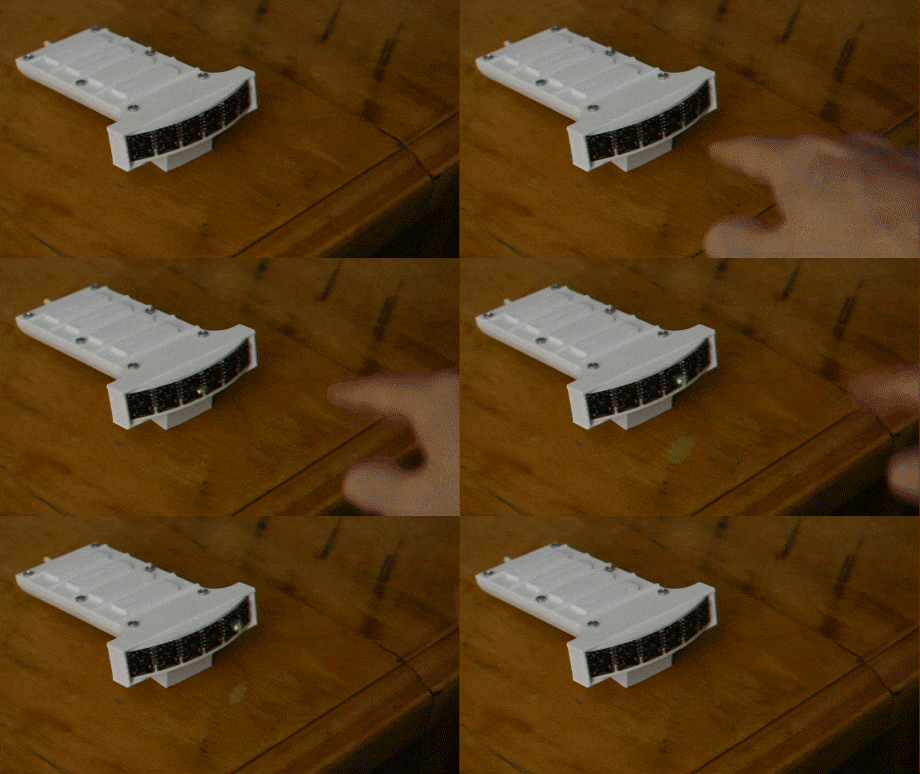
He uses a very clever arrangement of six sensors to get four virtual strings. Each sensor scans a 25-degree field of view. Three adjacent sensors are used to define a string, with the string being in the overlap of the outer two of those sensors. The middle sensor is used for the distance data.

For the chords, he started out using some commercially made joysticks but ran into some ergonomic issues. Also, the manufacturer was discontinuing the product, a no-no for an open source project. So he abandoned that approach and designed his own buttons. He came up with a PCB with a linear hall effect sensor and some springs on it. The button has a magnet attached to its underside and sits on the springs. That way he gets the press and can do vibrato as well.

He plans to use Bluetooth MIDI so that you can play the sound on a phone or laptop but for now he lights up an LED beside each sensor as you press the strings.


Retrotechtacular: Synchros Go To War (and Peace)

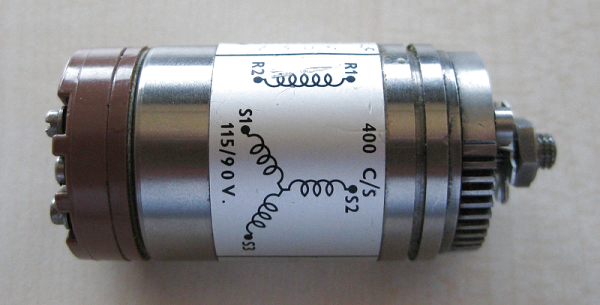
Rotation. Motors rotate. Potentiometers and variable capacitors often rotate. It is a common task to have to rotate something remotely or measure the rotation of something. If I asked you today to rotate a volume control remotely, for example, you might offer up an open loop stepper motor or an RC-style servo. If you wanted to measure a rotation, you’d likely use some sort of optical or mechanical encoder. However, there’s a much older way to do those same tasks and one that still sees use in some equipment: a synchro.

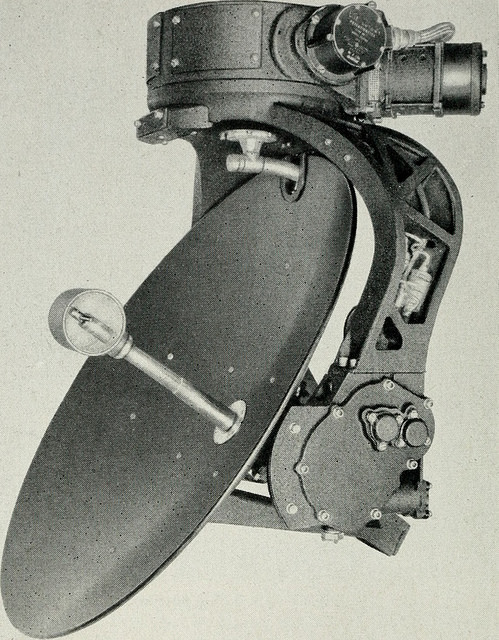
The synchro dates back to the early 1900s when the Panama Canal used them to read and control valves and gates. These devices were very common in World War II equipment, too. In particular, they were often part of the mechanisms that set and read gun azimuth and elevation or — like the picture to the left — a position indication of a radar antenna. Even movie cameras used these devices for many years. Today, with more options, you don’t see them as much except in applications where their simplicity and ruggedness is necessary.

Continue reading “Retrotechtacular: Synchros Go To War (and Peace)”

Friday Hack Chat: Control Schemes For Robotics

The Hackaday Prize is in full swing if you haven’t heard. It’s the Academy Awards of Open hardware, and the chance for you — yes, you — to create the next great piece of hardware and a better future for everyone. Right now, we’re in the Robotics Module Challenge portion of the prize. This is your chance to build a module that could be used in robotics projects across the world! Show off your mechatronic skills and build a robotics module that’s transferable to other builds!

Not coincidentally, for this week’s Hack Chat, we’re talking all about Robotics Modules. We’re taking a deep dive into actuation and control schemes for robotics, and you’re invited to take part. Everyone wants affordable robotics, and stepper and servo motors are no longer the domain of high-budget industrial robots. Everyone can build a robot, but how do you do that? That’s what we’re going to find out this Friday in the Hack Chat!

Our guest for this week’s Hack Chat is [Ryan Walker]. He holds a diploma in Mechatronics and Robotics from BCIT. He’s worked on everything from prosthetics to industrial automation, and his current hobbies include designing and building control algorithms that drive electronics and enable cheap hardware to excel! If you want to learn about robotics, this is the Hack Chat for you.

In this chat, we’ll be talking about:

  • Control schemes
  • How to actuate your projects
  • Wheels, tweels, and ways to make your project move
  • Automating robotics

You are, of course, encouraged to add your own questions to the discussion. You can do that by leaving a comment on the Hack Chat Event Page and we’ll put that in the queue for the Hack Chat discussion.join-hack-chat

Our Hack Chats are live community events on the Hackaday.io Hack Chat group messaging. This week is just like any other, and we’ll be gathering ’round our video terminals at noon, Pacific, on Friday, April 27th.  Here’s a clock counting down the time until the Hack Chat starts.

Click that speech bubble to the right, and you’ll be taken directly to the Hack Chat group on Hackaday.io.

You don’t have to wait until Friday; join whenever you want and you can see what the community is talking about.

Reflow Rig Makes SMD Soldering A Wok In The Park

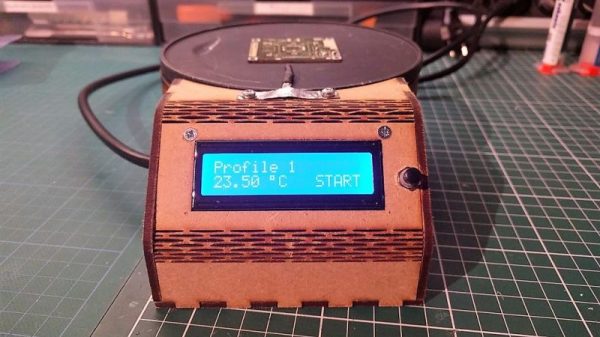
For a DIY reflow setup, most people seem to rely on the trusty thrift store toaster oven as a platform to hack. But there’s something to be said for heating the PCB directly rather than heating the surrounding air, and for that one can cruise the yard sales looking for a hot plate to convert. But an electric wok as a reflow hotplate? Sure, why not?

At the end of the day [ThomasVDD]’s reflow wok is the same as any other reflow build. It has a heat source that can be controlled easily, temperature sensors, and a microcontroller that can run the proportional-integral-derivative (PID) control algorithm needed for precise temperature control. That the heating element he used came from an electric wok was just a happy accident. A laser-cut MDF case complete with kerf-bent joints holds the heating element, the solid-state relay, and the Arduino Nano that runs the show. A MAX6675 thermocouple amp senses the temperature and allows the Nano to cycle the temperature through different profiles for different solders. It’s compact, simple, and [ThomasVDD] now has a spare wok to use on the stove top. What’s not to like?

Reflow doesn’t just mean oven or hotplate, of course. Why not give reflow headlights, a reflow blowtorch, or even a reflow work light a try?

Firing Bullets Through Propellers

Early airborne combat was more like a drive-by shooting as pilot used handheld firearms to fire upon other aircraft. Whomever could boost firepower and accuracy would have the upper hand and so machine guns were added to planes. But it certainly wasn’t as simple as just bolting one to the chassis.

This was during World War I which spanned 1914 to 1918 and the controllable airplane had been invented a mere eleven years before. Most airplanes still used wooden frames, fabric-covered wings, and external cable bracing. The engineers became pretty inventive, even finding ways to fire bullets through the path of the wooden propeller blades while somehow not tearing them to splinters.

Continue reading “Firing Bullets Through Propellers”

Beat This Mario Block Like It Owes You Money

People trying to replicate their favorite items and gadgets from video games is nothing new, and with desktop 3D printing now at affordable prices, we’re seeing more of these types of projects than ever. At the risk of painting with too broad a stroke, most of these projects seem to revolve around weaponry; be it a mystic sword or a cobbled together plasma rifle, it seems most gamers want to hold the same piece of gear in the physical world that they do in the digital one.

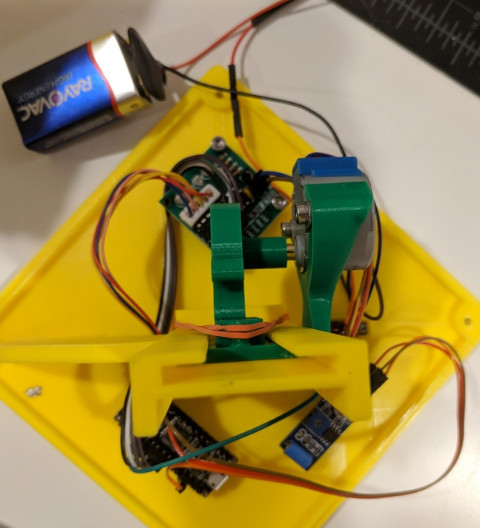
But [Jonathan Whalen] walks a different path. When provided with the power to manifest physical objects, he decided to recreate the iconic “Question Block” from the Mario franchise. But not content to just have a big yellow cube sitting idly on his desk, he decided to make it functional. While you probably shouldn’t smash your head into the thing, if you give it a good knock it will launch gold coins into the air. Unfortunately you have to provide the gold coins yourself, at least until we get that whole alchemy thing figured out.

Printing the block itself is straightforward enough. It’s simply a 145 mm yellow cube, with indents on the side to accept the question mark printed in white and glued in. A neat enough piece of decoration perhaps, but not exactly a hack.

The real magic is on the inside. An Arduino Nano and a vibration sensor are used to detect when things start to get rough, which then sets the stepper motor into motion. Through an ingenious printed rack and pinion arrangement, a rubber band is pulled back and then released. When loaded with $1 US gold coins, all you need to do is jostle the cube around to cause a coin to shoot out of the top.

If this project has got you interested in the world of 3D printed props from the world of entertainment, don’t worry, we’ve got you covered.

Continue reading “Beat This Mario Block Like It Owes You Money”

Smart Outlet Cover Offers Lessons On Going From Project To Product

Going from idea to one-off widget is one thing; engineering the widget into a marketable product is quite another. So sometimes it’s instructive to take an in-depth look at a project that was designed from the get-go to be a consumer product, like this power indicating wall outlet cover plate. The fact that it’s a pretty cool project helps too.

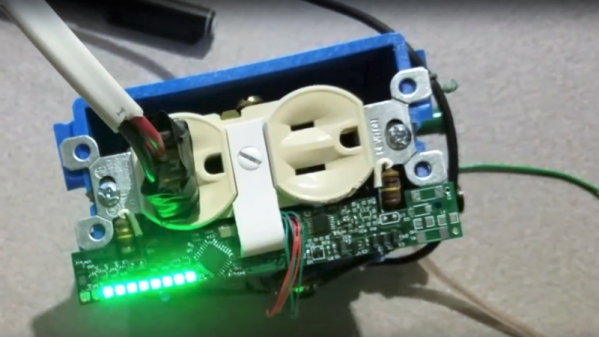
Although [Vitaliy] has been working on this project for a while, he only recently tipped us off to it, and we’re glad he did because there’s a lot to learn here. His goal was to build a replacement cover for a standard North American power outlet that indicates how much power is being used by whatever is plugged into it. He set constraints that included having everything fit into the familiar outlet cover form factor, as well as to not require any modification to the existing outlet or rewiring, so that a consumer can just remove the old cover and put on the new one. Given the extremely limited space inside an outlet cover, these were significant challenges, but [Vitaliy] found a way. Current is sensed with two inductors positioned to sense magnetic flux within the outlet, amplified by a differential amp, and power use is calculated by an ATmega328 for display on 10 LEDs. Power for the electronics is tapped right from the outlet wiring terminals by spring clips, and everything fits neatly inside the cover.

It’s a great design, but not without issues. We look forward to seeing [Vitaliy] tackle those problems and bring this to market. For more on what it takes to turn a project into a product, check out our own [Lewin Day]’s story of bringing a guitar effects pedal to market.

Continue reading “Smart Outlet Cover Offers Lessons On Going From Project To Product”