N64 Emulated In VR Makes Hyrule Go 3D

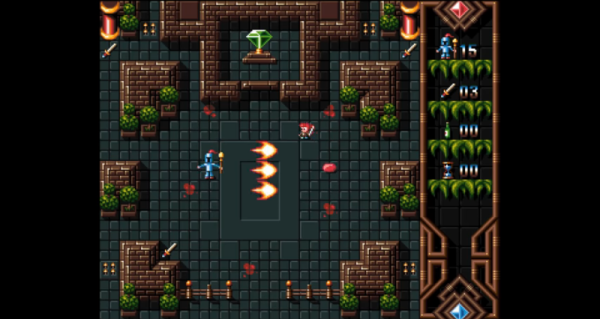
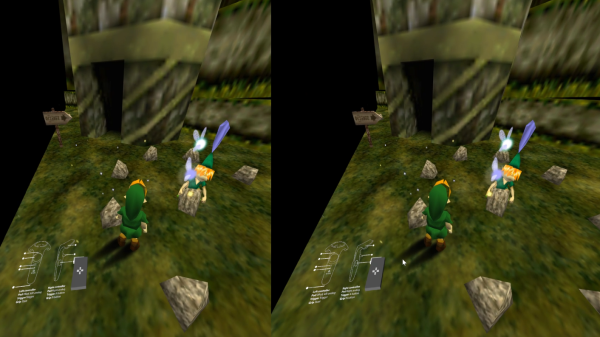
The Nintendo 64 had some groundbreaking and popular 3D games, and [Avaer Kazmer] felt it was only right to tamper with things just enough to trick an emulator into playing Ocarina of Time in VR, complete with stereoscopic 3D. The result is more than just running an emulator on a simulated screen in virtual reality; the software correctly renders a slightly different perspective of the world of Hyrule to each eye in order to really make the 3D pop in a way the original never could, and make it playable with VR controllers in the process. The VR emulator solution is called Emukit and works best with Exokit, a JavaScript web browser for AR and VR environments for which [Avaer] is a developer.

It turns out that there were a few challenges to work around and a few new problems to solve, not least of which was mapping VR controllers to control an N64 game in a sensible way. One thing that wasn’t avoidable is that the N64’s rendered world may now pop in 3D, but it still springs forth from a rectangular stage. The N64, after all, is still only rendering a world in a TV-screen-sized portion; anything outside that rectangular window doesn’t really exist, and there’s no way around it as long an emulated N64 is running the show. Still, the result is impressive, and a video demo is embedded below where you can see the effect for yourself.

Continue reading “N64 Emulated In VR Makes Hyrule Go 3D”

Nintendo Switch Gets Internal Trinket Hardmod

If you haven’t been following the Nintendo Switch hacking scene, the short version of the story is that a vulnerability was discovered that allows executing code on all versions of the Switch hardware and operating system. In fact, it’s believed that the only way to stop this vulnerability from being exploited is for Nintendo to release a new revision of the hardware. Presumably there are a lot of sad faces in the House of Mario right about now, but it’s good news for us peons who dream of actually controlling the devices we purchase.

To run your own code on Nintendo’s latest and greatest, you must first put it into recovery mode by shorting out two pins in the controller connector, and then use either a computer or a microcontroller connected to the system’s USB port to preform the exploit and execute the binary payload. It’s relatively easy, but something you need to do every time you shut the system down. But if you’re willing to install an Adafruit Trinket M0 inside your Nintendo Switch, you can make things a little easier.

Stemming from work done by [atlas44] and [noemu], the final iteration of this mod was created by [Quantum-cross]. The general idea is to strip down the Trinket M0 board to as small as possible by removing the USB port and a few capacitors, and then install it inside the Switch’s case. By wiring it up to power, the back of the USB-C connector, and the controller connector, the Trinket can interact with all the key components involved in the exploit.

You can even use the Switch’s USB port to update the firmware on the Trinket to load different payloads, though in his walkthrough video after the break, [xboxexpert] mentions eventually this won’t really be necessary as the homebrew software environment on the Switch matures. Indeed, there will almost certainly come a time when performing this exploit on every boot of the system will be made unnecessary, rendering this modification obsolete. But until then, this is a pretty slick way of getting your feet wet in the world of Switch hacking.

It was only six months or so back that we were reading about the first steps towards running arbitrary code on the Nintendo Switch, and just a few months prior to that we saw people experimenting with controlling the system with a microcontroller.

Continue reading “Nintendo Switch Gets Internal Trinket Hardmod”

A Lightgun For LCDs – Thanks To Maths!

Light guns were a fun way to learn to shoot things on consoles, enjoying their heyday in the 80s and 90s. The original designs largely relied on the unique characteristics of CRT televisions and the timing involved in the drawing of their frames. Unfortunately, due to a variety of reasons (dependent on the exact techniques used), they typically do not work at all with modern LCD & plasma screens.

The light gun contains a camera, and reportedly works by using the distortion of the rectangular image of the screen to calculate the position of the light gun itself.

Recently, there has emerged a new project called the Sinden Lightgun. In the How It Works video, it seems to use a fairly standard 30fps camera inside the gun to image the television screen being used by the game. The display is then rendered in 4:3, letterboxed on a 16:9 aspect ratio display, within a rectangular bezel. The image from the camera is then processed, and the distortion of the game image is used to calculate the position of the gun and the direction of its aim. Processing is handled by the host computer running MAME and the requisite coordinates are fed back in to the game code.

The basic concept seems sound, though as always, there’s a healthy amount of skepticism around the project. We’d love to hear your take, on whether the concept is plausible, and whether the lag figures stated are cromulent. We’re always excited to see new developments in the lightgun space! Video after the break.

Our own [Will Sweatman] penned an excellent piece on a variety of ways one could resurrect the venerable game of Duck Hunt, too.
Continue reading “A Lightgun For LCDs – Thanks To Maths!”

The Best New Amiga Title Of 2018?

Just because a system becomes obsolete for most of us doesn’t mean that everyone stops working with them. Take a look at this brand new game for the Amiga 500 called Worthy, which is sure to make most of us regret ever upgrading our home computers, despite the improvements made since 1987.

The group who developed the game is known as Pixelglass and they have done a lot of work on this platform, releasing several games over the past few years. Their latest is Worthy, an action-adventure game that looks similar to the top-down perspective Zelda games from the SNES. It’s an impressive piece of work for a system that few of us own anymore, but if you have one (or even if you have a good emulator) you might want to give it a whirl.

If developing games for retro systems is your style, this isn’t limited to personal computers like the Amiga. We’ve seen development platforms for the Super Nintendo that will let you run your own code, and even other methods for working with the Sega Saturn if you’re feeling really adventurous.

Thanks to [Chappy1978] for the tip!

Continue reading “The Best New Amiga Title Of 2018?”

Print Physical Buttons For Your Touch Screen

Modern handheld gaming hardware is great. The units are ergonomic powerhouses, yet many of us do all our portable gaming on a painfully rectangular smartphone. Their primary method of interaction is the index finger or thumbs, not a D-pad and buttons. Shoulder triggers have only existed on a few phones. Bluetooth gaming pads are affordable but they are either bulky or you have to find another way to hold your phone. Detachable shoulder buttons are a perfect compromise since they can fit in a coin purse and they’re cheap because you can make your own.

[ASCAS] explains how his levers work to translate a physical lever press into a capacitive touch response. The basic premise is that the contact point is always touching the screen, but until you pull the lever, which is covered in aluminum tape, the screen won’t sense anything there. It’s pretty clever, and the whole kit can be built with consumables usually stocked in hardware stores and hacker basements and it should work on any capacitive touch screen.

Physical buttons and phones don’t have to be estranged and full-fledged keyswitches aren’t exempt. Or maybe many capacitive touch switches are your forte.

Continue reading “Print Physical Buttons For Your Touch Screen”

Unlocking Animal Crossing’s Debug Mode

Originally released on the Nintendo 64 in 2001, Animal Crossing was the first entry into what has become a massively successful franchise. But while the game has appeared on more modern Nintendo consoles, most recently Android and iOS, the version released on the GameCube holds a special place in many fan’s hearts. The GameCube version was the first time those outside of Japan got a taste of the unique community simulation offered by Animal Crossing, and maintains a following nearly 20 years after its release.

[James Chambers] has recently been investigating creating mods for the GameCube version of Animal Crossing, and in the process uncovered some interesting references to a debug mode. That launched a deep dive into the game’s assembly code in an attempt to find what the debug functions did and if they could be enabled without having to patch the game ROM. In the end, he was able to find a push button code that enables debug mode on the retail copy of the game.

[James] starts by using the debugger provided by the Dolphin GameCube emulator to poke around and figure out exactly what flags need to be modified to activate the debug mode. This leads to a few interesting finds, such as being able to pop up a performance monitor graph and some build info. Eventually he finds the proper incantation to bring up a functional debug display in the game, but there was still the mystery of how you do it on the real hardware with a retail copy of the game.

It wouldn’t be unreasonable to think that some special dongle or development version of the GameCube would be required to kick the game into debug mode. But through careful examination of the code path, [James] was able to figure out that hitting a specific combination of buttons on the controller was all that was required to use the debug mode on the stock game. Once the debug mode is started, a controller plugged into the second port allows the user to navigate through options and perform tasks. Not everything is currently understood, but some progress has been made, such as figuring out how to add items to your inventory.

It’s hardly Nintendo’s most popular console, but there’s still a healthy interest in GameCube hacking as the machine approaches its 20th anniversary. We recently saw some impressive work being done to reverse engineer the system’s wireless controllers, though some people are more interested in just cutting the thing in half.

[Thanks to Tim Trzepacz for the tip.]

Custom Buttons For Your Game Controller

Console gamers have relatively few options when it comes to hardware hacking, unless they wish to partake of some extreme modifications that threaten the very integrity of their machines. So without reaching for a Dremel, how can you insert a little individuality into the same standard components all your friends have?

It seems one answer is to customise your controller with some different buttons. There are commercial outfits that will supply your needs in this direction, but they aren’t always cheap, and plenty of older machines have no products available. This isn’t  a problem for [RockerGaming] though, who shows us how to cast your own set of custom buttons using a silicone mold taken from the originals.

The video is a step-by-step walkthrough of the molding process that could just as easily be applied to any other small plastic parts and is not unique to console buttons. The subjects come from a Sega Saturn controller, in the video a beige model, which raises a passing interest among European Hackaday scribes who remember the Saturn as a black console.

We see the preparation of the original buttons and mold. An acrylic golf ball trophy display case is pressed into service. (Who knew those were even a thing!) A dye is added to the two-part silicone to provide a visual mixing aid, and once the cast mold is separated from the buttons the final resin is poured into it. The cloned buttons are tidied up underneath with a Dremel, and the controller is reassembled.

A set of custom buttons will not improve your gaming, but underlying this is the fact that resin casting is a useful skill. It’s somewhere we’ve been before in depth, so it’s worth reading our guide from back in 2016.

Continue reading “Custom Buttons For Your Game Controller”