A 6502 Computer, With Acres Of Breadboard And Dozens Of Chips

Imagine you’re time-warped back to 1979 and tasked with constructing a personal computer. Could you do it? [RadicalBrad] thinks he can, and his 6502-based “Super VIC” build looks like it’s off to a great retrocomputing start.

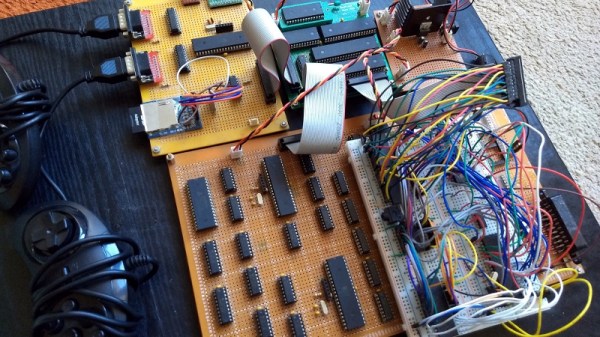
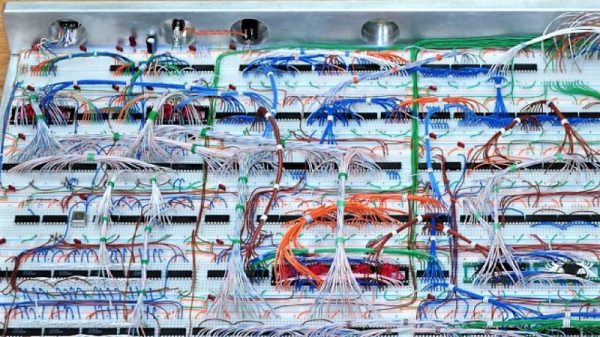
Most emulations of old hardware these days go the FPGA route, and while we respect those projects immensely, there’s something to be said for applying a highly artificial constraint at the outset of a project. [RadicalBrad] chose to design like it’s 1979, and limited his ode to the machines of his youth to the 6502 CPU and logic and RAM chips available before 1980. The computer will support NTSC video output and 4-channels of 8-bit sound. No circuit boards will be used – everything is to be assembled on solderless breadboards. So far he has 48 (!) of them ganged together, which sounds like an enormous amount of space to work with, but he still found things crowded enough that some of the DIP bodies were trimmed a bit to fit more closely on the breadboards. The SRAM posed a problem, though, in that the 512K chips he wanted were not available in DIPs. To stay faithful to the constraints, he soldered the SOJ-packaged RAM chips into 40-PIN DIP headers – all 25 chips! We can’t recall a PC of the era sporting 12 megabytes of RAM, but no matter – it’s too cool not to love.

[RadicalBrad] has his work cut out for him, and this could take years to finish. We’re keen to follow his progress and can’t wait till it boots for the first time. Until it does, we’ll just gaze upon such discrete computing wonders as this almost-as-simple-as-possible computer, or even this delightfully noisy adder for a relay computer.

Yet Another DIY Handheld Pi Gaming Console

The Raspberry Pi is a great platform for running retro video games, and with the addition of some buttons, a TFT screen and some speakers it’s relatively inexpensive and easy to get a working console up and running. If you have access to even a cheap 3D printer, a good-looking DIY console is well within reach for not a lot of money. YouTube user [DIY Engineering] has a bunch of consumer-grade fabrication tools and has designed and built a high-end but still DIY RetroPi gaming console, the RKDR II.

Among the tools that [DIY Engineering] has are both a FDM and DLP 3D printer, a reflow oven, a couple of different CNC machines and a laser cutter. They are all consumer grade, but not necessarily cheap – especially combined! [DIY Engineering] uses Fusion3D to model the case, bezel and circuit board, the latter of which is a 4 layer board designed in Eagle and sent off to be fabbed. The buttons, D-pad, screen and battery are bought off the shelf, but everything else is DIY. Check out the video for the details – the tools used, and the design files, are linked in the information section under the video on YouTube.

Continue reading “Yet Another DIY Handheld Pi Gaming Console”

Creating 8-bit Games With The Multi Platform Arcade Game Designer

Creating a game from scratch can be hard work. There are concepts to be designed, coding to be done, and art to be created to make it all happen. However, it doesn’t always have to be quite so difficult. There are a variety of development tools that allow budding game designers to get started with a point-and-click approach. [Jonathan Cauldwell] has come up with just such a tool that lets you do just that, for a variety of 8-bit platforms.

[Jonathan]’s project is called the Multi Platform Arcade Game Designer, so named for its ability to create games for several 8-bit systems of yesteryear. Currently, the Spectrum, Amstrad CPC, and Acorn Atom are all supported, with plans to add more down the track.

Creating a game is a simple affair, which [Jonathan] explores in a video tutorial series. Sprite and background editors are built into the software. Scripts can be automatically generated to create a wide variety of basic game types, from scrolling shoot-em-ups to classic platformers. There’s also functionality that allows advanced users to add further functionality by supplying some of their own code.

If point-and-click isn’t for you, you can always forge your ZX Spectrum games the classic way, with assembly and BASIC. Video after the break.

Continue reading “Creating 8-bit Games With The Multi Platform Arcade Game Designer”

A Z80 Homebrew Console, With A Bit Of Modern Help

We see a lot of retrocomputing projects here at Hackaday that take devices from the 8-bit era and re-create them in the 21st century. Sometimes they remain period-accurate and stick to all contemporary devices, but in other cases they take full advantage of four decades of advancing technology. [Pkiller]’s Z80 console is one of this later category, creating peripherals for the classic CPU using microcontrollers in the place of the banks of 74 logic or ULA chips that might have graced a 1980s machine.

The video generation hardware produces a PAL signal using an interesting technique involving two RAM buffers. An ATmega644 microcontroller composites a single frame into one of the buffers while another ATmega644 is generating the previous frame of video from the other buffer. On each change of frame the buffers are switched between the two microcontrollers, requiring some extra 74 logic chips. Another AtMega chip provides the Z80 with I/O interfacing, and the sound comes via another dual-buffer microcontroller setup and a quick return to classic hardware with a YM3438 FM synthesis chip. The result can be seen in the video below, and would have not looked out of place in a late-’80s or even early-’90s living room.

Some people might ask why so much trouble should be gone to in the pursuit of a project like this one, but to do so is to miss the point. Sure, a Sega Master System can be had from the usual sources, but in creating  project such as this one the builder has to truly understand the technologies such as PAL generation or the internals of a Z80 in great detail. The result while it is undeniably impressive is almost secondary to the process of reaching it.

Continue reading “A Z80 Homebrew Console, With A Bit Of Modern Help”

Make Your Commodore 16 64k, But Not A Commodore 64

The Commodore 16 was a budget home computer from the mid 1980s, the entry-level model in a wider range of machines. As its name suggests it only has 16k of memory in keeping with its budget status, and while it has the rest of the hardware necessary to run software intended for its 64k stablemates, that 16k is impossible to expand without modifying the machine. Should you have a ’16 in your collection this is not a particularly arduous process, and Tynemouth Software have gone into great detail over how it can be achieved.

As was quite common in machines of the period, the address lines for the RAM area above the fitted 16k are not wired to disable it when those addresses are selected, so the same 16k appears mirrored three times in the space between it and the 64k limit. Thus simply plugging in a 64k cartridge would result in the top 48k being unusable, and some means of disabling or supplanting the internal chips was called for. Contemporary upgrades required pin or track snipping, but as they go on to show us there are some less ugly alternatives both permanent and reversible. Whichever you might favor they all at least don’t carry the huge cost hurdle in 2019 that they might have been when the machine was new. Sadly even though their cases may be similar the resulting machine will not be a Commodore 64, not even a new one.

Long-time Hackaday readers will know that the hardware designer for these machines was our Hackaday colleague [Bil Herd], and all followers of Commodore and his work should read his account of the CES trade show at the heady height of Commodore’s  fame.

World’s Oldest Computer Festival Is This Weekend

There was a time when owning a home computer was kind of a big deal. In the days before the popularization of the Internet, so-called “computer shows” were the best way to meet with others to swap advice, information, and hardware. Of course today, things are very different. The kind of people who are building their computers just buy the parts online, and everyone else is probably using a $200 laptop from Walmart that isn’t worth spending the time or money on to upgrade.

Small sampling of the talks at TCF 2019

So while the Trenton Computer Festival (TCF) may have started in 1976 as a way for people to buy early computers like the Altair 8800, over the years it has morphed into something much closer to the modern idea of a “con”. Those who visit the 44th TCF on March 23rd at the College of New Jersey will likely spend most of their time at the festival attending the 40+ talks and workshops that will be happening in a span of just six hours. But anyone who’s got some cash to burn can still head over to the flea market area where they’ll be able to buy both modern and vintage hardware.

Talks run the gamut from Arduino to quantum computing, and if you don’t see something that piques your interest in this year’s program, one might wonder how you found yourself reading Hackaday in the first place. If you manage to find some spare time between all the talks, the New Jersey chapter of the The Open Organisation Of Lockpickers (TOOOL) will be there giving a hands-on lock picking class, and if you don’t mind taking the crash course, you can even get your ham radio license. All for the princely sum of just $20 at the door.

In fact, there’s so much going on at TCF that it can be somewhat overwhelming. As I found out during my visit last year, the number of simultaneous events means you’ll almost certainly have some difficult decisions to make. I’ll be making the trip out to the College of New Jersey campus again this year for TCF, and will have plenty of Hackaday stickers and buttons to give out to anyone who manages to stop me while I dash between talks.

Vintage Atari Becomes Modern Keyboard

The modern keyboard enthusiast is blessed with innumerable choices when it comes to typing hardware. There are keyboards designed specifically for gaming, fast typing, ergonomics, and all manner of other criteria. [iot4c] undertook their own build for no other reason than nostalgia – which sounds plenty fun to us.

An Arduino Leonardo is pressed into service for this hack. With its USB HID capabilities, it’s perfectly suited for custom keyboard builds. It’s built into a working Atari 65XE computer, and connected to the keyboard matrix. The Keypad and Keyboard libraries are pressed into service to turn keypresses on the 80s keyboard into easily digseted USB data.

There’s plenty of room inside the computer for the added hardware, with the USB cable neatly sneaked out the rear. [iot4c] notes that everything still works and the added hardware does not cause any problems, as long as it’s not used as a computer and a keyboard at the same time.

It’s possible to do a similar hack on the Commodore 64, too. If you’re doing tricky keyboard builds yourself, you know where to send ’em.