Sub-$20 Arduino-Based Telemetry System

[William Osman] set out to prove that unlike expensive commercial data logging rigs, he could get the same results for under twenty bucks. He wanted to build a wireless three-axis accelerometer for a race car project, allowing engineers to make modifications to the suspension based on the data collected.

The hardware consists of an Arduino Pro Mini connected to a three-axis accelerometer, and an nRF24L01 wireless module. Power is supplied by the race car’s 12 V, changed to 5 V by a linear regulator with the Pro Mini in turn supplying 3.3 V. The base station consists of an Arduino and another nRF24L01 module plugged into a laptop.

The telemetry system is based on COSMOS, an open-source, realtime datalogging platform put out by Bell Aerospace. COSMOS consists of fifteen separate applications depending on how you want to view and manage your telemetry. You can download [William]’s COSMOS config files and Arduino sketch on Google Docs.

We’ve published a bunch of pieces on telemetry, like this ESP8266 telemetry project, a rocket telemetry rig, and open sourcing satellite telemetry.

[Thanks, Dennis Nestor!]

Finding The Sun And Moon The New Old-Fashioned Way

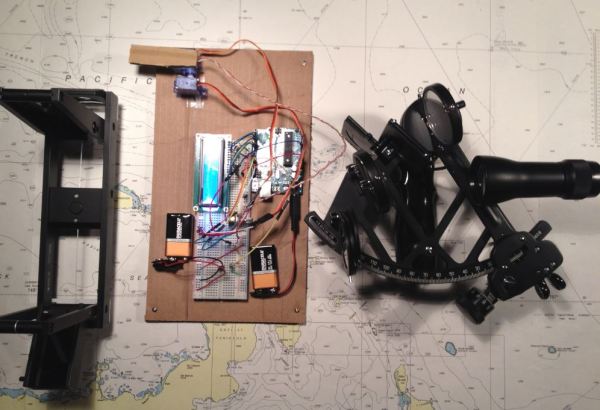
The ability to build a robot to take care of a tedious task for you is power indeed. For a few centuries, the task of helping determine one’s location fell to the sextant. Now, you can offload that task to this auto-sextant, courtesy of [Raz85].

To be clear, this robo-sextant doesn’t give you your exact location, but it does find and display the bearing and altitude of the most luminous object around and display them on the LCD — so, the sun and moon. A pair of cheap servos handle the horizontal and vertical movement, an Arduino Uno acts as the brains and nervous system, and a photoresistor acts as the all-seeing eye. Clever use of some cardboard allow [Raz85] to keep the photoresistor isolated from most all light except what the sextant is currently pointed at. Servos have a limited field of movement, so you might need to adjust [Raz85]’s code accordingly if you’re rebuilding this one yourself.

After taking three minutes to make its rounds of the sky, the Uno records the servos’ positions when fixed on the sun or moon, translating that data into usable coordinates. Don’t forget the best part, it runs on batteries making it convenient for all your wave-faring excursions!

Continue reading “Finding The Sun And Moon The New Old-Fashioned Way”

Follow The Bouncing Ball Of Entropy

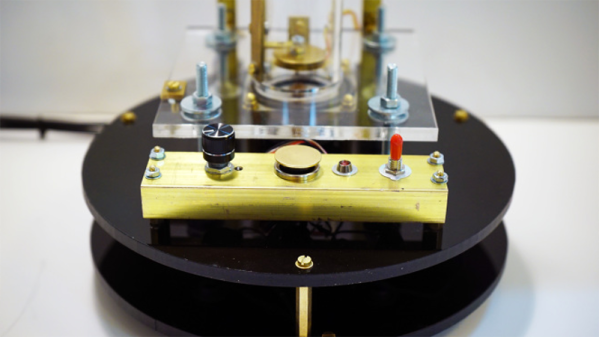
When [::vtol::] wants to generate random numbers he doesn’t simply type rand() into his Arduino IDE, no, he builds a piece of art. It all starts with a knob, presumably connected to a potentiometer, which sets a frequency. An Arduino UNO takes the reading and generates a tone for an upward-facing speaker. A tiny ball bounces on that speaker where it occasionally collides with a piezoelectric element. The intervals between collisions become our sufficiently random number.

The generated number travels up the Rube Goldberg-esque machine to an LCD mounted at the top where a word, corresponding to our generated number, is displayed. As long as the button is held, a tone will continue to sound and words will be generated so poetry pours forth.

If this take on beat poetry doesn’t suit you, the construction of the Ball-O-Bol has an aesthetic quality that’s eye-catching, whereas projects like his Tape-Head Robot That Listens to the Floor and 8-Bit Digital Photo Gun showed the electronic guts front and center with their own appeal.

Continue reading “Follow The Bouncing Ball Of Entropy”

Fail Of The Week: Arduino Sand Matrix Printer

NYC beaches are where tropical beaches addicted to meth go to die. So says [Vije Miller] in his write-up for his Arduino sand matrix printer. It’s a clever idea, five servo-operated cardboard plungers that indent a pattern of dots in the sand as the device is pulled forward, resulting in something not unlike a dot matrix printer that can write messages in the sand.

He’s submitted it to us as a Fail Of The Week, because it doesn’t do a very good job of writing in the sand, and it’s burned out a servo. But we feel this isn’t entirely fair, because whether or not it has delivered the goods it’s still an excellent build. Cardboard isn’t a material we see much of here at Hackaday, but in this case he’s mastered it in a complex mechanism that while it may have proved a little too flexible for the job in hand is nevertheless a rather impressive piece of work.

You can see a brief video below the break showing it in action. He tells us his motivation has waned on this project, and expresses the hope that others will take up the baton and produce a more viable machine.

Continue reading “Fail Of The Week: Arduino Sand Matrix Printer”

Cluephone For Partiers

[Sam Horne] adapted an old school landline phone to deliver clues to birthday party guests. When guests find a numerical clue, they type it into the keypad to hear  the next clue, which involves decoding some Morse code.

The phone consists of an Arduino Pro Mini, a MP3/WAV trigger, and the phone itself, of which the earpiece and keypad have been reused. [Sam] had to map out the keypad and solder leads connecting the various contact points of the phone’s PCB to the Arduino’s digital pins. He used a digitally-generated voice to generate the audio files, and employed the Keypad and Password Arduino libraries to deliver the audio clues.

This seems like a great project to do for a party of any age of attendee, though the keying speed is quick. Hopefully [Sam]’s guests have a high Morse WPM or are quick with the pen! For more keypad projects check out this custom shortcut keyboard and printing a flexible keyboard.

Continue reading “Cluephone For Partiers”

Hackaday Prize Entry: CPAP Humidifier Monitor Alarm

CPAP (Continuous Positive Airway Pressure) machines can be life-changing for people with sleep apnea. [Scott Clandinin] benefits from his CPAP machine and devised a way to improve his quality of life even further with a non-destructive modification to monitor his machine’s humidifier.

With a CPAP machine, all air the wearer breathes is air that has gone through the machine. [Scott]’s CPAP machine has a small water reservoir which is heated to humidify the air before it goes to the wearer. However, depending on conditions the water reservoir may run dry during use, leading to the user waking up dried out and uncomfortable.

To solve this in a non-invasive way that required no modifications to the machine itself, [Scott] created a two-part device. The first part is a platform upon which the CPAP machine rests. A load cell interfaced to an HX711 Load Cell Amplifier allows an Arduino Nano to measure the mass of the CPAP machine plus the integrated water reservoir. By taking regular measurements, the Arduino can detect when the reservoir is about to run dry and sound an alarm. Getting one’s sleep interrupted by an alarm isn’t a pleasant way to wake up, but it’s much more pleasant than waking up dried out and uncomfortable from breathing hot, dry air for a while.

The second part of the device is a simple button interfaced to a hanger for the mask itself. While the mask is hung up, the system is idle. When the mask is removed from the hook, the system takes measurements and goes to work. This makes activation hassle-free, not to mention also avoids spurious alarms while the user removes and fills the water reservoir.

Non-invasive modifications to medical or other health-related devices is common, and a perfect example of nondestructive interfacing is the Eyedriveomatic which won the 2015 Hackaday Prize. Also, the HX711 Load Cell Amplifier has an Arduino library that was used in this bathroom scale refurb project.

Secret Serial Port For Arduino/ESP32

If you use the Arduino IDE to program the ESP32, you might be interested in [Andreas Spiess’] latest video (see below). In it, he shows an example of using all three ESP32 UARTs from an Arduino program. He calls the third port “secret” although that’s really a misnomer. However, it does require a quick patch to the Arduino library to make it work.

Just gaining access to the additional UARTs isn’t hard. You simply use one of the additional serial port objects available. However, enabling UART 1 causes the ESP32 to crash! The reason is that by default, UART 1 uses the same pins as the ESP32 flash memory.

Luckily, the chip has a matrix switch that can put nearly any logical I/O pin on any physical I/O pin. [Andreas] shows how to modify the code, so that UART 1 maps to unused pins, which makes everything work. it is a simple change, replacing two parameters to a call that — among other things — maps the I/O pins. You could use the technique to relocate the UARTs to other places if you choose.

If you want to learn more about the ESP32, we covered a good set of tutorials for you to check out. Or if you just want a quick overview, you can start here.