Start Printing From Film For Around £100

For the vast majority of readers, the act of taking a photograph will mean reaching for a mobile phone, or for a subset of you picking up a digital camera. A very small number of you will still use chemical film for its versatility and resolution, and we’re guessing that more would join those ranks if some of the cost barriers to doing so could be reduced.

It would be near-impossible to reduce the cost of a chemical photograph to the infinitely repeatable click of a digital camera shutter, but at least if the cost of a darkroom is intimidating then [Sroyon Mukherjee] has an interesting post over at 35mmc about how a darkroom for black-and-white printing from negatives can be equipped for less than £100 ($123). It’s a fascinating read even if your photography remains firmly in the digital, because along the way it explains some of the mysteries of the process. Few people had this type of equipment at home even in the days when most of us took our films to the drugstore, so as time passes this knowledge is concentrated among an ever narrower group.

The guide is full of useful hacks. Finding a second-hand enlarger takes an element of patience, but once it has been secured there are a variety of other essential items. The red safe light can be as simple as a mobile phone flashlight with a red filter, but we learn the trick of exposing a sheet of photographic paper with a coin laid on it to check that no white light is sneaking in. One of the main points of the piece is that there is no need for a special room to make a darkroom, and we take a tour of a few photographers’ set-ups in hallways, bathrooms, and basements.

So if you spot an unloved enlarger just waiting for a hacker to pass by, this might inspire you to do something with it. He doesn’t cover the development process, but if you throw caution to the winds you could always try coffee and vitamin C.

[via Hacker News]

Putting An Arcade Cabinet Inside Of An NES Controller

The arcade game shoehorned into an original Nintendo Entertainment System controller from [Taylor Burley] is certainly made slightly easier by its starting with one of those miniature cabinets that are all the rage now, but since he’s still achieved the feat of an entire arcade game in a controller we still stand by the assessment in our title.

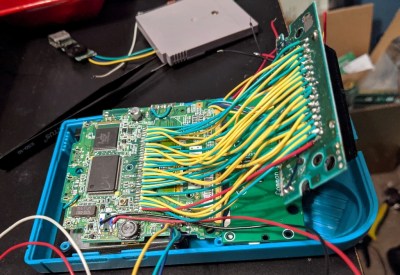
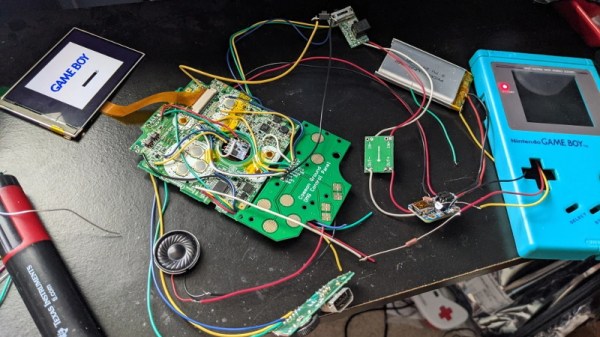
In fact, he’s put not one but four arcade games into the controller. The board that [Taylor] liberated from the miniature game system can actually be switched between the onboard games by shorting out different pads on the PCB. Normally this would be done during manufacture with a zero-ohm resistor, but in this case, he’s wired the pads out to a strip of membrane keypad liberated from an LED remote control. By holding a different button while powering on the system, the user can select which of the games they want to boot into.

The original buttons and directional pad have been preserved, and in the video after the break, [Taylor] shows how he wires them into the arcade PCB. The Start and Select buttons had to go since that’s where the tiny color LCD goes now, but they wouldn’t have been used in any of these games anyway. With the addition of a small battery pack and charge controller, this build is a clever way to take several classic arcade titles with you on the go.

With the growing popularity of these tiny arcade cabinets, we’ve seen a number of hackers tearing into them. The work that [wrongbaud] has done in modifying them to run other ROMs is not to be missed if you’re looking at building a project using one of these little bundles of nostalgia.

Continue reading “Putting An Arcade Cabinet Inside Of An NES Controller”

Breadboard Computer Plays Snake On Character Display; Also In A Browser!

If building a homebrew computer on a breadboard is your thing, you’re most certainly familiar with [Ben Eater], whose design of using nothing but logic gates has served as inspiration for many replicas over the years. [visrealm] took the concept and expanded upon it, even adding a 16×2 LCD that let’s you play Snake by moving a single pixel on the character display!

Making the most of tiny resolution is impressive — it’s a difficult constraint for the game field. But there are other tricks at work as well. [visrealm] uses different intensities to distinguish between the snake and its food which is kind of a dark pixel in the demo shown after the break. But what stands out most is that the breadboard build is really only half of the story. In addition, [visrealm] built an entire emulator that resembles his actual breadboard design, which can be programmed and used via browser, giving WebAssembly a whole new meaning. While that’s convenient for anyone interested to play around with these breadboard computers, but lacks the patience to build one themselves, it also functions as the real one’s programming environment. In addition, an ESP8266 is used to load a new program directly via WiFi.

All the code and some build notes are available on GitHub, and if you’re looking for a nifty LCD emulator for your web site, there’s a standalone repository for that as well. But in case you need a better display option for your own breadboard computer, how about adding a VGA connector? And if you don’t build your own yet, it’s never too late to start.

Continue reading “Breadboard Computer Plays Snake On Character Display; Also In A Browser!”

Researchers Break FPGA Encryption Using FPGA Encryption

FPGAs are awesome — they can be essentially configured into becoming any computing device you want. Simply load your selected bitstream into the device on boot, and it behaves like a different piece of hardware. With great power comes great responsibility.

You might try to hack a given FPGA system by getting between the EEPROM that stores the bitstream and the FPGA during bootup, but FPGA manufacturers are a step ahead of you. Xilinx 7 series FPGAs have an onboard encryption and signing engine, and facilities for storing a secret key. Once the security bit is set, bitstreams coming in have to be encrypted to protect from eavesdropping, and HMAC-signed to assure that they are authentic. You can’t simply read the bitstream in transit or inject your own.

Researchers at Ruhr University Bochum and Max Planck Institute for Cybersecurity and Privacy in Germany have figured out a way to use the FPGA’s own encryption engine against itself to break both of these security guarantees for the entire mainstream 7-series. The attack abuses a MultiBoot function that allows you to specify an address to begin execution after reboot. The researchers send 32 bits of the encoded payload as a MultiBoot address, the FPGA decrypts it and stores it in a register, and then resets because their command wasn’t correctly HMAC signed. But because the WBSTAR register is meant to be readable on boot after reset, the payload is still there in its decrypted form. Repeat for every 32 bits in the bitstream, and you’re done.

Pulling off this attack requires physical access to the FPGA’s debug pins and up to 12 hours, so you only have to worry about particularly dedicated adversaries, but the results are catastrophic — if you can reconfigure an FPGA, you can make it do essentially anything. Security-sensitive folks, we have three words of consolation for you: “restrict physical access”.

What does this mean for Hackaday? If you’re looking at a piece of hardware with a hardened Xilinx 7-series FPGA in it, you’ll be able to use it, although it’s horribly awkward for debugging due to the multi-hour encryption procedure. Anyone know of a good side-channel bootloader for these chips? On the other hand, if you’re just looking to dig secrets out from the bitstream, this is a one-time cost.

This hack is probably only tangentially relevant to the Symbiflow team’s effort to reverse-engineer an open-source toolchain for this series of FPGAs. They are using unencrypted bitstreams for all of their research, naturally, and are almost done anyway. Still, it widens the range of applicability just a little bit, and we’re all for that.

[Banner image is a Numato Lab Neso, and comes totally unlocked naturally.]

3D Print Your Way To A Bartop Arcade Cabinet

Custom arcade machines have always been a fairly common project in the hacker and maker circles, but they’ve really taken off with the advent of the Raspberry Pi and turn-key controller kits. With all the internals neatly sorted, the only thing you need to figure out is the cabinet itself. Unfortunately, that’s often the trickiest part. Without proper woodworking tools, or ideally a CNC router, it can be tough going to build a decent looking cabinet out of the traditional MDF panels.

But if you’re willing to leave wood behind, [Gerrit Gazic] might have a solution for you. This bartop arcade, which he calls the simplyRetro D8, uses a fully 3D printed cabinet. He’s gone through the trouble of designing it so there are no visible screw holes, so it looks like the whole thing was hewn from a chunk of pure synthwave ore. He notes that this can make the assembly somewhat tricky in a few spots, but we think it’s a worthy compromise.

Given the squat profile of the simplyRetro, the internals are packed in a bit tighter than we’re accustomed to seeing in a arcade build. But there’s still more than enough room for the Raspberry Pi, eight inch touch screen HDMI panel, and all the controls. To keep things as neat as possible, [Gerrit] even added integrated zip tie mount points; a worthwhile CAD tip that’s certainly not limited to arcade cabinets.

[Gerrit] has included not only the STL files for this design, but also the Fusion 360 Archive should you want to make any modifications. There’s also a complete Bill of Materials, as well as detailed instructions on how to pull it all together. If you’ve ever wanted your own arcade machine but felt a bit overwhelmed about figuring out all the nuances on your own, the simplyRetro could be the project you’ve been waiting for.

Of course if you do have access to a CNC or laser cutter, then there are some designs you could produce quite a bit faster.

A Jaw-Dropping Demo In Only 256 Bytes

“Revision” is probably the Olympics of the demoscene. The world’s best tiny graphics coders assemble, show off their works, and learn new tricks to pack as much awesome into as few bytes as possible or make unheard-of effects on limited hardware. And of course, there’s a competition. Winning this year’s 256-byte (byte!) competition, and then taking the overall crowd favorite award, was [HellMood]’s Memories.

If you watch it in the live-stream from Revision, you’ll hear the crowd going (virtually) wild, and the announcer losing his grip and gasping for words. It’s that amazing. Not only are more effects put into 28 bytes than we thought possible, but there’s a full generative MIDI score to go with it. What?!?

But almost as amazing is [HellMood]’s generous writeup of how he pulled it off. If you’re at all interested in demos, minimal graphics effects, or just plain old sweet hacks, you have your weekend’s reading laid out for you. [HellMood] has all of his references and influences linked in as well. You’re about to go down a very deep rabbit hole.

Continue reading “A Jaw-Dropping Demo In Only 256 Bytes”

Dissecting A Mechanical Voltage Regulator

When the fuel gauge of his 1975 Triumph Spitfire started going off the scale, the collected knowledge of the Internet indicated that [smellsofbikes] needed to replace a faulty voltage regulator behind the dash. For most people, that would be the end of the story. But he, like everyone who’s reading this right now, really wanted to see what the inside of a 45 year old voltage regulator looked like.

After prying open the metal case, he discovered that not only is the regulator mechanical in nature, but there’s even a tiny screw that allows you to adjust the output voltage. Luckily for us, not only is [smellsofbikes] curious enough to open it up, but he’s also got the tools and knowledge to explain how it works in the video after the break.

Put simply, the heart of the regulator is a bimetallic strip with a coil of wire wrapped around it. When power from the battery is passed through the coil it acts as a heater, which makes the strip move up and break the connection to the adjustable contact. With the connection broken and the heating coil off the strip rapidly cools, and in doing so returns to its original position and reconnects the heater; thus starting the process over again.

These rapid voltage pulses average out to around 10 VDC, though [smellsofbikes] notes that you can’t actually measure the output voltage of the regulator with a meter because it moves around too much to get any sort of accurate reading. He also mentions a unique quirk of this technology: due to the force of gravity acting on the bimetallic strip, the output of the regulator will actually change depending on its mounting orientation.

On the oscilloscope, [smellsofbikes] is able to show us what the output actually looks like. As you might expect, it looks like a mess to 21st century eyes. But these were simpler times, and it should go without saying there aren’t any sensitive electronics in a sports car from 1975. Interestingly, he says he’s now replaced the mechanical assembly with a modern regulator chip. Here’s hoping we’re around long enough to see if he gets another 50 years out of it.

Continue reading “Dissecting A Mechanical Voltage Regulator”