For the last year or so, Monoprice has been teasing their follow-up to the fantastic $200 MP Select Mini. This is the $150 mini delta printer. We got a look at it last January at CES, it was on display at the Bay Area Maker Faire last May. Now there’s one on the Hackaday review desk.
Over the last few years, 3D printing has settled down into what most of us expected way back in 2010. No, not everyone wants, or arguably needs, a 3D printer on their desks. This is a far cry from the hype of a few years ago, leaving us with what we have today. 3D printers are just tools, much like a drill press or a laser cutter.
With that said, there still are some fantastic advances in 3D printing coming down from on high. Prusa will be shipping the 4-color multi-extruder add-on for the i3 Mk 2 shortly, and somehow or another we have infinite build volume printers. Still, there’s space to democratize 3D printing, and an opportunity for someone to release a very cheap, very good printer.
Monoprice was kind enough to send me a review unit of the MP Mini Delta before it officially hit their website. This is one of the first off the production line, alongside the few hundred pre ordered on an Indiegogo campaign earlier this year. Does this printer live up to expectations? It sure does, and that’s not just because it’s a $150 printer.
This would be an excellent printer at three times the price, and evidence enough that 3D printing is changing from a weird hobbyist thing to a proper tool.
I am something of an Inkscape fan. If you’re not familiar with the application, it’s like an Open Source version of Adobe Illustrator. Back when I was a production artist I’d been an Illustrator master ninja but it’s been four years and my skills are rusty. Plus, Inkscape is just enough different in terms of menus and capabilities that I had a hard time adapting.
So I created some wooden lettering with the help of Inkscape and a laser cutter, and I’m going to show you how I did it. If you’re interested in following along with this project, you can find it on Hackaday.io.
While playing around with Inkscape, I noticed you can create a variety of grids, including axonometric grids. This term refers to the horizon lines in an orthographic projection. In other words, it helps make things look 3D by providing perspective lines.
In The Martian we saw what kind of hacking was needed to stay alive for a relatively short while on Mars, but what if you were trying to live there permanently? Mars’ hostile environment would affect your house, your transportation, even how you communicate. So here’s a fun thought experiment about how you’d live on Mars as part of a larger community.
Not Your Normal House
Mars One living units under regolith, Source video
Radiation on Mars comes from solar particle events (SPE) and galactic cosmic radiation (GCR). Mars One, the organization planning one-way trips to Mars talks about covering their habitats in several meters of regolith, a fancy word for the miscellaneous rocky material covering the bedrock. Five meters provides the same protection as the Earth’s atmosphere — around 1,000 g/cm2 of shielding. A paper from the NASA Langley Research Center says that the largest reduction comes from the top 15 to 20 cm of regolith. And so our Mars house will have an underlying structure but the radiation protection will come from somewhere between 20 cm to a few meters of regolith. Effectively, people will be living underground.
On Earth, producing water and air for your house is not something you think of doing, let alone disposing of exhaled CO2. But Mars houses will need systems for this and more.
While most people who make the trek to the path of totality for the Great American Eclipse next week will fix their gazes skyward as the heavenly spectacle unfolds, we suspect many will attempt to post a duck-face selfie with the eclipsed sun in the background. But at least one man will be feverishly tending to an experiment.
On a lonely hilltop in Wyoming, Dr. Don Bruns will be attempting to replicate a famous experiment. If he succeeds, not only will he have pulled off something that’s only been done twice before, he’ll provide yet more evidence that Einstein was right.
As ever, I am fighting a marginally winning battle against my 1991 Mazda MX-5, and this is the story of how I came to install a wideband oxygen sensor in my Japanese thoroughbred. It came about as part of my ongoing project to build myself a viable racecar, and to figure out why my 1990s Japanese economy car engine runs more like a late 1970s Malaise-era boat anchor.
I’ve always considered myself unlucky. My taste for early 90s metal has meant I’ve never known the loving embrace of OBD-2 diagnostics, and I’ve had to make to do with whatever hokey system was implemented by manufacturers who were just starting to produce reliable fuel injection systems.
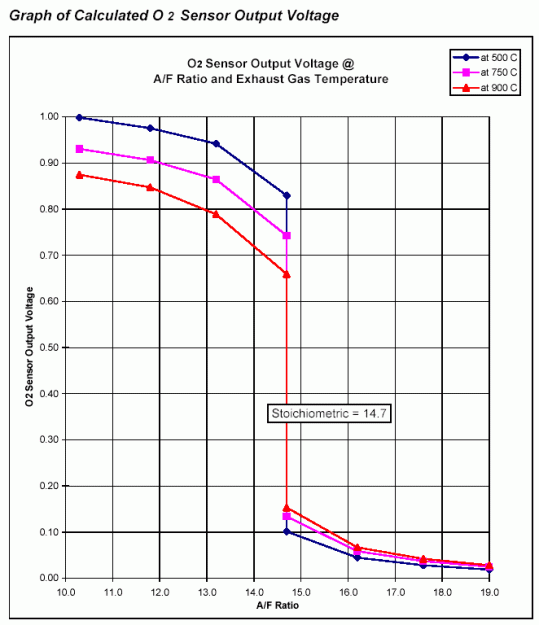
Narrowband oxygen sensor voltage output. The output is heavily dependent on sensor temperature and highly non-linear, making these sensors unsuitable for delivering a true AFR reading.
This generally involves putting in a wire jumper somewhere, attaching an LED, and watching it flash out the trouble codes. My Mazda was no exception, and after putting up with a car that was running rich enough to leave soot all over the rear bumper, I had to run the diagnostic.
It turned up three codes – one for the cam angle sensor, and two for the oxygen sensor. Now, a cam angle sensor (CAS) fault will normally prevent the car running at all, so it’s safe to assume that was an intermittent fault to keep an eye on.
The oxygen sensor, however, was clearly in need of attention. Its job is to allow the engine control unit (ECU) to monitor the fuel mixture in the exhaust, and make sure it’s not too rich or too lean. As my car was very obviously running too rich, and the diagnostic codes indicated an oxygen sensor failure, a repair was in order.
I priced up replacement sensors, and a new oxygen sensor could be had for under $100. However, it wasn’t exactly what I wanted, as not all oxygen sensors are created equal. Cars in the 80s and 90s typically shipped from the OEM fitted with what’s called a narrowband oxygen sensor. These almost always consist of a zirconia dioxide cell that outputs a voltage depending on the difference in oxygen concentration between the exhaust gas and the free air. These sensors generally sit at 0.45 V when the fuel mixture is stoichiometric, but rapidly change to 0.1 V in a lean condition and 0.9 V in a rich condition. The response is highly non-linear, and changes greatly with respect to temperature, and thus is only good for telling the ECU if it’s rich or lean, but not by how much. ECUs with narrowband sensors tend to hunt a lot when running in closed loop O2 control – you’ll see an engine at idle hunt either side of the magical 14.7 stoichiometric air fuel ratio, never able to quite dial in on the correct number.
As I intend to switch to an aftermarket ECU in the future, I’ll need to tune the car. This involves making sure the air/fuel ratios (AFRs) are correct, and for that I need to be able to properly measure them. Just knowing whether you’re rich or lean isn’t enough, as often it’s desirable to run the engine intentionally rich or lean at certain engine loads. To get a true AFR reading requires fitting a wideband oxygen sensor. These are a little more complicated.
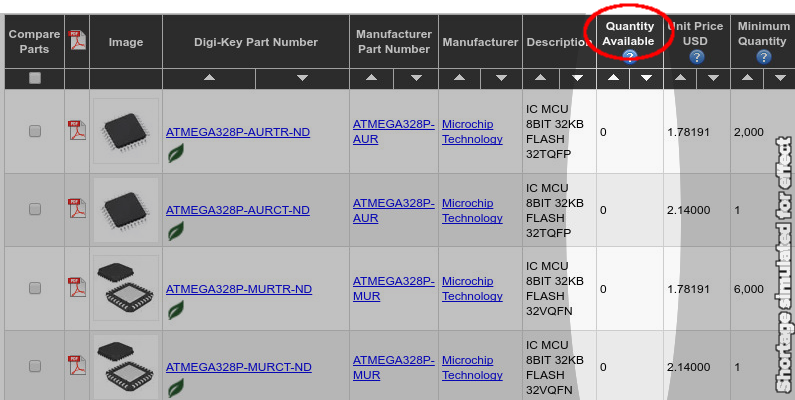
You’ve spent months developing your product, your Kickstarter just finished successfully, and now you’re ready to order all the parts. Unfortunately, your main component, an ATmega328P, is out of stock everywhere with a manufacturer lead time of 16 weeks. Now what?
When manufacturing things in large volumes, acquiring enough stock at the right time can be tricky. There can be seasonal shortages with companies trying to get products manufactured and available for Christmas. There can be natural disasters like floods of hard drive factories, or politically-related availability problems like tantalum for capacitors, or maybe new markets open up that increase demand or a new product sucks up all the available supply. The result is all the same; you have a harder time getting what you need. Fortunately, there are some ways to avoid this problem, or at least mitigate it.
The badge has become one of the defining features of a modern hacker camp, a wearable electronic device that serves as both event computer and platform for some mild software and hardware hacking. Some events have had astoundingly sophisticated badges while others are more simple affairs, and the phenomenon has even spawned an ecosystem of unofficial badges which have nothing to do with the event in question.
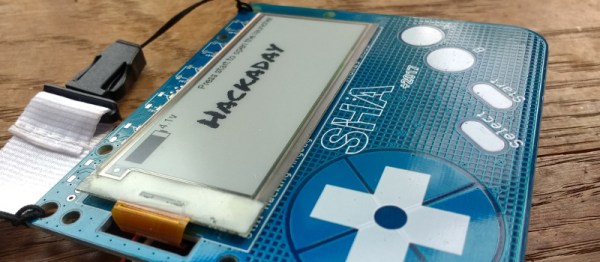
The SHACamp 2017 badge is the latest to come the way of a Hackaday writer, and certainly contains enough to be taken as representative of the state of hacker camp badges in 2017. It doesn’t have a star turn like CCCCamp 2015’s software defined radio, instead it’s an extremely handy little computer in its own right.







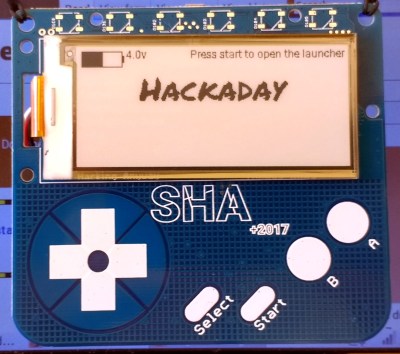 The badge has become one of the defining features of a modern hacker camp, a wearable electronic device that serves as both event computer and platform for some mild software and hardware hacking. Some events have had astoundingly sophisticated badges while others are more simple affairs, and the phenomenon has even spawned an ecosystem of unofficial badges which have nothing to do with the event in question.








