How Do They Synchronize Power Stations With The Grid?

There are probably times in every Hackaday reader’s life at which you see something and realise that the technology behind it is something you have always taken for granted but have never considered quite how it works. Where this is being written there was such a moment at the weekend, an acquaintance on an amateur radio field day posted a picture of three portable gas-powered alternators connected together and running in synchronization. In this case the alternators in question were fancy new ones with automatic electronic synchronization built-in, but it left the question: how do they do that? How do they connect a new power station to the grid, and bring it into synchronization with the line? There followed a casual web search, which in turn led to the video below the break of a bench-top demonstration.

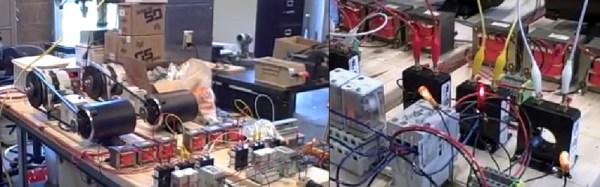
If two AC sources are to be connected together to form a grid, they must match each other exactly in frequency, phase, and voltage. To not do so would be to risk excessive currents between the sources, which could damage them and the grid infrastructure. The video below from [BTCInstrumentation] demonstrates in the simplest form how the frequencies of two alternators can be matched, by measuring the frequency difference between them and adjusting their speed and thus frequency until they can be connected. In the video he uses neon bulbs which flash at the difference frequency between the two alternators, and demonstrates adjusting the speed of one until the bulbs are extinguished. The two alternators can then be connected, and will then act together to keep themselves in synchronization. There are further videos in which he shows us the same process using a strobe light, then demonstrates the alternators keeping themselves synchronized, and phase deviation between them.

Of course, utility employees probably do not spend their time gazing at flashing neon bulbs to sync their power stations. The same measurements are not performed by eye but by electromechanical or electronic systems with automatic control of the contactors, just as they are in the fancy electronic alternator mentioned earlier. But most of us have probably never had to think about synchronizing a set of alternators, so to see it demonstrated in such a simple manner should fill a knowledge gap even if it’s one only of idle curiosity.

Continue reading “How Do They Synchronize Power Stations With The Grid?”

Use All That Extra Space With PCB Panelization

Anyone who’s made a PCB has encountered the conundrum of having to pay for space that you don’t use… for instance, designing a round PCB and seeing the corners go to waste. The solution? Smaller boards added to the blank spots.

One logical stumbling block might be that you simply don’t have a small PCB design ready to go. Latvian hacker [Arsenijs] created a resource of small PCBs that can be dropped into those blank spots, as well as a tutorial on how to combine the gerbers into a single panel.

Great minds think alike, and this guide is following hot on the heels of [Brian Benchoff’s] article on panelization. They’re both a great read. It’s interesting to think that not long ago we would see multiple guides on home etching boards and now we’ve climbed the production ladder to guides that help better utilize PCB fab houses. Neat!

This project seems a logical spinoff of [Arsenijs]’s ZeroPhone Pi smartphone project, a finalist for the 2017 Hackaday Prize that makes a low-cost phone using a stack of PCBs. One imagines that while prototyping the phone [Arsenijs] ended up with a lot of wasted space! Fill that up with smaller designs like breakouts, or decorative items like a hackerspace business card. If you’re looking for small PCBs you can find a few in the files area of the project on Hackaday.io. Otherwise, you can share yours and [Arsenijs] will add them.

An ExoArm For The Elderly

Prosthetic and assistive technologies have come have come a long way in recent years. When there are not only major medical research organizations, but individuals getting on board designing tools to improve the lives of others? That’s something special. Enter a homebrew essay into this field: ExoArm.

Attached to the body via what was available — in this case, the support harness for a gas-powered weed-eater — which distributes the load across the upper body and an Arduino for a brain, ExoArm designer [Kristjan Berce] has since faced roadblocks with muscle sensors meant to enable more instinctive control. So — for now — functionality is limited to a simple up and down motion controlled by two switches. It is worth noting that the down switch is currently mounted in such a way that when the user moves their arm down, the ExoArm follows suit, so there is some natural feel to using the arm in its present iteration.

Continue reading “An ExoArm For The Elderly”

Dirty Now Does Cables

PCB makers Dirty made a name for themselves in the prototype PCB biz, with a convenient web form and numerous options for PCB color, thickness, layers, silk screening, and so on. Now they’ve branched out into custom cabling with Dirty Cables.

You can design it yourself by dragging wires and connectors out of a sidebar and arranging them on a workspace, deciding which wire goes to what pin of the connector. Your choices for wires include various gauges and ribbon configurations. You choose a color (they have eleven) select connectors and drag those out too–choose from 17 cable-to-cable and cable-to-board connector families. We made a quick cable with four 32ga wires and two 16ga wires, with two different connectors on each side, with pricing updated realtime. If you want a sample pack of connectors, Dirty sells them for $10.

The downside to the service: there’s a minimum order of 100, though paying Shenzhen prices might make it worth your while. Just imagining crimping all of those connectors makes Hackaday’s hands hurt.

To get a sense of the diversity of connectors out there, read Elliot’s piece on the connector zoo that we published last year.

[thanks, Akiba]

Interfacing A Retro Controller Using The USBASP

An ISP dongle is a very common piece of equipment on a maker’s bench. However, its potential as a hackable device is generally overlooked. The USBASP has an ATmeg8L at its heart and [Robson] decided that this humble USB device could be used as an interface between his PC and a SNES Joypad.

A SNES controller required three pins to communicate with a host: clock, data and latch. In his hack, [Robson]  connects the controller to the ISP interface using a small DIY adaptor and programs the AVR using the V-USB library. V-USB is a software USB library for small microcontrollers and comes in pretty handy in this instance.

[Robson] does a pretty good job of documenting the entire process of creating the interface which includes the USB HID code as well as the SNES joypad serial protocol. His hack works on both Windows and Linux alike and the code is available on GitHub for download.

Simple implementation like this project are a great starting point for anyone looking to dip their toes in the DIY USB device pool. Veterans may find a complete DIY joystick more up their alley and will be inspired by some plastic techniques as well.

The Silence Of The Fans

The good thing about using a server-grade machine as your desktop is having raw computing power at your fingertips. The downside is living next to a machine that sounds like a fleet of quadcopters taking off. Luckily, loud server fans can be replaced with quieter units if you know what you’re doing.

Servers are a breed apart from desktop-grade machines, and are designed around the fact that they’ll be installed in some kind of controlled environment. [Juan] made his Dell PowerEdge T710 tower server a better neighbor by probing the PWM signals to and from the stock Dell fans; he found that the motherboard is happy to just receive a fixed PWM signal that indicates the fans are running at top speed. Knowing this, [Juan] was able to spoof the feedback signal with an ATtiny85 and a single line of code. The noisy fans could then be swapped for desktop-grade fans; even running full-tilt, the new fans are quieter by far and still keep things cool inside.

But what to do with all those extra fans? Why not team them up with some lasers for a musical light show?

Hackaday Prize Entry: 3D Printed Linear Actuator Does 2kg+

The rabbit hole of features and clever hacks in [chiprobot]’s NEMA17 3D Printed Linear Actuator is pretty deep. Not only can it lift 2kg+ of mass easily, it is mostly 3D printed, and uses commonplace hardware like a NEMA 17 stepper motor and a RAMPS board for motion control.

The main 3D printed leadscrew uses a plug-and-socket design so that the assembly can be extended easily to any length desired without needing to print the leadscrew as a single piece. The tip of the actuator even integrates a force sensor made from conductive foam, which changes resistance as it is compressed, allowing the actuator some degree of feedback. The force sensor is made from a 3M foam earplug which has been saturated with a conductive ink. [chiprobot] doesn’t go into many details about his specific method, but using conductive foam as a force sensor is a fairly well-known and effective hack. To top it all off, [chiprobot] added a web GUI served over WiFi with an ESP32. Watch the whole thing in action in the video embedded below.

Continue reading “Hackaday Prize Entry: 3D Printed Linear Actuator Does 2kg+”