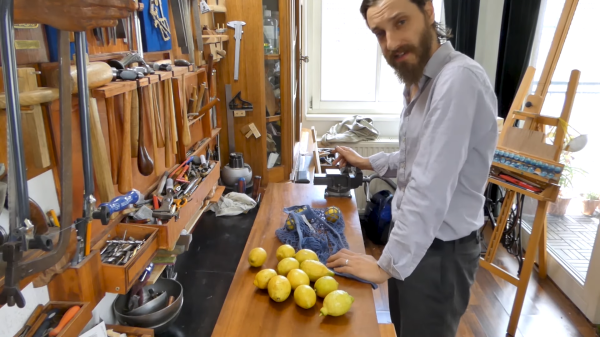
Making Flexible Overmolded Parts With Urethane Resin

Resin casting videos have taken social media by storm of late. Everything from inlaid driftwood tables to fancy pens are getting the treatment. Pouring some nicely colored epoxy is straightforward enough, but it’s just the tip of the iceberg. [Eric Strebel] has some serious skills in resin casting, and has lately been working on some overmolded electroniics with urethane resin (Youtube link, embedded below).

The build starts with the creation of a silicone mold, using a 3D printed SLA master. The part in question is for a prototype medical device, and requires overmolding, in which a flexible PCB is covered in flexible urethane. Wooden pins are used to allow the flexible PCB to clip into the mold for accurate location, and a small shield is placed over the metal contacts of the PCB to avoid them being covered in silicone.

Initial tests are done with an empty mold to determine the correct material to use, before the actual parts are ready to produce. [Eric] takes great care with the final production, as any mistakes would waste the expensive prototype PCBs provided to him by the client. With the electronics placed in the mold, the resin is degassed and carefully injected, using a syringe to minimise the chance of any air bubbles. With some delicate cleanup by hand, the completed parts are ready for delivery.

It’s a process that covers the basics of overmolding for a prototype part, as well as showing off [Eric]’s skill at producing quality prototype parts. We’ve seen [Eric]’s work before, too – like his discussion of the value of cardboard in product design. Video after the break.

Continue reading “Making Flexible Overmolded Parts With Urethane Resin”

Blacksmithing For The Uninitiated: Curves And Rings

You know the funny looking side of the anvil? That’s where the best curves come from. It’s called the anvil horn and is the blacksmith’s friend when bending steel and shaping it into curves.

The principle of bending a piece of steel stock is very easy to understand. Heat it up to temperature, and hammer it over a curved profile to the intended shape. A gentler touch is required than when you are shaping metal. That’s because the intent is to bend the metal rather than deform. Let’s take a look!

Continue reading “Blacksmithing For The Uninitiated: Curves And Rings”

Getting MIDI Under Control

When [Mr. Sobolak] started his DIY Midi Fighter he already had experience with the MIDI protocol, and because it is only natural once you have mastered something to expand on the success and build something more impressive, more useful, and more button-y. He is far from rare in this regard. More buttons mean more than extra mounting holes, for example an Arduino’s I/O will fill up quickly as potentiometers hog precious analog inputs and button arrays take digital ones. Multiplexing came to the rescue, a logic-based way to monitor or control more devices, in contrast to the serial protocols used by an IO expander.

Multiplexing was not in [Mr. Sobolak]’s repertoire, but it was a fitting time to learn and who doesn’t love acquiring a new skill by improving upon a past project? All the buttons were easy enough to mount but keeping the wires tidy was not in the scope of this project, so if you have a weak stomach when it comes to a “bird’s nest” on the underside you may want to look away and think of something neat. Regardless of how well-groomed the wires are, the system works and you can listen to a demo after the break. Perhaps the tangle of copper beneath serves a purpose as it buoys the board up in lieu of an enclosure.

We are looking forward to the exciting new versions where more solutions are exercised, but sometimes, you just have to tackle a problem with the tools you have, like when the code won’t compile with the MIDI and NeoPixel libraries together so he adds an Uno to take care of the LEDs. Is it the most elegant? No. Did it get the job done? Yes, and if you don’t flip over the board, you would not even know.

Continue reading “Getting MIDI Under Control”

E-Book Reader Gets Page Turn Buttons, Is None The Wiser

Most e-book readers don’t have physical page turn buttons. Why? They just don’t. Virtual page turns are accomplished with a tap at a screen edge. Determined to reduce the awkwardness of one-handed use, [Sagar Vaze] modified a Kobo e-reader with two physical page turn buttons as a weekend project.

[Sagar] points out that since the underlying OS of the Kobo device is Linux, it is possible to fake touches to the screen (and therefore trigger page turns) by recording then replaying the appropriate input event. However, there was a more direct solution available to those willing to tamper slightly with the hardware. Touch sensing on the screen is done via an infrared break-beam system. Along two edges of the screen are IR emitters, and opposite the emitters are receivers. Broadly speaking, when a fingertip touches the display a minimum of two IR beams are broken, and the physical location of the fingertip can therefore be determined by analyzing exactly how the IR pattern has been changed.

To spoof page turns, [Sagar] briefly shorts two IR emitters: one on each axis. The sudden winking out of the IR is interpreted by the device as a crisp tap, and the device obediently turns the page. The only hitch is that both IR emitters must be shorted at the same time. If one is shorted before the other, the device ignores it. Double-pole switches would probably do the trick, but with the part bin coming up empty in that respect, [Sagar] instead used a few transistors to accomplish the same thing. A 3D printed enclosure rounds out the whole mod, and a brief video is embedded below.

Continue reading “E-Book Reader Gets Page Turn Buttons, Is None The Wiser”

Building A Foam Machine From A Leaf Blower And A Water Pump

Imagine a tub overflowing with bubble bath, except it’s a club dancefloor and music is pumping all night. This is what is known as a “foam party” — a wild and exciting concept that nonetheless many are yet to experience. The concept exploded in popularity in Ibiza in the 1990s, and foam parties are regularly held at nightclubs and festivals the world over.

Foam is generated with the obviously-named foam machine, and these can be readily purchased or hired for anyone wishing to host such an event. However, that’s not the hacker way. If you’re a little ingenious and take heed of the safety precautions, here’s how you can do it yourself.

Continue reading “Building A Foam Machine From A Leaf Blower And A Water Pump”

A Baby Named DJ

Some of us are guilty of picking up questionable hardware from garage sales, fleamarkets, and well-meaning relatives. There is a balance between turning down a good investment and hoarding, and if we figure out how to tell the difference you will be the first to know. [Clem Mayer] may start on the side of unwise acquisition, but he pushes a broken fetal detector into the realm of awesome by converting it to an analog synthesizer, born to headline at an Eastern European dance party.

He starts with a basic teardown, and we get to see how old hardware was serviceable with only two standard screws. It is a good thing too, because the nickel-cadmium batteries are older than some of you and they are in need of replacement. New nickel-metal hydride batteries got it up and running but [Clem] does not have a baby bump so its functionality turned to Pink Floyd era synthesizer circuit bending. Circuit bending involves modifying a circuit for sound it was not intended to make.

Continue reading “A Baby Named DJ”

Etching Large Brass Sheets Is Harder Than You Think

One of my favorite ways to think of engineering is that a glass is not half empty or half full, only twice as large as it needs to be. As useful as that idea is, it also means that I rarely put any effort into the aesthetics of my projects – I learn or accomplish what I need, desolder and recycle the components, then move on. Few of my projects are permanent, and custom cases tend to be non-reusable, so I skip the effort and expense.

Once in a while though, I need to make a gift. In that case form and function both become priorities. Thankfully, all that glitters is not gold – and over the last year I’ve been learning to etch the copper alloys commonly classified as ‘brass’. We’ve covered some truly excellent etched brass pieces previously, and I was inspired to try and etch larger pieces of metal (A4 and larger) without sacrificing resolution. I thought this would be just like etching circuits. In fact, I went through several months of failed attempts before I produced anything halfway decent!

Although I’m still working on perfecting my techniques, I’ve learned enough in the meantime to give a report. Read on if you’re feeling the need for more fancy brass signs in your life.

Continue reading “Etching Large Brass Sheets Is Harder Than You Think”