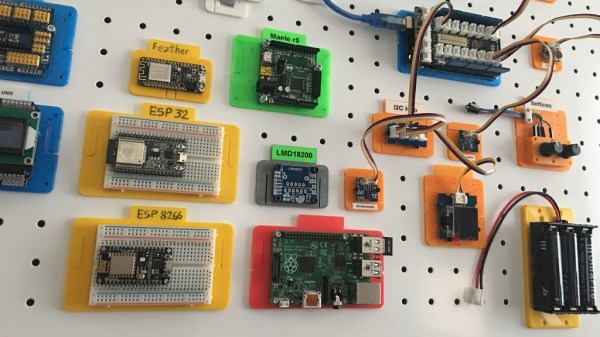
Joule Thief Steals In Favor Of Christmas

A lot of things tend to get stretched during the holiday season, like shopping budgets and waistbands and patience. This year, [Chris] is stretching the limits of both the mini breadboard and the humble 1.5 V LR44 coin cell with his joule thief-driven LED mini Christmas tree.

With the push of a micro momentary, the joule thief circuit squeezes enough power from an LR44 to boot an MSP430 microcontroller, which needs 1.8 V – 3.6 V. After boot, the micro takes control of the joule thief circuit and milks it whenever the voltage falls below 3.2 V. This tree may be small in stature, but it’s feature-rich. A push of the same momentary button cycles through four different light shows, ending with a medley of all four. Be dazzled after the break.

The code for this tiny tree, which features an awesome ASCII breadboard layout and schematic, is up on GitHub. [Chris] has it listed among a few other manageable bare-metal ‘430 projects that would be great for beginners at pure C. If that sounds like you, why not give yourself the gift of learning a new language?

We’ve seen some spirited ways of lighting LEDs, but doing it with candle power takes the fruitcake.

Continue reading “Joule Thief Steals In Favor Of Christmas”

The Smartest Air Freshener In The Room

Many automatic air fresheners are wasteful in that they either ceaselessly spritz the room, and manual ones need to be — well — manually operated. This will not do in an era of smart products, so Instructables user [IgorF2] has put together an air freshener that does more than check if you’re around before freshening things up.

The air freshener uses a NodeMCU LoLin and an MG 995 servomotor, with a NeoPixel ring acting as a status light. Be aware — when the servo is triggered there is a significant spike in current, so be sure you aren’t powering the air freshener from a PC USB port or another device. After modeling the air freshener’s case in Fusion 360 — files available here — [IgorF2] wired the components together and mounted them inside the 3D printed case.

Hardware work completed, [IgorF2] has detailed how to set up the Arduino IDE and ESP8266 support for a first-time-user, as well as adding a few libraries to his sketch. A combination of an Adafruit.IO feed and ITTT — once again, showing the setup steps — handles how the air freshener operates: location detection, time specific spritzing, and after tapping a software button on your phone for those particularly lazy moments.

Continue reading “The Smartest Air Freshener In The Room”

Give Workshop Pencils A Flush-Mounted Home

Pencils and pens are apt to go wandering in a busy workshop if they don’t have a handy storage spot. For most of us a soup can or an old coffee mug does the trick, but for a prettier and more useful holder [Stuff I Made] has a short video demonstrating a storage unit made from an elbow fitting and a scrap piece of plywood. He cuts a plywood disk that is friction-fit into one end of the elbow, then it gets screwed into a wall making an attractively flush-mounted holder in a convenient spot.

With the right joint the bottom of the holder remains accessible, as a 90 degree bend would be no good. With a shallower joint angle, a regular screwdriver can still reach the mounting screw and it’s possible to access the bottom of the holder just in case it needs cleaning or something small falls inside. You can see the process and results in the video embedded below. Not bad for one screw, a spare joint, and a scrap piece of plywood.

Continue reading “Give Workshop Pencils A Flush-Mounted Home”

Using Gmail With OAUTH2 In Linux And On An ESP8266

One of the tasks I dread is configuring a web server to send email correctly via Gmail. The simplest way of sending emails is SMTP, and there are a number of scripts out there that provide a simple method to send mail that way with a minimum of configuration. There’s even PHP mail(), although it’s less than reliable.

Out of the box, Gmail requires OAUTH2 for authentication and to share user data, which has the major advantage of not requiring that you store your username and password in the application that requires access to your account. While they have an ‘allow less secure apps’ option that allows SMTP access for legacy products like Microsoft Outlook, it just doesn’t seem like the right way forward. Google documents how to interact with their API with OAUTH2, so why not just use that instead of putting my username and password in plaintext in a bunch of prototypes and test scripts?

Those are the thoughts that run through my head every time this comes up for a project, and each time I’ve somehow forgotten the steps to do it, also forgotten to write it down, and end up wasting quite a bit of time due to my own foolishness. As penance, I’ve decided to document the process and share it with all of you, and then also make it work on an ESP8266 board running the Arduino development environment.

Continue reading “Using Gmail With OAUTH2 In Linux And On An ESP8266”

Statistics And Hacking: A Stout Little Distribution

Previously, we discussed how to apply the most basic hypothesis test: the z-test. It requires a relatively large sample size, and might be appreciated less by hackers searching for truth on a tight budget of time and money.

As an alternative, we briefly mentioned the t-test. The basic procedure still applies: form hypotheses, sample data, check your assumptions, and perform the test. This time though, we’ll run the test with real data from IoT sensors, and programmatically rather than by hand.

The most important difference between the z-test and the t-test is that the t-test uses a different probability distribution. It is called the ‘t-distribution’, and is similar in principle to the normal distribution used by the z-test, but was developed by studying the properties of small sample sizes. The precise shape of the distribution depends on your sample size. Continue reading “Statistics And Hacking: A Stout Little Distribution”

Car Lights For Reflow Heat Source

If you only have a car and you need to unsolder some tricky surface mount components: what would you do? If you’re Kasyan TV, you’d remove your car’s halogen lights and get to town. That’s right: car lights for reflow.

When the friend of the host of Kasyan TV needed to remove some roasted toasted FETs from his motherboard but didn’t have anything for reflowing, she took some headlights and used them as an infrared source to desolder the FETs. Powered by a lab supply (although car batteries work too), the process works with 60 and 100-watt bulbs.

Now, reflowing with halogen bulbs isn’t new, and we’ve seen it done with the run of the mill 100-watt bulbs and a halogen floodlight. However, what we really like about using car lights is that they’re available everywhere and we already own some that we could (temporarily) repurpose. Now, don’t get us wrong – if you’re going to be reflowing more than just a little, there are plenty of alternative methods that don’t involve staring at “rather bright lights” for extended periods of time.

People ’round these parts can’t seem to get enough of reflow: from open source reflow oven controllers to reflowing with a hair straightener we’ve seen quite a bit. If you’re new to the reflow arena, we’ve got zero to hero: reflow style just for you. And if DIY at home reflow isn’t intense enough for you, we’ve got next level reflowing as well.

The full video is after the break, complete with Kasyan TV’s sponsored segment in the middle..

Continue reading “Car Lights For Reflow Heat Source”

The Incredible Shrinking Coin Cell Battery Pack

How’s it going with your project for the coin cell challenge? You can only use a single one, but Hackaday alum [Jeremy S Cook] has a great way to package coin cells into a sleek little power packs whether you need one, two, or even four.

[Jeremy] is building a wireless Wii nunchuk, so he needs a small battery that won’t short out or get punctured in the confines of the controller body. A single coin cell holder is already a bit bulky, and he needs to use two in series. He thought, why not try shrink wrapping them together? The only downside here is that the biggest tube that came with your average heat shrink multi-pack is probably a bit too tight to fit around them, so you might have to buy more (aw, shucks!).

After trying a few ways to make a good connection between the leads and the bare coin cell faces, [Jeremy] settled on generously stripping stranded wire and wrapping the long strands around the end to form a conductive swab. This slides in nicely between the coin cell and preshrunk tube. A little more heat will make a good connection, and some hot glue secures the wires. Click past the break for his build video and the other connection methods he tried. Have you come up with something better? Let us know in the comments.

Stray a bit further from the bench and you might come up with something like this googly eye battery holder we saw a few months ago.

Continue reading “The Incredible Shrinking Coin Cell Battery Pack”