Lamp’s Ghostly Glow Benefits From Happy Mistake

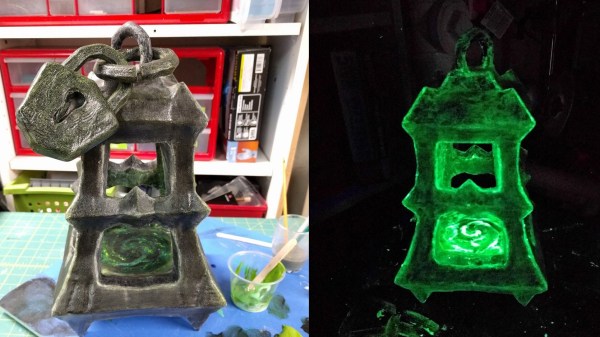
[cyborgworkshop]’s youngest sister is a fan of a character in a popular video game (Thresh from League of Legends) who wields an iconic lantern with a mystical green glow. He resolved to make a replica of that lantern. Perhaps as a gift for the cherished family member? Certainly not! [cyborgworkshop]’s goal was the simple joy of having something “to lord over her.” Ah, ain’t siblings grand?

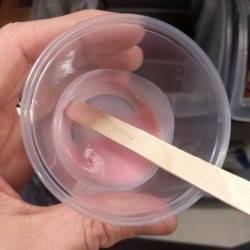
Why the glow powder turned pink in clear varnish is a bit of a mystery.

There were some interesting things learned in the process of making the ghostly green lamp. The first part of the build log is all about post-processing the lantern model, which was 3D printed at a chunky 0.48 mm layer height, but the rest is about getting the ghostly green glow to come out the way it did. [cyborgworkshop] used both glow in the dark paint and glow in the dark powder to really make the object pop, but the process involved some trial and error. Originally he mixed the glow powder into some clear varnish, and despite the mixture turning pink for some mysterious reason, a small sample spot appeared to turn out fine. However, after applying to the lantern and waiting, the varnish remained goopy and the glow powder settled out of the mixture. He ended up having to remove it as best he could and tried a heavy application of the glow paint instead. This ended up being a real blessing in disguise, because the combination resulted in a gritty stone-like texture that glowed brightly! As [cyborgworkshop] observes, sometimes mistakes end up being the highlight of a piece.

After more glow powder for highlighting, the finishing touches were a thin black wash to mute the powder’s whiteness, and a clear coat. The result looks great and a short video is embedded below. Oh, and if anyone has an idea why glow powder would turn pink when mixed into varnish, let us know in the comments!

Continue reading “Lamp’s Ghostly Glow Benefits From Happy Mistake”

DIY Peristaltic Pump Keeps The Booze Flowing

A few months ago we showed you a bar bot built by [GreatScott] that uses peristaltic pumps to food-safely move the various spirits and mixers around behind the curtain. The bar bot uses three of them, and at $30 each for pumps with decent flow rate, they added a lot to the parts bill. These pumps are pretty much the ideal choice for a bar bot, so what do you do? [GreatScott] decided to see if it was worth it to make them instead.

Peristaltic pumps are simple devices that pump liquids without touching them. A motor turns a set of rollers that push a flexible tube against a wall. As the motor turns, the rollers move liquid through the tube by squeezing it flat from the outside in turns. Typically, the more you pay for an off-the-shelf peristaltic, the higher the flow rate.

[GreatScott] figured it was cheaper to buy the motor and the control circuitry. He chose a NEMA-17 for their reputation and ubiquity and a DRV8825 controller to go with it. The pump is driven by an Arduino Nano and a pot controls the RPM. After trying to design the mechanical assembly from scratch, he found [Ralf]’s pump model on Thingiverse and modified it to fit a NEMA-17.

The verdict? DIY all the way, assuming you can print the parts. [GreatScott] was trying to beat the purchased pumps’ flow rate of 100mL/minute and ended up with 200mL/minute from his DIY pump. Squeeze past the break for the build video and demonstration.

Is there a bar bot build on your list? No? Is it because you’re more of a single-malt scotch guy? Build a peristaltic pachyderm to pour your potion.

Continue reading “DIY Peristaltic Pump Keeps The Booze Flowing”

Create A Discord Webhook With Python For Your Bot

Discord is an IRC-like chat platform that all the young cool kids are hanging out on. Originally intended as a way to communicate during online games, Discord has grown to the point that there are servers out there for nearly any topic imaginable. One of the reasons for this phenomenal growth is how easy it is to create and moderate your own Discord server: just hit the “+” icon on the website or in the mobile application, and away you go.

As a long-time IRC guy, I was initially unimpressed with Discord. It seemed like the same kind of stuff we’ve had for decades, but with an admittedly slick UI. After having used it for a few months now and joining servers dedicated to everything from gaming to rocket science, I can’t say that my initial impression of Discord is inaccurate: it’s definitely just a modern IRC. But I’ve also come to the realization that I’m OK with that.

But this isn’t a review of Discord or an invitation to join the server I’ve setup for my Battlefield platoon. In this article we’re going to look at how easy it is to create a simple “bot” that you can plug into a Discord server and do useful work with. Since anyone can create a persistent Discord server for free, it’s an interesting platform to use for IoT monitoring and logging by simply sending messages into the server.

Continue reading “Create A Discord Webhook With Python For Your Bot”

Zen And The Art Of Foam Core

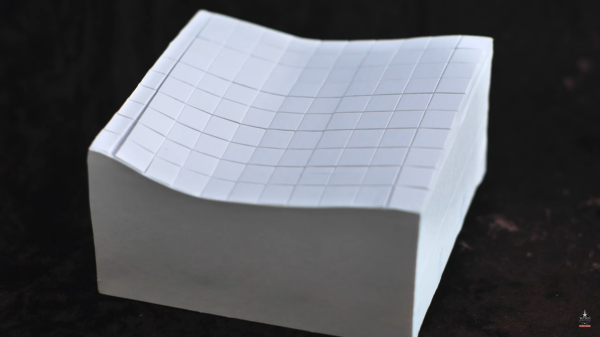
Some of our pastimes are so deeply meditative that we lose ourselves for hours. Our hands seem to perform every step, and sequence like a pianist might recite her favorite song. If [Eric Strebel]’s voice and videos are any indications, working with foam core can have that effect.

Foam core is a staple of art stores, hobby stores, and office supply stores. It comes in different colors, but the universal trait is a sheet of foam sandwiched between a couple of layers of paper. This composition makes a versatile material which [Eric] demonstrates well in his advanced tutorial making a compound surface and later on a speaker mockup.

After the break, you can catch a couple of beginner tutorials which explain the differences between a slapdash foam core model, and one which will draw appreciation. Proper tools and thoughtful planning might be the biggest takeaways from the first two videos unless you count the Zen narration. The advanced videos, linked above, show some ingenious ways to use foam core like offset scoring, adjustable super-structures, and paper transfers.

Each video is less than ten minutes long, so if you just started your coffee break, you can complete a video right now. Or look at another 2D material turned into amazingness with a papercraft strandbeest, then step up your game with another look at vinyl cutters.
Continue reading “Zen And The Art Of Foam Core”

Heated DryBox Banishes Filament Moisture For Under $20

There has been a lot of activity from [Richard Horne] regarding 3D printing filaments lately; most recently he has shared two useful designs for upping one’s filament storage and monitoring game. The first is for a DIY Heated DryBox for 3D printing filament. It keeps filament dry not just by sealing it into a plastic box with some desiccant, but by incorporating a mild and economical heater intended for reptile habitats inside. Desiccant is great, but a gently heated enclosure can do wonders for driving away humidity in the right environment. The DryBox design also incorporates a handy little temperature and humidity sensor to show how well things are working.

Spool-mounted adapter for temperature and humidity sensor (and desiccant) to monitor storage bag conditions.

The second design is a simple spin-off that we particularly liked: a 3D printed adapter that provides a way to conveniently mount one of the simple temperature and humidity sensors to a filament spool with a desiccant packet. This allows storing a filament spool in a clear plastic bag as usual, but provides a tidy way to monitor the conditions inside the bag at a glance. The designs for everything are on Thingiverse along with the parts for the Heated DryBox itself.

[Richard] kindly shares the magic words to search for on eBay for those seeking the build’s inexpensive key components: “15*28CM Adjustable Temperature Reptile Heating Heater Mat” and “Mini LCD Celsius Digital Thermometer Hygrometer Temperature Humidity Meter Gauge”. There are many vendors selling what are essentially the same parts with minor variations.

Since the DryBox is for dispensing filament as well as storing it, a good spool mounting system is necessary but [Richard] found that the lack of spool standardization made designing a reliable system difficult. He noted that having spool edges roll on bearings is a pretty good solution, but only if one doesn’t intend to use cardboard-sided spools, otherwise it creates troublesome cardboard fluff. In the end, [Richard] went with a fixed stand and 3D printable adapters for the spools themselves. He explains it all in the video, embedded below.

Continue reading “Heated DryBox Banishes Filament Moisture For Under $20”

Ride Bike, Charge Phone

Spring is coming to the northern hemisphere, and soon it’ll be nice enough outside to tool around town on your bicycle. But bikes don’t have power outlets, so phone charging on the go will require forethought and charged-up battery packs. It doesn’t have to be that way. You’re working to make the bike move, so why not make the bike work for you?

If you’ve ever used a motor as a generator, then you can see where this is going. That’s the underlying principle behind [Creativity Buzz]’s bike-powered phone charger. As the bike wheel turns, the rim comes in contact with a small wheel attached to the output shaft of a DC motor. Cranking the output shaft of a motor with permanent magnets inside will induce a small voltage, and here it is amplified with a DC-DC boost converter and output to a USB jack.

As long as you can find a way to secure the phone to the bike frame, or use a long cord and good cable management, you’re in business. Wheelie past the break to watch [Creativity Buzz] build it and give it a stationary test run. While you wait for bike-riding weather, you can still use this kind of charger by turning a crank.

Continue reading “Ride Bike, Charge Phone”

Build A Tiny Hot Wire Foam Cutter

Let’s face it: cutting foam with a knife, even a serrated plastic knife meant for the job, is a messy pain in the ass.  This is as true for insulation board as it is for the ubiquitous expanded polystyrene kind of foam used for everything from coffee cups to packaging material.

Those stick-type hot wire cutters from the craft store that plug into the wall aren’t much better than a knife. The actual cleaving of foam is easier, but dragging a long, hot flexible wand through rigid foam just right, without making burn marks, is pretty frustrating. It’s not like you can hold the other end to keep it steady. A foam cutter built like a coping saw but held parallel to the wire would offer much better control.

[Techgenie]’s handheld hot wire foam cutter is a simple build based on a single 18650 and a piece of nichrome wire. While this is probably not the most Earth-shattering hack you’ll see today, it’s a useful tool that can be made in minutes with items on hand. Laptop chargers are full of 18650s, and nichrome wire can be sourced from old toasters, hair dryers, or space heaters.

You shouldn’t use just any old wire for this, though, or the battery will get hot and potentially explode. Nichrome wire has a high resistance, and that’s exactly what you want in a tool that essentially shorts a battery to make heat. [Techgenie] used a momentary button instead of a switch, which is a good way to stay safe while using it. It wouldn’t hurt to add some protection circuitry and take the battery out when you’re done. Burn past the break to watch him build it and cut a few tight turns with ease.

If you have bigger, more complicated foam-cutting jobs in mind, why not build a CNC version out of e-waste?

Continue reading “Build A Tiny Hot Wire Foam Cutter”