This looks like the end of the road for Intel’s brief foray into the “maker market”. Reader [Chris] sent us in a tip that eventually leads to the discontinuation notice (PCN115582-00, PDF) for the Arduino 101 board. According to Intel forum post, Intel is looking for an alternative manufacturer. We’re not holding our breath.
We previously reported that Intel was discontinuing its Joule, Galileo, and Edison lines, leaving only the Arduino 101 with its Curie chip still standing. At the time, we speculated that the first wave of discontinuations were due to the chips being too fast, too power-hungry, and too expensive for hobbyists. Now that Intel is pulling the plug on the more manageable Arduino 101, the fat lady has sung: they’re giving up on hardware hackers entirely after just a two-year effort.
According to the notice, you’ve got until September 17 to stock up on Arduino 101s. Intel is freezing its Curie community, but will keep it online until 2020, and they’re not cancelling their GitHub account. Arduino software support, being free and open, will continue as long as someone’s willing to port to the platform.
Who will mourn the Arduino 101? Documentation was sub-par, but a tiny bit better than their other hacker efforts, and it wasn’t overpriced. We’re a little misty-eyed, but we’re not crying. You?
Temperature-controlled soldering irons can be cheap, lightweight, and good. Pick any two of those attributes when you choose an iron, because you’ll never have all three. You might believe that this adage represents a cast-iron rule, no iron could possibly combine all three to make a lightweight high-performance tool that won’t break the bank! And until fairly recently you’d have had a point, but perhaps there is now a contender that could achieve that impossible feat.
The Miniware TS100 is a relatively inexpensive temperature-controlled soldering iron from China that has made a stealthy entry to the market, and which some online commentators claim to be the equal of far more expensive professional-grade irons. We parted with just below £50 (around $60) to place an order for a TS100, and waited for it to arrive so we could see what all the fuss was about. Continue reading “Review: TS100 Soldering Iron”→
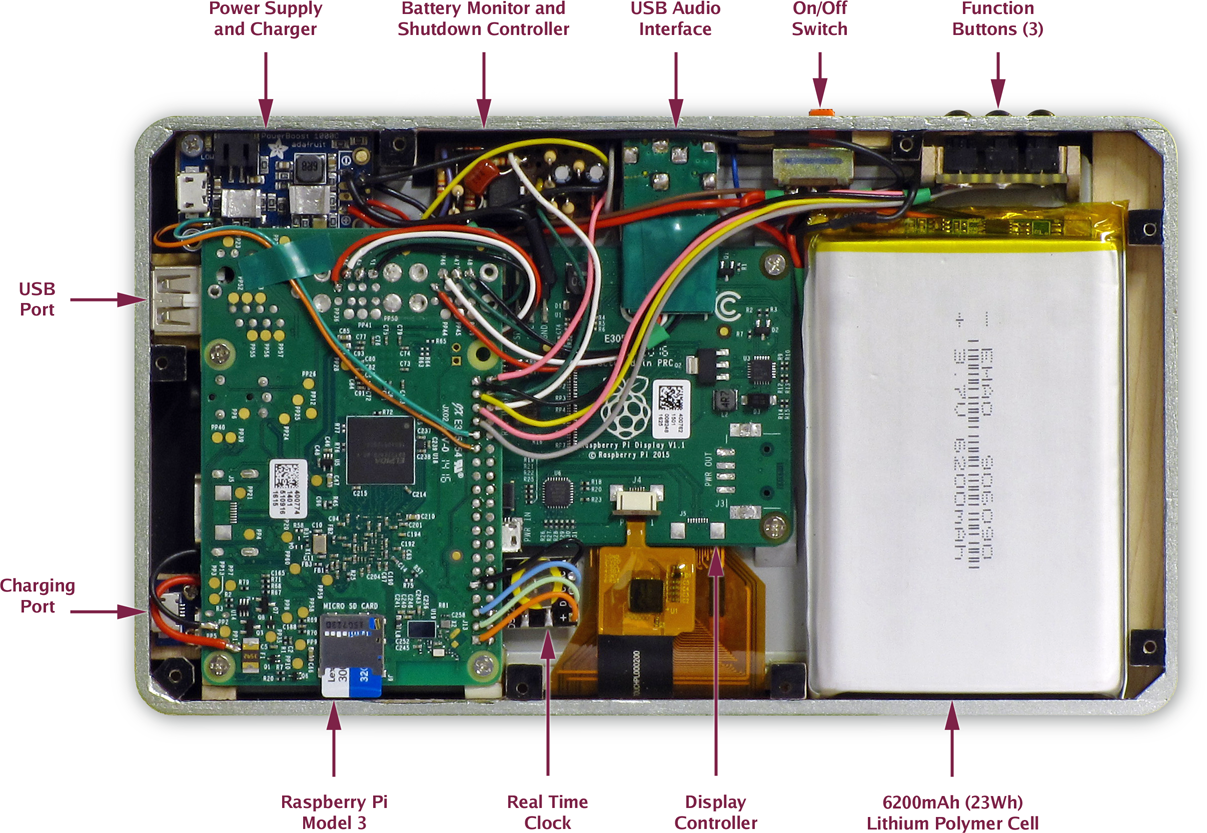
As the adage goes, “if you want something done right, do it yourself.” Desirous of a tablet but preferring to eschew consumer models, [Stefan Vorkoetter] constructed his own compact and lightweight Raspberry Pi tablet, covering several extra miles in the process.
The tablet makes use of a Raspberry Pi 3 and the official touchscreen, with the final product marginally larger than the screen itself. Designed with a ‘slimmer the better’ profile in mind, [Vorkoetter] had to modify several components to fit this precept; most obvious of these are the removal of the Pi’s GPIO headers, USB, and Ethernet ports, and removing the USB power out port from the touchscreen controller board so the two could be mounted side-by-side.
An Adafruit PowerBoost 1000C handles charging the 6200 mAh battery — meaning up to six hours(!) of YouTube videos — via a micro USB, but only after [Vorkoetter] attached a pair of home-made heatsinks due to negligible air flow within the case. A modified USB audio adapter boosts the Pi’s audio capabilities, enabling the use of headphones, a mic, and a built-in speaker which is attached to the tablet’s back cover.
It is easy to dismiss bash — the typical Linux shell program — as just a command prompt that allows scripting. Bash, however, is a full-blown programming language. I wouldn’t presume to tell you that it is as fast as a compiled C program, but that’s not why it exists. While a lot of people use shell scripts as an analog to a batch file in MSDOS, it can do so much more than that. Contrary to what you might think after a casual glance, it is entirely possible to write scripts that are reliable and robust enough to use in many embedded systems on a Raspberry Pi or similar computer.
I say that because sometimes bash gets a bad reputation. For one thing, it emphasizes ease-of-use. So while it has features that can promote making a robust script, you have to know to turn those features on. Another issue is that a lot of the functionality you’ll use in writing a bash script doesn’t come from bash, it comes from Linux commands (or whatever environment you are using; I’m going to assume some Linux distribution). If those programs do bad things, that isn’t a problem specific to bash.
One other limiting issue to bash is that many people (and I’m one of them) tend to write scripts using constructs that are compatible with older shells. Often times bash can do things better or neater, but we still use the older ways. For example:
Hackaday is all over this eclipse. There are thousands of members of the Hackaday community headed to a narrow swath of the United States on August 21st to revel in an incredibly rare, scientifically predictable life experience: a total eclipse of the sun.
Do not do it in solitude, get together and celebrate! Check out the Hackaday Eclipse Meetups page which shows where meetups are happening. And adding your own is simple. It’s a great day to meet up with other Hackaday readers and celebrate the day that the moon passed perfectly between you and the sun.
You can’t just stare directly at the sun, you need some eclipse glasses. We’re printing up some in black, adorned with the Jolly Wrencher and sending them out to all organized meetups, so get your event page up today and you’re on the list for a little bit of sweet swag. Look for the button on the Eclipse page that says “Host a meetup”.
I’m Too Cool to Watch an Eclipse
If you don’t get what all the hubbub is, you’re missing out. A total eclipse of the sun is an amazing life experience in so many ways. First off, they’re incredibly rare. There hasn’t been a total eclipse visible in the continental United States since 1979. The majority of the North American readership hasn’t even had the chance to see one in their lifetimes.
But of course it goes beyond the value of mere scarcity. Being able to understand, and predict an eclipse conveys a great deal about the progress of humanity. For millennia, a solar eclipse was a shocking (perhaps horrifying) experience. But through the scientific process of observation, the advances of record keeping, and the work of untold numbers of early astronomers we learned. Solar and Lunar eclipses were events that challenged thinking and became some of the earliest scientific discoveries.
This type of advancement hasn’t stopped. Even this year the application of the newest technology is present. Just one example that will turn your head is the shadow simulation that we saw in January. The moon isn’t a perfect sphere, and the combination of its landscape and that of the Earth means the outer fringes of totality will not be straight lines, but an undulating path. It’s a small detail realized in a profound way by a citizen scientist so that we may all enjoy it. Isn’t being alive now absolutely stunning?
Boil it Down for Me
So no, watching a rock cast a shadow won’t blow your mind. But understanding that the movement of this shadow isn’t random, that we didn’t always understand it, and that there are huge forces at work here will humble your modern brain and leave you awestruck. It’s a rare chance to observe with your own senses the evidence of huge masses governed by gigantic gravitational forces at incomprehensible distances through the simple act of a shadow racing across the landscape.
Be there, and make it a celebration of science, humanity, and your own life experience. Share your eclipse meetup now!
July 20th, 1969 was the day that people from Earth set foot on different soil for the first time. Here we are 48 years later, and the world’s space programs are — well — not very close to returning to the moon. If you aren’t old enough to remember, it was really amazing. The world was in a lot of turmoil in the 1960s (and still is, of course) but everyone stopped to look at the sky and listen to the sound of [Neil Armstrong] taking that first step. It was shocking in a good way and almost universally observed. Practically everyone in the world was focused on that one event. You can see some of that in the NASA video, below.
Space flight was an incredible accomplishment, but it paled in comparison with the push to actually landing a person on the moon and bringing them home safely. The effort is a credit to the ability of people to work together (on the order of thousands of minds) to overcome a difficult challenge. We can learn a lot from that alone, and it makes a compelling argument to continue taking on tough problems. Today, as we remember the Apollo landings, let’s take a moment to recognize what came of it beyond an iconic boot-print in the floury lunar soil.
The I/O capabilities built into most microcontrollers make it easy to measure the analog world. Say you want to build a data logger for temperature. All you need to do is get some kind of sensor that has a linear voltage output that represents the temperature range you need to monitor — zero to five volts representing 0° to 100°C, perhaps. Hook the sensor up to and analog input, whip up a little code, and you’re done. Easy stuff.
Now put a twist on it: you need to mount the sensor far from the microcontroller. The longer your wires, the bigger the voltage drop will be, until eventually your five-volt swing representing a 100° range is more like a one-volt swing. Plus your long sensor leads will act like a nice antenna to pick up all kinds of noise that’ll make digging a usable voltage signal off the line all the harder.
Luckily, industrial process engineers figured out how to deal with these problems a long time ago by using current loops for sensing and control. The most common standard is the 4-mA-to-20-mA current loop, and here we’ll take a look at how it came to be, how it works, and how you can leverage this basic process control technique for your microcontroller projects.