Silicon Sleuthing: Finding A Ancient Bugfix On The 8086

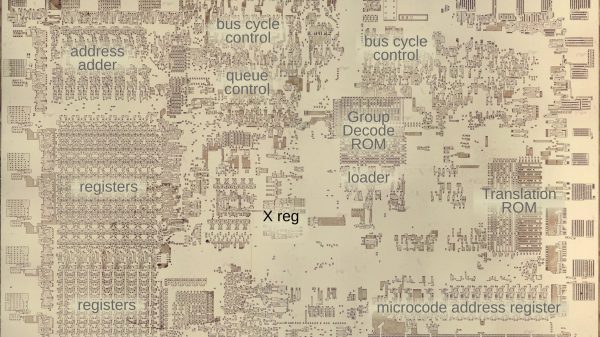
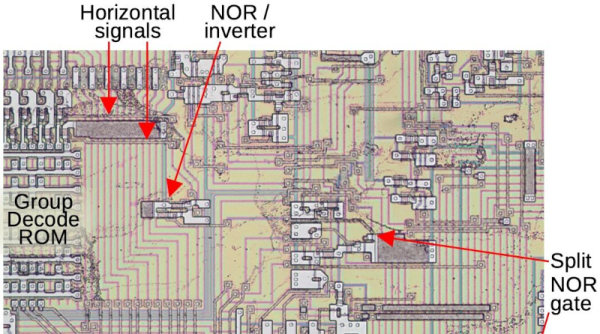
Few CPUs have had the long-lasting influence that the 8086 did. It is hard to believe that when your modern desktop computer boots, it probably thinks it is an 8086 from 1978 until some software gooses it into a more modern state. When [Ken] was examining an 8086 die, however, he noticed that part of the die didn’t look like the rest. Turns out, Intel had a bug in the original version of the 8086. In those days you couldn’t patch the microcode. It was more like a PC board — you had to change the layout and make a new one to fix it.

The affected area is the Group Decode ROM. The area is responsible for categorizing instructions based on the type of decoding they require. While it is marked as a ROM, it is more of a programmable logic array. The bug was pretty intense. If an interrupt followed either a MOV SS or POP SS instruction, havoc ensues.

Continue reading “Silicon Sleuthing: Finding A Ancient Bugfix On The 8086”

Reverse Engineering The Charge Pump Of An 8086 Microprocessor

You’d think that the 8086 microprocessor, a 40-year-old chip with a mere 29,000 transistors on board that kicked off the 16-bit PC revolution, would have no more tales left to tell. But as [Ken Shirriff] discovered, reverse engineering the chip from die photos reveals some hidden depths.

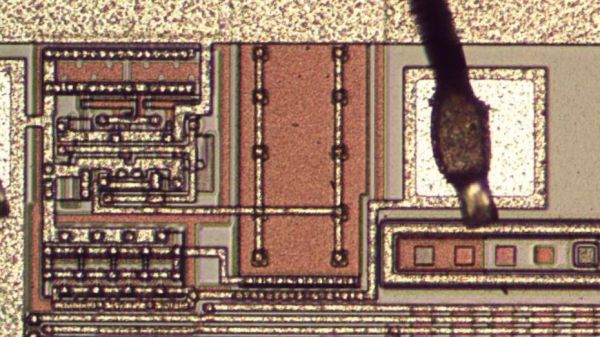
The focus of [Ken]’s exploration of the venerable chip is the charge pump, a circuit that he explains was used to provide a bias voltage across the substrate of the chip. Early chips generally took this -5 volt bias voltage from a pin, which meant designers had to provide a bipolar power supply. To reduce the engineering effort needed to incorporate the 8086 into designs, Intel opted for an on-board charge pump to generate the bias voltage. The circuit consists of a ring oscillator made from a trio of inverters, a pair of transistors, and some diodes to act as check valves. By alternately charging a capacitor and switching its polarity relative to the substrate, the needed -5 volt bias is created.

Given the circuit required, it was pretty easy for [Ken] to locate it on the die. The charge pump takes up a relatively huge amount of die space, which speaks to the engineering decisions Intel made when deciding to include it. [Ken] drills down to a very low level on the circuit, with fascinating details on how the MOSFETs were constructed, and why eight transistors were used instead of two diodes. As usual, his die photos are top quality, as are his explanations of what’s going on down inside the silicon.

If you’re somehow just stumbling upon [Ken]’s body of work, you’re in for a real treat. To get you started, you’ll want to check out how he found pi baked into the silicon of the 8087 coprocessor, or perhaps his die-level exploration of different Game Boy audio chips.

A Compiler In Plain Text Also Plays Music

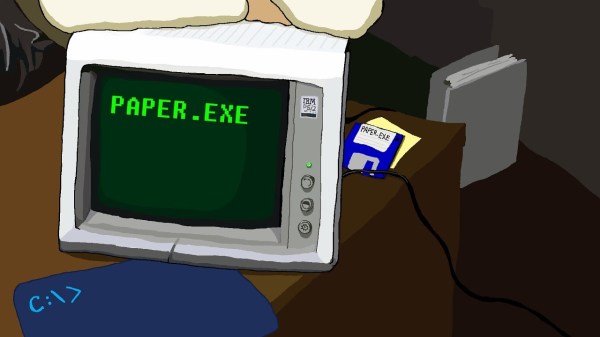
As a layperson reading about some branches of mathematics, it often seems like mathematicians are just people who really like to create and solve puzzles. And, knowing that computer science shares a lot of its fundamentals with mathematics, we can assume that most computer scientists are also puzzle-solvers as well. This latest project from [tom7] shows off his puzzle creating and solving skills with a readable file which is also a paper, which is also a compiler for C programs, which can also play music.

[tom7] started off with the instruction set for the Intel 8086 processor. Of the instructions available, he wanted to use only instructions which are also readable in a text file. This limits him dramatically in what this file will be able to execute, but also sets up the puzzle. He walks through each of the hurdles he found by only using instructions that also code to text, including limited memory space, no obvious way of exiting the program once it was complete, not being able to jump backward in the program (i.e. looping), and a flurry of other issues that come up once the instruction set is limited in this way.

The result is a sort of C compiler which might not be the most efficient way of executing programs, but it sure is the most effective way of showing off [tom7]’s PhD in computer science. As a bonus, the file can also play an antiquated type of sound file due to one of the available instructions being a call for the processor to interact with I/O. If you want to learn a little bit more about compilers, you can check out a primer we have for investigating some of their features.

Thanks to [Greg] for the tip!

Continue reading “A Compiler In Plain Text Also Plays Music”

Bootstrapping An MSDOS Assembler With Batch Files

You have a clean MSDOS system, and you need to write some software for it. What do you do? You could use debug, of course. But there are no labels so while you can get machine code from mnemonics, you’ll still need to figure out the addresses on your own. That wasn’t good enough for [mniip], who created an assembler using mostly batch files. There are a few .COM files and it looks as if the first time you use debug to create those, but there’s also source you can assemble on subsequent builds with the assembler.

Why? We aren’t entirely sure. But it is definitely a hack. The technique sort of reminded us of our own universal cross assembler — sort of.

Continue reading “Bootstrapping An MSDOS Assembler With Batch Files”

Universal Chip Analyzer: Test Old CPUs In Seconds

Collecting old CPUs and firing them up again is all the rage these days, but how do you know if they will work? For many of these ICs, which ceased production decades ago, sorting the good stuff from the defective and counterfeit is a minefield.

Testing old chips is a challenge in itself. Even if you can find the right motherboard, the slim chances of escaping the effect of time on the components (in particular, capacitor and EEPROM degradation) make a reliable test setup hard to come by.

Enter [Samuel], and the Universal Chip Analyzer (UCA). Using an FPGA to emulate the motherboard, it means the experience of testing an IC takes just a matter of seconds. Why an FPGA? Microcontrollers are simply too slow to get a full speed interface to the CPU, even one from the ’80s.

So, how does it actually test? Synthesized inside the FPGA is everything the CPU needs from the motherboard to make it tick, including ROM, RAM, bus controllers, clock generation and interrupt handling. Many testing frequencies are supported (which is helpful for spotting fakes), and if connected to a computer via USB, the UCA can check power consumption, and even benchmark the chip. We can’t begin to detail the amount of thought that’s gone into the design here, from auto-detecting data bus width to the sheer amount of models supported, but you can read more technical details here.

The Mojo v3 FPGA development board was chosen as the heart of the project, featuring an ATmega32U4 and Xilinx Spartan 6 FPGA. The wily among you will have already spotted a problem – the voltage levels used by early CPUs vary greatly (as high as 15V for an Intel 4004). [Samuel]’s ingenious solution to keep the cost down is a shield for each IC family – each with its own voltage converter.

Continue reading “Universal Chip Analyzer: Test Old CPUs In Seconds”

Megaprocessor Is A Macro Microprocessor

If we have to make a list of Projects that are insane and awesome at the same time, this would probably be among the top three right up there. For the past few years, [James Newman] has been busy building Megaprocessor – a huge micro-processor made out of transistors and LED’s, thousands of ’em. “I started by wanting to learn about transistors. Things got out of hand.” And quite appropriately, he’s based out of Cambridge – the “City of perspiring dreams“. The Why part is pretty simple – because he can. We posted about his build as recently as 10 months back, but he’s made a ton of progress since then and an update seemed in order.

megaprocessor_04How big is it ? For starters, the 8-bit adder module is about 300mm (a foot) long – and he’s using five of them. When fully complete, it will stretch 14m wide and stand 2m tall, filling a 30 sq.m room, consisting of seven individual frames that form the parts of the Megaprocessor.

The original plan was for nine frames but he’s managed to squeeze all parts in to seven, building three last year and adding the other four since then. Assembling the individual boards (gates), putting them together to form modules, then fitting it all on to the frames and putting in almost 10kms of cabling is a slow, painstaking job, but he’s been on fire last few months. He has managed to test and integrate the racks shown here and even run some code.

The Megaprocessor has a 16-bit architecture, seven registers, 256bytes of RAM and a questionable amount of PROM (depending on his soldering endurance, he says). It sips 500W, most of it going to light up all the LED’s. He guesses it weighs about half a ton. The processor uses up 15,300 transistors and 8,500 LED’s, while the RAM has 27,000 transistors and 2,048 LED’s. That puts it somewhere between the 8086 and the 68000 microprocessors in terms of number of transistors. He recently got around to calculating the money he’s spent on this to date, and it is notching up over 40,000 Quid (almost $60,000 USD)!  You can read a lot of other interesting statistics on the Cost and Materials page.

Continue reading “Megaprocessor Is A Macro Microprocessor”

Non-Arduino Powered By A Piece Of Computing History

Sometimes it is a blessing to have some spare time on your hands, specially if you are a hacker with lots of ideas and skill to bring them to life. [Matt] was lucky enough to have all of that and recently completed an ambitious project 8 months in the making – a Non-Arduino powered by the giant of computing history – Intel’s 8086 processor. Luckily, [Matt] provides a link to describe what Non-Arduino actually means; it’s a board that is shield-compatible, but not Arduino IDE compatible.

He was driven by a desire to build a single board computer in the old style, specifically, one with a traditional local bus. In the early days, a System Development Kit for Intel’s emerging range of  microprocessors would have involved a fair bit of discrete hardware, and software tools which were not all too easy to use.

Back in his den, [Matt] was grappling with his own set of challenges. The 8086 is a microprocessor, not a microcontroller like the AVR, so the software side of things are quite different. He quickly found himself locking horns with complex concepts such as assembly bootstrapping routines, linker scripts, code relocation, memory maps, vectors and so on. The hardware side of things was also difficult. But his goal was learning so he did not take any short cuts along the way.

[Matt] documented his project in detail, listing out the various microprocessors that run on his 8OD board, describing the software that makes it all run, linking to the schematics and source code. There’s also an interesting section on running Soviet era (USSR) microprocessor clones on the 8OD. He is still contemplating if it is worthwhile building this board in quantities, considering it uses some not so easy to source parts. If you are interested in contributing to the project, you could get lucky. [Matt] has a few spares of the prototypes which he is willing to loan out to anyone who can can convince him that they could add some value to the project.

Continue reading “Non-Arduino Powered By A Piece Of Computing History”