Cheating At Bowling, The Hacker Way

Anyone who has ever gone to a bowling alley will know the preferred (but ineffective) technique to telepathically control a bowling ball. [Mark Rober] and [James Bruton] decided to change that and hacked a bowling ball that can be steered remotely (and discreetly), simply by leaning your body.

They started with a standard bowling ball, that was cut in half and hollowed out on a lathe. A beam sits on the centre line of the ball, mounted on a bearing in each half to allow the ball to spin around it. Steering done by shifting the centre of mass, by moving a steel pendulum that hangs below the beam side to side with heavy-duty servo. The servo is controlled with an Arduino, and an IMU to detects the balls orientation. Power is provided by and RC Lipo battery. The wireless controller is a sneaky little device that is taped to [Mark]’s back and covered with clothing, and steers the ball by detecting how far he leans with an IMU module. The brain is an Arduino Mini and an NRF24L01 provides the RF link.

While it’s not an easy build, it’s a fairly simple system electronically, with off the shelf electronics modules and perfboard. The genius is in the implementation and its entertainment value. The look on the kids faces when [Mark] “telepathically” controls the ball, after showing off the fact that he has zero natural ability, is absolutely priceless. [Mark Rober], a former NASA engineer, has made a name for himself with viral Youtube videos on cool projects like a glitter booby trap for package thieves and a liquid sand hot tub. [James Bruton], a former toy designer is known for his robotics prowess that he has put on display with OpenDog and functional Star Wars robots.

For us this hack is a perfect example of one that entertains and inspires, a powerful combination for young and old alike. Check out the awesome video after the break. Continue reading “Cheating At Bowling, The Hacker Way”

Adding Sensors To Improve Your Curling Game? Turns Out It’s Really Hard

Sometimes, a project turns out to be harder than expected at every turn and the plug gets pulled. That was the case with [Chris Fenton]’s efforts to gain insight into his curling game by adding sensors to monitor the movement of curling stones as well as the broom action. Luckily, [Chris] documented his efforts and provided us all with an opportunity to learn. After all, failure is (or should be) an excellent source of learning.

The first piece of hardware was intended to log curling stone motion and use it as a way to measure the performance of the sweepers. [Chris] wanted to stick a simple sensor brick made from a Teensy 3.0 and IMU to a stone and log all the motion-related data. The concept is straightforward, but in practice it wasn’t nearly as simple. The gyro, which measures angular velocity, did a good job of keeping track of the stone’s spin but the accelerometer was a different story. An accelerometer measures how much something is speeding up or slowing down, but it simply wasn’t able to properly sense the gentle and gradual changes in speed that the stone underwent as the ice ahead of it was swept or not swept. In theory a good idea, but in practice it ended up being the wrong tool for the job.

The other approach [Chris] attempted was to make a curling broom with a handle that lit up differently based on how hard one was sweeping. It wasn’t hard to put an LED strip on a broom and light it up based on a load sensor reading, but what ended up sinking this project was the need to do it in a way that didn’t interfere with the broom’s primary function and purpose. Even a mediocre curler applies extremely high forces to a broom when sweeping in a curling game, so not only do the electronics need to be extremely rugged, but the broom’s shaft needs to be able to withstand considerable force. The ideal shaft would be a clear and hollow plastic holding an LED strip with an attachment for the load sensor, but no plastic was up to the task. [Chris] made an aluminum-reinforced shaft, but even that only barely worked.

We’re glad [Chris] shared his findings, and he said the project deserves a more detailed report. We’re looking forward to that, because failure is a great teacher, and we’ve celebrated its learning potential time and again.

Arduino, Accelerometer, And TensorFlow Make You A Real-World Street Fighter

A question: if you’re controlling the classic video game Street Fighter with gestures, aren’t you just, you know, street fighting?

That’s a question [Charlie Gerard] is going to have to tackle should her AI gesture-recognition controller experiments take off. [Charlie] put together the game controller to learn more about the dark arts of machine learning in a fun and engaging way.

The controller consists of a battery-powered Arduino MKR1000 with WiFi and an MPU6050 accelerometer. Held in the hand, the controller streams accelerometer data to an external PC, capturing the characteristics of the motion. [Charlie] trained three different moves – a punch, an uppercut, and the dreaded Hadouken – and captured hundreds of examples of each. The raw data was massaged, converted to Tensors, and used to train a model for the three moves. Initial tests seem to work well. [Charlie] also made an online version that captures motion from your smartphone. The demo is explained in the video below; sadly, we couldn’t get more than three Hadoukens in before crashing it.

With most machine learning project seeming to concentrate on telling cats from dogs, this is a refreshing change. We’re seeing lots of offbeat machine learning projects these days, from cryptocurrency wallet attacks to a semi-creepy workout-monitoring gym camera.

Continue reading “Arduino, Accelerometer, And TensorFlow Make You A Real-World Street Fighter”

A 3D Printed Micro:Bit Nunchuk

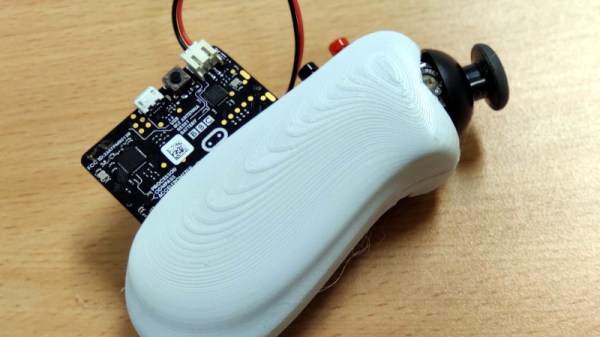
As [Paul Bardini] explains on the Thingiverse page for his “Micro:Bit Hand Controller”, the Bluetooth radio baked into the BBC’s educational microcontroller makes it an ideal choice for remotely controlling things. You just need to give it a nice enclosure, a joystick, a couple of buttons, and away you go. You can even use the integrated accelerometer as another axis of control. This is starting to sound a bit familiar, especially to gamers.

While it might not come with the Official Nintendo Seal of Quality, the 3D printable enclosure [Paul] has come up with for the Micro:Bit certainly takes more than a little inspiration from the iconic Wii “Nunchuck” controller. He’s jostled around the positions of the joystick and momentary buttons a bit, but it still has that iconic one-handed ergonomic styling.

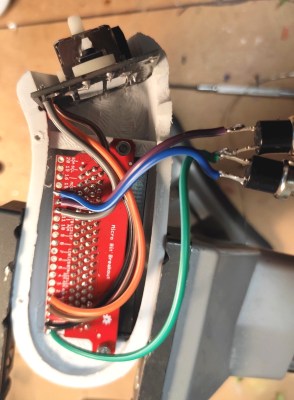
In a particularly nice touch, [Paul] has built his controller around a Micro:Bit breakout board from SparkFun that allows you to plug the microcontroller in via its edge connector. This means you can pull the board out and still use it in other projects. The only other connection to the controller leads to the battery, which uses a two pin JST-PH plug that can easily be removed.

Thanks to this breakout board, the internal wiring is exceptionally simple. The joystick (the type used in a PS2 controller) and the buttons are simply soldered directly to pins on the breakout board. No passives required, just a few short lengths of flexible wiring to snake through the printed enclosure.

The Thingiverse page only has the STLs for the two halves of the controller, and no source code for the Micro:Bit itself. But it shouldn’t be terribly hard to piece together the basic functionality with example code that’s floating around out there. Especially since you can run Python on them now. Of course, you could also add Bluetooth to the original Wii version if you’re not looking to reinvent the wheel nunchuck.

Fly A Pi On Your Next Model Rocket

From time to time, we see electronics projects for model rocket instrumentation. Those who have been involved in the hobby for many years may remember when 8-bit microcontrollers like the PIC16F84 were the kind of hardware you might fly on a mission. These days, however, there’s little reason not to send a high-powered processor. This is exactly what [Mohamed Elhariry] has done with his PiX project, which turns a Raspberry Pi Zero W into a neat little flight data recorder.

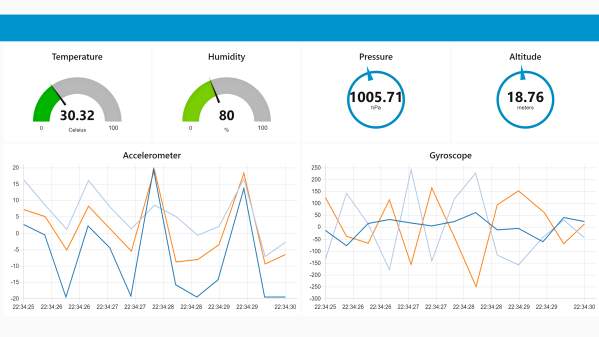
The hardware has what you might expect from a flight recorder, including accelerometer, gyroscope, and pressure sensor. In addition, it carries temperature and humidity sensors, and of course, a camera. A 64 GB microSD card provides the storage, while a LiPo SHIM board allows the whole thing to run from a 150 mAh battery. All of the components are off-the-shelf breakouts, which makes assembly as easy as soldering a few connections and securing the modules with a little tape.

The project is in GitHub, including python code, schematics for the hardware, and detailed instructions. If you ever wanted to get started with instrumenting a model rocket, this looks like a great resource. Also in the repo is a captured video from an actual flight [34 MB GIF] if you just want to see the view from one launch.

Using commercial modules seems pretty convenient, but if custom hardware is more your thing, check out these 22 mm round PCBs designed to fit inside rockets.

Add Scroll Wheels And Buttons To Smartphones With 3D-Printed Widgets Read By Accelerometer

The first LED digital wristwatches hit the market in the 1970s. They required a button push to turn the display on, prompting one comedian to quip that giving one to a one-armed man would be in poor taste. While the UIs of watches and other wearables have improved since then, smartphones still present some usability challenges. Some of the touch screen gestures needed to operate a phone, like pinching, are nigh impossible when one-handing the phone, and woe unto those with stubby thumbs when trying to take a selfie.

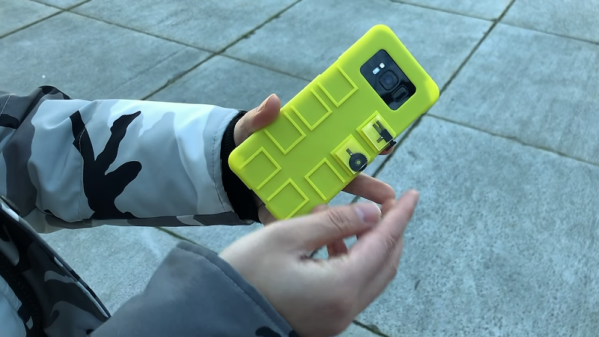
You’d think that the fleet of sensors and the raw computing power on board would afford better ways to control phones. And you’d be right, if the modular mechanical input widgets described in a paper from Columbia University catch on. Dubbed “Vidgets” by [Chang Xiao] et al, the haptic devices are designed to create characteristic acceleration profiles on a phone’s inertial measurement unit (IMU) when actuated. Vidgets take various forms, from push buttons to scroll wheels, each of a similar size and shape and designed to dock into one of eight positions on the back of a 3D-printed phone case. Once trained, the algorithm watches for the acceleration signature caused by actuating a Vidget, and sends commands to the phone to mimic the corresponding gestures. The video below demonstrates a couple of use cases, of which the virtual saxophone is our favorite.

This is really clever stuff, and ventures deep into “Why didn’t I think of that?” territory. Need to get ahead of the curve on IMUs to capitalize on what they can do? You could start with [Al Williams]’ primer on micro-electromechanical systems, or MEMS.

Continue reading “Add Scroll Wheels And Buttons To Smartphones With 3D-Printed Widgets Read By Accelerometer”

Door Springs And Neopixels Demonstrate Quantum Computing Principles

They may be out of style now, and something of a choking hazard for toddlers, but there’s no denying that spring doorstops make a great sound when they’re “plucked” by a foot as you walk by. Sure, maybe not on a 2:00 AM bathroom break when the rest of the house is sleeping, but certainly when used as sensors in this interactive light show.

The idea behind [Robin Baumgarten]’s “Quantum Garden” is clear from the first video below: engaging people through touch, sound, and light. Each of the 228 springs, surrounded by a Neopixel ring, is connected to one of the 12 inputs on an MPR121 capacitive touch sensor. The touch sensors and an accelerometer in the base detect which spring is sproinging and send that information to a pair of Teensies. A PC then runs the simulations that determine how the lights will react. The display is actually capable of some pretty complex responses, including full-on games. But the most interesting modes demonstrate principles of quantum computing, specifically stimulated Raman adiabatic passage (STIRAP), which describes transfers between quantum states. While the kids in the first video were a great stress test, the second video shows the display under less stimulation and gives a better idea of how it works.

We like this because it uses a simple mechanism of springs to demonstrate difficult quantum concepts in an engaging way. If you need more background on quantum computing, [Al Williams] has been covering the field for a while. Need the basics? Check out [Will Sweatman]’s primer.

Continue reading “Door Springs And Neopixels Demonstrate Quantum Computing Principles”