There was a time when virtual reality seemed like it would remain in the realm of science fiction at least for the foreseeable future. Then we were blessed with products like the Power Glove and Virtual Boy which seemed to make it more of a reality, if not a clunky and limited one. Now, though, virtual reality is taking more of a center stage as the technology for it improves and more and more games are released. We can see no greater proof of this than the fact that some gamers are building their own custom controllers to interact with the virtual world in more meaningful ways, like this game controller specifically built for first-person shooter games.
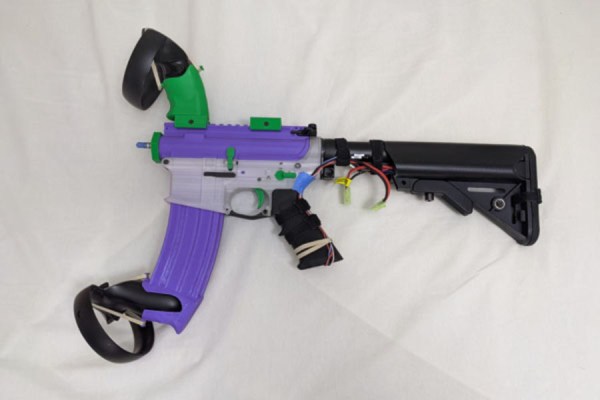
The controller is based on an airsoft gun but completely lacks the ability to fire a projectile, instead using the gun as a base for building the controller. In fact, the gun’s operation is effectively reversed in order to immerse the player into the game by using haptic feedback provided by pressurized air. The air is pumped in to what would be the front of the barrel and is discharged through the receiver when a trigger pull is detected in order to generate a recoil effect. The controller includes plenty of other features as well, including the ability to reload ammunition, change the firing mode, and track motion thanks to its pair of integrated Oculus controllers.
All of the parts for this controller are either 3D printed or readily available off-the-shelf, making this an ideal platform for customization and improvement. There’s also a demo game available from Unity which allows for a pretty easy setup for testing. While the controller looks like an excellent way to enjoy an FPS virtual reality experience, if you’re looking for a more general-purpose controller we are also starting to see a lot of development on that end as well.
Continue reading “Haptic Feedback “Rifle” Lets You Take Aim In VR”