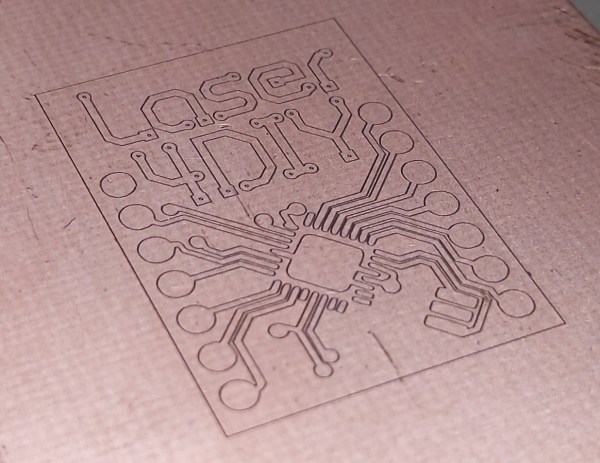
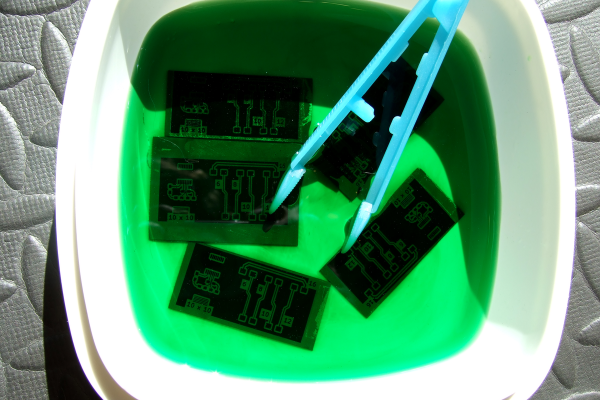
DIY Laser For Ablating Metal

For those who wish to go beyond through-hole construction on perfboard for their circuit boards, a printed circuit board is usually the next step up. Allowing for things like surface-mount components, multi-layer boards, and a wider array of parts, they are much more versatile but do have a slight downside in that they are a little bit harder to make. There are lots of methods for producing them at home or makerspace, though, and although we’ve seen plenty of methods for their production like toner transfer, photoresist, and CNC milling, it’s also possible to make them using laser ablation, although you do need a special laser to get this job done.

The problem with cutting copper is that it reflects infra-red, so a higher-wavelength blue green laser is used instead. And because you want to ablate the copper, but not melt the surrounding areas or cut straight through the board, extremely short, high-power pulses are the way to go. Here, the [Munich Fab Lab] is using 9 kW pulses of around 30 microseconds each.  With these specifications the copper is ablated from the surface of the board allowing for fine details in the range of about 20 µm, which is fine enough for just about any circuit board. The design of the laser head itself is worth a look.

Aside from the laser, the rest is standard CNC machine fodder, but with an emphasis on safety that’s appropriate for a tool in a shared workspace, and the whole project is published under an open license and offers an affordable solution for larger-scale PCB production with extremely fine resolution and without the need for any amounts of chemicals for the more common PCB production methods. There is a lot more information available on the project’s webpage and its GitHub page as well.

Of course, there are other methods of producing PCBs by laser if you happen to have a 20 W fiber laser just kicking around.

The Voltaic Pile: Building The First Battery

In the technologically-underpinned modern world, most of us interact with a battery of some sort every day. Whether that’s the starter battery in a car, the lithium battery in a phone, or even just the coin cell battery in a wrist watch, batteries underpin a lot of what makes society possible now. Not so in the early 1800s when chemists and physicists were first building and experimenting with batteries. And those batteries were enormous, non-rechargable, and fairly fragile to boot. Not something suited for powering much of anything, but if you want to explore what it would have been like to use one of these devices, follow along with [Christopher]’s build of a voltaic pile. Continue reading “The Voltaic Pile: Building The First Battery”

Electroplating Makes 3D-Printed Star Wars Prop Shine

3D printing is known for producing parts with a fairly average finish at best. Even the smoothest resin prints are still fairly plasticky and dull in appearance. However, it’s possible to do much better if you get creative with electroplating. This thermal detonator prop from [HEN3DRIK] shows just how good a 3D print can look with a little post-processing and some chemical help.

[HEN3DRIK] started with a Star Wars thermal detonator model found online, and printed it in resin for the best possible surface finish from the get go. The parts were cleaned after printing and cured, as per usual resin processing techniques. From there, fine steel wool and sandpaper was used to make the print as smooth as possible. A conductive layer of copper paint was then sprayed on with an airbrush, with mating surfaces masked off to avoid ruining the fit.

The part was then dunked in an acidic copper bath while attached to a power source, and gently rotated during the electroplating process. The results were excellent, resulting in near-mirror finish copper-plated parts after polishing. Nickel was then plated on top to get the prop to the proper silver color. The prop was finally then assembled with an Arduino Nano inside to run several LEDs for visual effect.

Electroplating isn’t just for making things pretty. It can also add strength to your 3D prints, too! Video after the break.

Continue reading “Electroplating Makes 3D-Printed Star Wars Prop Shine”

This Scratch-Built X-Ray Tube Really Shines

On no planet is making your own X-ray tube a good idea. But that doesn’t mean we’re not going to talk about it, because it’s pretty darn cool.

And when we say making an X-ray tube, we mean it — [atominik] worked from raw materials, like glass test tubes, tungsten welding electrodes, and bits of scrap metal, to make this dangerously delightful tube. His tool setup was minimalistic as well– where we might expect to see a glassblower’s lathe like the ones used by [Dalibor Farny] to make his custom Nixie tubes, [atominik] only had a small oxy-propane hand torch to work with. The only other specialized tools, besides the obvious vacuum pump, was a homebrew spot welder, which was used to bond metal components to the tungsten wires used for the glass-to-metal seals.

Although [atominik] made several versions, the best tube is a hot cathode design, with a thoriated tungsten cathode inside a copper focusing cup. Across from that is the anode, a copper slug target with an angled face to direct the X-rays perpendicular to the long axis of the tube. He also included a titanium electrode to create a getter to scavenge oxygen and nitrogen and improve the vacuum inside the tube. All in all, it looks pretty similar to a commercial dental X-ray tube.

The demonstration in the video below is both convincing and terrifying. He doesn’t mention the voltage he’s using across the anode, but from the cracking sound we’d guess somewhere around 25- to 30 kilovolts. The tube really gets his Geiger counter clicking.

Here’s hoping [atominik] is taking the proper precautions during these experiments, and that you do too if you decide to replicate this. You’ll also probably want to check out our look at the engineering inside commercial medical X-ray tubes.

Continue reading “This Scratch-Built X-Ray Tube Really Shines”

Just How Good Is A Tape Measure Antenna Anyway?

Amateur radio operators have played a longstanding game of “Will It Antenna?” If there’s something even marginally conductive and remotely resonant, a ham has probably tried to make an antenna out of it. Some of these expedient antennas actually turn out to be surprisingly effective, but as we can see from this in-depth analysis of the characteristics of tape measure antennas, a lot of that is probably down to luck.

At first glance, tape measure antennas seem to have a lot going for them (just for clarification, most tape measure antennas use only the spring steel blade of a tape measure, not the case or retraction mechanism — although we have seen that done.) Tape measures can be rolled up or folded down for storage, and they’ll spring back out when released to form a stiff, mostly self-supporting structure.

But [fvfilippetti] suspected that tape measures might have some electrical drawbacks, thanks to the skin effect. That’s the tendency for current to flow on the outside of a conductor, which at lower frequencies on conductors with a round cross-section turns out to be not a huge problem. But in a thin, rectangular conductor, a little finite element method magnetics (FEMM) analysis revealed that most of the current is carried in very small areas, resulting in high electrical resistance — an order of magnitude greater than a round conductor. Add in the high permittivity of the carbon steel material of the blade, and you end up something more like what [fvfilippetti] calls “a tape measure dummy load.

One possible solution: stripping the paint off the blade and copper plating it. It’s not clear if this was tried; we’d think it would be difficult to accomplish, but not impossible — and surely worth a try.

Brass Plaque Honors Brother

Brass plaques are eye-catching because no one makes them on a whim. They are more costly than wood or plastic, and processing them is proportionally difficult. [Becky Stern] picked the medium to honor her brother, who enjoyed coffee, motorcycles, and making things by hand. She made some playing card-sized pieces to adorn his favorite brand of hot bean juice and a large one to hang at his memorial site.

The primary components are a vertical salt water bath, DC power supply, metal to etch, scrap steel approximately the same size, and a water agitator, which in this case is an air pump and diffuser stone. You could stir manually for two hours and binge your shows but trust us and take the easy route. The video doesn’t explicitly call for flexible wires, but [Becky] wisely selected some high-strand hook-up leads, which will cause fewer headaches as stiff copper has a mind of its own, and you don’t want the two sides colliding.

There are a couple of ways to transfer an insulating mask to metal, and we see the ole’ magazine paper method fail in the video, but cutting vinyl works a treat. You may prefer lasers or resin printers, and that’s all right too. Once your mask is sorted, connect the positive lead to the brass and the negative to your steel. Now, it’s into the agitated salt water bath, apply direct current, and allow electricity to immortalize your design.

Continue reading “Brass Plaque Honors Brother”

Dead Solar Panels Are The Hottest New Recyclables

When it comes to renewable energy, there are many great sources. Whether it’s solar, wind, or something else, though, we need a lot of it. Factories around the globe are rising to the challenge to provide what we need.

We can build plenty of new solar panels, of course, but we need to think about what happens when they reach end of life. As it turns out, with so much solar now out in the field, a major new recycling industry may be just around the corner.

Continue reading “Dead Solar Panels Are The Hottest New Recyclables”