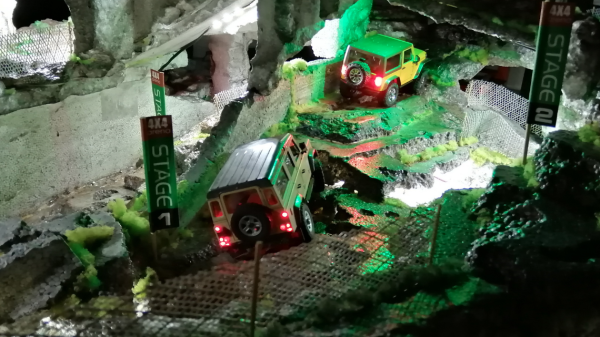
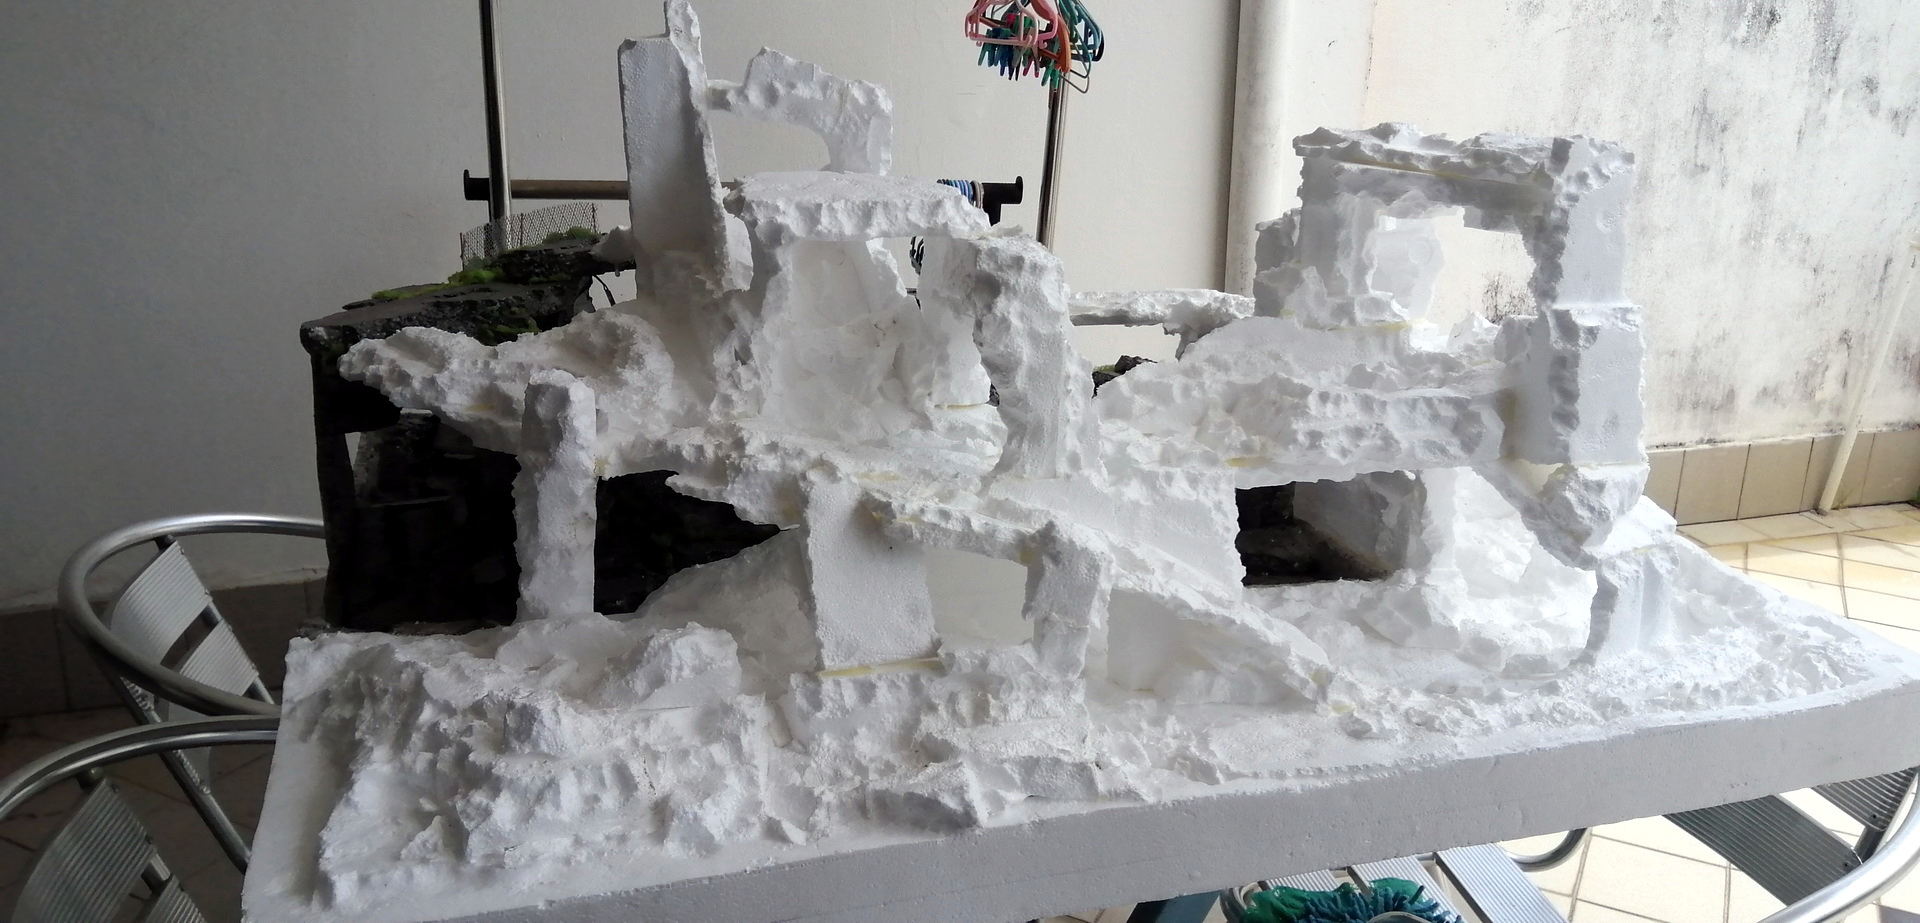
Add An Ant To Your Desk For Some Compact PCB Manufacturing

Usually when one thinks of using a CNC machine for producing PCBs, one thinks of those big, bulky CNC machines that pretty much fill an entire desk. But what if a CNC machine could be small enough to fit on a desk without getting in the way, yet still be useful enough to make single- and double-sided PCBs? This was the idea behind The Ant, the compact PCB manufacturing machine which [Mattia] and [Angelo] designed and open sourced.

In addition to the above linked Bitbucket repository for the project, the ‘Ant Team’ has a YouTube channel on which they have a range of rather professionally edited videos on the project, ranging from constructing the little machine, to various updates and more  Also see the video that is attached after the link for a visual introduction to the project.

Support and community interaction is mostly performed via the Reddit group for the project, where the diminutive machine finds a welcoming community as it continues to evolve. The machine itself is specified at this point as being able to built from commercially available and 3D printed parts, requiring no further tools for cutting or shaping. The precision is about 0.2 mm trace spacing.

Optical alignment for double-sided boards is achieved using a USB micro camera and the bCNC software, while the cost for materials is said to be quite inexpensive when compared with commercial solutions

Honestly, after seeing the machine in action, wouldn’t you want to have a CNC machine that’s so small and good-looking on your desk? If there’s one thing one might want to add, it’s probably a way to deal with the copper dust that’s produced while creating PCBs. Having to clean that off the desk after each PCB manufacturing session would get a bit cumbersome, we imagine.

Continue reading “Add An Ant To Your Desk For Some Compact PCB Manufacturing”

The Theremin Gets A Voice

Every once in a while, we come across a project that adds a ridiculously good twist on an existing design. This is exactly what [Xiao Xiao] and the team at LAM research group at the Institut d’Alembert in Paris have done. Their project T-VOKS is a singing and Speaking Theremin that is sure to drive everyone in the office crazy. (YouTube link, embedded below for your viewing pleasure.)

For the uninitiated, the Theremin is an electronic music instrument that does not require physical contact. Instead, it uses two antennas to sense the distance of the operators hands and uses that to modulate the pitch and volume of the output audio. From music concerts to movie background music to even scaring the neighbours, this instrument can do it all.

T-VOKS is a different take on the instrument, and it interfaces with a voice synthesizer to sing. There is an additional sensor that is used for the syllable sequencing, and the video below shows the gadget in operation. The icing on the cake is the instrument playing, or should that be singing in an actual concert. There is also a research paper detailing the operation on Dropbox[PDF] if you need the nitty-gritty.

We wonder how a TTS engine would work with this idea and hope to see some more projects like it in the future. Fore those looking to get started, have a look at the build guide for a DIY theremin.

Continue reading “The Theremin Gets A Voice”

Yet Another DIY Handheld Pi Gaming Console

The Raspberry Pi is a great platform for running retro video games, and with the addition of some buttons, a TFT screen and some speakers it’s relatively inexpensive and easy to get a working console up and running. If you have access to even a cheap 3D printer, a good-looking DIY console is well within reach for not a lot of money. YouTube user [DIY Engineering] has a bunch of consumer-grade fabrication tools and has designed and built a high-end but still DIY RetroPi gaming console, the RKDR II.

Among the tools that [DIY Engineering] has are both a FDM and DLP 3D printer, a reflow oven, a couple of different CNC machines and a laser cutter. They are all consumer grade, but not necessarily cheap – especially combined! [DIY Engineering] uses Fusion3D to model the case, bezel and circuit board, the latter of which is a 4 layer board designed in Eagle and sent off to be fabbed. The buttons, D-pad, screen and battery are bought off the shelf, but everything else is DIY. Check out the video for the details – the tools used, and the design files, are linked in the information section under the video on YouTube.

Continue reading “Yet Another DIY Handheld Pi Gaming Console”

Three-Conductor Pivot For E-Textiles Is Better Than Wires

Pivots for e-textiles can seem like a trivial problem. After all, wires and fabrics bend and flex just fine. However, things that are worn on a body can have trickier needs. Snap connectors are the usual way to get both an electrical connection and a pivot point, but they provide only a single conductor. When [KOBAKANT] had a need for a pivoting connection with three electrical conductors, they came up with a design that did exactly that by using a flexible circuit board integrated to a single button snap.

This interesting design is part of a solution to a specific requirement, which is to accurately measure hand movements. The photo shows two strips connected together, which pivot as one. The metal disk near the center is a magnet, and underneath it is a Hall effect sensor. When the wrist bends, the magnet is moved nearer or further from the sensor and the unit flexes and pivots smoothly in response. The brief videos embedded below make it clear how the whole thing works.

Continue reading “Three-Conductor Pivot For E-Textiles Is Better Than Wires”

How To Make Bisected Pine Cones Look Great, Step-by-Step

[Black Beard Projects] sealed some pine cones in colored resin, then cut them in half and polished them up. The results look great, but what’s really good about this project is that it clearly demonstrates the necessary steps and techniques from beginning to end. He even employs some homemade equipment, to boot.

Briefly, the process is to first bake the pine cones to remove any moisture. Then they get coated in a heat-activated resin for stabilizing, which is a process that infuses and pre-seals the pine cones for better casting results. The prepped pine cones go into molds, clear resin is mixed with coloring and poured in. The resin cures inside a pressure chamber, which helps ensure that it gets into every nook and cranny while also causing any small air bubbles introduced during mixing and pouring to shrink so small that they can’t really be seen. After that is cutting, then sanding and polishing. It’s an excellent overview of the entire process.

The video (which is embedded below) also has an outstanding depth of information in the details section. Not only is there an overview of the process and links to related information, but there’s a complete time-coded index to every action taken in the entire video. Now that’s some attention to detail.

Continue reading “How To Make Bisected Pine Cones Look Great, Step-by-Step”

DIY Vacuum Table Enhances PCB Milling

CNC milling a copper-clad board is an effective way to create a PCB by cutting away copper to form traces instead of etching it away chemically, and [loska] has improved that process further with his DIY PCB vacuum table. The small unit will accommodate a 100 x 80 mm board size, which was not chosen by accident. That’s the maximum board size that the free version of Eagle CAD will process.

When it comes to milling PCBs, double-sided tape or toe clamps are easy solutions to holding down a board, but [loska]’s unit has purpose behind its added features. The rigid aluminum base and vacuum help ensure the board is pulled completely flat and held secure without any need for external fasteners or adhesives. It’s even liquid-proof, should cutting fluid be used during the process. Also, the four raised pegs provide a way to reliably make double-sided PCBs. By using a blank with holes to match the pegs, the board’s position can be precisely controlled, ensuring that the back side of the board is cut to match the front. Holes if required are drilled in a separate process by using a thin wasteboard.

Milling copper-clad boards is becoming more accessible every year; if you’re intrigued by the idea our own [Adil Malik] provided an excellent walkthrough of the workflow and requirements for milling instead of etching.

Open Source Fader Bank Modulates Our Hearts

Here at Hackaday, we love knobs and buttons. So what could be better than one button? How about 16! No deep philosophy about the true nature of Making here; [infovore], [tehn], and [shellfritsch] put together a very slick, very adaptable bank of 16 analog faders for controlling music synthesis. If you don’t recognize those names it might help to mention that [tehn] is one of the folks behind monome, a company built on their iconic grid controller. Monome now produces a variety of lovingly crafted music creation tools.

Over the years we’ve written about some of the many clones and DIY versions of the monome grid controller, so it’s exciting to see an open source hardware release by the creators themselves!

The unambiguously named 16n follows in the footsteps of the monome grid in the sense that it’s not really for something specific. The grid is a musical instrument insofar as it can be connected to a computer (or a modular synth, etc) and used as a control input for another tool that creates sound. Likewise, the 16n is designed to be easily integrated into a music creation workflow. It can speak a variety of interfaces, like purely analog control voltage (it has one jack per fader), or i2c to connect to certain other monome devices like Ansible and Teletype. Under the hood, the 16n is actually a Teensy, so it’s fluent in MIDI over USB and nearly anything else you can imagine.

Continue reading “Open Source Fader Bank Modulates Our Hearts”