Use A Digital Key To Deter Lockpicking

Spending an hour or two around any consumer-level padlock or house deadbolt lock with a simple lockpicking kit will typically instill a good amount of panic and concern about security. While it’s true that any lock can be defeated, it’s almost comically easy to pick basic locks like this. So, if you’re looking for a level of security that can’t be defeated in two minutes with a tiny piece of metal, you might want to try something a little more advanced.

This project stemmed from an idea to use a YubiKey, a USB hardware token typically used for two-factor authentication, for physical locks instead. The prototype was built around an Arduino UNO, and all of the code and build instructions are available on the project’s site. The creator, [rprinz08], does not have one built inside of a secure enclosure so that would remain an exercise for the reader, but the proof-of-concept is interesting and certainly useful.

While digital keys like this can have their own set of problems (as all locks do), this would be a great solution for anyone needing to lock up anything where physical keys are a liability or a nuisance, where logging is important, or where many people need access to the same lock. The open source code and well-known platform make it easy for anyone to build, too.

Getting MIDI Under Control

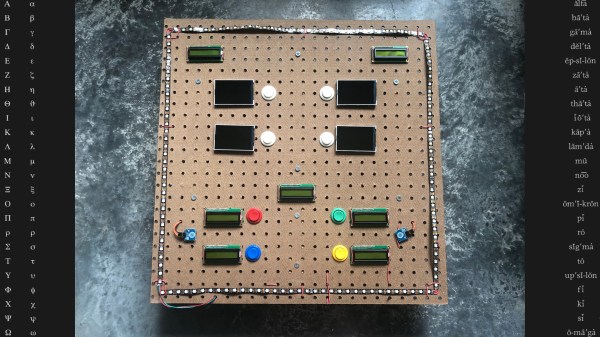
When [Mr. Sobolak] started his DIY Midi Fighter he already had experience with the MIDI protocol, and because it is only natural once you have mastered something to expand on the success and build something more impressive, more useful, and more button-y. He is far from rare in this regard. More buttons mean more than extra mounting holes, for example an Arduino’s I/O will fill up quickly as potentiometers hog precious analog inputs and button arrays take digital ones. Multiplexing came to the rescue, a logic-based way to monitor or control more devices, in contrast to the serial protocols used by an IO expander.

Multiplexing was not in [Mr. Sobolak]’s repertoire, but it was a fitting time to learn and who doesn’t love acquiring a new skill by improving upon a past project? All the buttons were easy enough to mount but keeping the wires tidy was not in the scope of this project, so if you have a weak stomach when it comes to a “bird’s nest” on the underside you may want to look away and think of something neat. Regardless of how well-groomed the wires are, the system works and you can listen to a demo after the break. Perhaps the tangle of copper beneath serves a purpose as it buoys the board up in lieu of an enclosure.

We are looking forward to the exciting new versions where more solutions are exercised, but sometimes, you just have to tackle a problem with the tools you have, like when the code won’t compile with the MIDI and NeoPixel libraries together so he adds an Uno to take care of the LEDs. Is it the most elegant? No. Did it get the job done? Yes, and if you don’t flip over the board, you would not even know.

Continue reading “Getting MIDI Under Control”

Tokyo Mechanical Keyboard Meetup Knocks Our Clacks Off

Just a few days ago, on the other side of the planet from this author, there was a mechanical keyboard meetup in Tokyo. Fortunately through the magic of the Internet we can all enjoy the impressive collection of devices people brought, and boy were there some interesting specimens. There were certainly the inevitable collections of strange artisan keycaps, unusual handmade switches, and keycap sets only available in one group buy five years ago in Nicaragua. But among the bright colors were some truly unique custom designs the likes of which we haven’t see before. A single source is hard to credit, you could check the hashtag #tokyomk6 on Twitter, or [obra]’s thread of photos, or this great blog post (video walkthroughs and photos included) from [romly].

Speaking of [romly], one of their designs stands out as particularly unusual. There are a few things to note here. One is the very conspicuous surface profile of the (clearly totally custom) keycaps themselves. Instead of flat or cylindrical or spherical, these are round. Round like the outside of a log. If we didn’t know better it might look like the entire thing was sculpted or extruded as a single unit. And just below the deck are the perpendicular thumb clusters. Frankly we aren’t sure how to refer to this design feature. The switches are mounted at right angles facing inward so the user places a thumb inside it in a style reminiscent of the DataHand. It’s quite interesting, and we’d be love to know more about what specific functionality it provides.

Another interesting entrant is this keyboard with unusually staggered switches and hexagonal caps (check out the individual markings!). Very broadly there are two typical keyboard layout styles; the diagonal columns of QWERTY (derived from a typewriter in the 1800’s) or the non slanted columns of an “ortholinear” or matrix style layout. By those metrics this is something like an ortholinear keyboard in that its switches overlap their neighbors by half, but the edge to edge close packed caps imply that it might be something else.  We’d be very interested to know how typing on this beast would be!

There were so many more awesome designs present at the meetup that this would never end if we tried to document them all. Take a look through the posts and call out anything else too excellent to go unnoticed!

Thanks [obra] for Tweeting about this so we could discover it.

What Happened With Supermicro?

Back in October 2018, a bombshell rocked the tech industry when Bloomberg reported that some motherboards made by Supermicro had malicious components on them that were used to spy or interfere with the operation of the board, and that these motherboards were found on servers used by Amazon and Apple. We covered the event, looking at how it could work if it were true. Now seven months have passed, and it’s time to look at how things shook out.

Continue reading “What Happened With Supermicro?”

From Software To Tindie Hack Chat With Brian Lough

Join us Wednesday at noon Pacific time for the From Software to Tindie Hack Chat!

Brian Lough has followed a roundabout but probably not unusual route to the hardware hacking scene. Educated in Electronic and Computer Engineering, Brian is a software developer by trade who became enamored of Arduino development when the ESP8266 hit the market. He realized the microcontrollers such as these offered incredible capabilities on the cheap, and the bug bit him.

Since then, Brian has fully embraced the hardware hacking way, going so far as to live stream complete builds in a sort of collaborative “hack-along” with his viewers. He’s also turned a few of his builds into legitimate products, selling them on his Tindie store and even going so far as to automate testing before shipping to catch errors and improve quality.

Please join us for this Hack Chat, where we’ll discuss:

  • How software hacking leads to hardware hacking;
  • The creative process and how live streaming helps or hinders it;
  • The implications of going from project to product; and
  • What sorts of new projects might we see soon?

Continue reading “From Software To Tindie Hack Chat With Brian Lough”

Years Don’t Dim The Shine Of These Curious Gadgets

[Maarten Tromp] recently took the time to document some of the unusual and creative electronic projects he received as gifts over the years. These gadgets were created in the early 2000’s and still work flawlessly today. Two of our favorites are shown here: Hardware Tetris Unit (shown in the image above) and Heap of Electronic Parts.

The “Heap of Electronic Parts” makes sounds when in sunlight.

Heap of Electronic Parts was a kind of hardware puzzle and certainly lives up to its name. It’s a bunch of parts soldered in a mystifying way to the backs of four old EPROMs — the chips with the little window through which UV is used to erase the contents. Assured that the unit really did have a function, [Maarten] eventually figured out that when placed in sunlight, the device ticks, buzzes, and squeals. [Jeroen] had figured out that the EPROMs could act like tiny solar cells when placed in sunlight, and together the four generate just enough power to drive an oscillator connected to a piezo speaker. It still chirps happily away, even today.

Hardware Tetris plays in a terminal window.

Hardware Tetris Unit was a black box intended to be plugged into a serial port. With a terminal opened using the correct serial port settings, a fully-functional Tetris game using ASCII-art graphics could be played. It was even self-powered from the serial port pins.

Inside Hardware Tetris is an AVR microcontroller with some level shifters, and the source code and schematics are available for download. 14 years later, computers no longer have hardware serial ports but [Maarten] says a USB-to-serial converter worked just fine and the device still functions perfectly.

There are a couple more devices documented on [Maarten]’s gifts page, including a Zork-inspired mini text adventure and a hardware board that does some trippy demos on an old Nokia color LCD.  [Maarten]’s friend [Jeroen Domburg] (aka Sprite_tm) had a hand in creating most of the gadgets, and he’s someone whose brilliant work we have had the good fortune to feature many times in the past.

Being An SPI Slave Can Be Trickier Than It Appears

Interfacing with the outside world is a fairly common microcontroller task. Outside of certain use cases microcontrollers are arguably primarily useful because of how easily they can interface with other devices. If we just wanted to read and write some data we wouldn’t have gotten that Arduino! But some tasks are more common than others; for instance we’re used to being on the master side of the interface equation, not the slave side. (That’s the job for the TI engineer who designed the temperature sensor, right?) As [Pat] discovered when mocking out a missing SPI GPIO extender, sometimes playing the other role can contain unexpected difficulties.

The simple case for a SPI slave is exactly that: simple. SPI can be wonderful in its apparent simplicity. Unlike I2C there are no weird addressing schemes, read/write bits, stop and start clock conditions. You toggle a clock line and a bit of data comes out, as long as you have the right polarity schemes of course. As a slave device the basic algorithm is of commensurate complexity. Setup an interrupt on the clock pin, wait for your chip select to be asserted, and on each clock edge shift out the next bit of the current word. Check out [Pat]’s eminently readable code to see how simple it can be.

But that last little bit is where the complexity lies. When you’re the master it’s like being the apex predator, the king of the jungle, the head program manager. You dictate the tempo and everyone on the bus dances to the beat of your clock edge. Sure the datasheet for that SRAM says it can’t run faster than 8 MHz but do you really believe it? Not until you try driving that clock a little quicker to see if there’s not a speedier transfer to be had! When you’re the slave you have to have a bit ready every clock edge. Period. Missing even a single bit due to, say, an errant print statement will trash the rest of transaction in ways which are hard to detect and recover from. And your slave code needs to be able to detect those problems in order to reset for the next transaction. Getting stuck waiting to send the 8th bit of a transaction that has ended won’t do.

Check out [Pat]’s very friendly post for a nice refresher on SPI and their discoveries working through the problems of building a SPI slave. There are some helpful tips about how to keep things responsive in a device performing other tasks.