Little RC Car Project Takes Inspiration From Mario Kart

RC cars used to be pretty simple. They’d go forwards, backwards, and steer if you got a full-function toy. However, with modern technology, it’s pretty trivial to make them more advanced. [Stuck at Prototype] demonstrates that nicely with his little Micro Racer Cars.

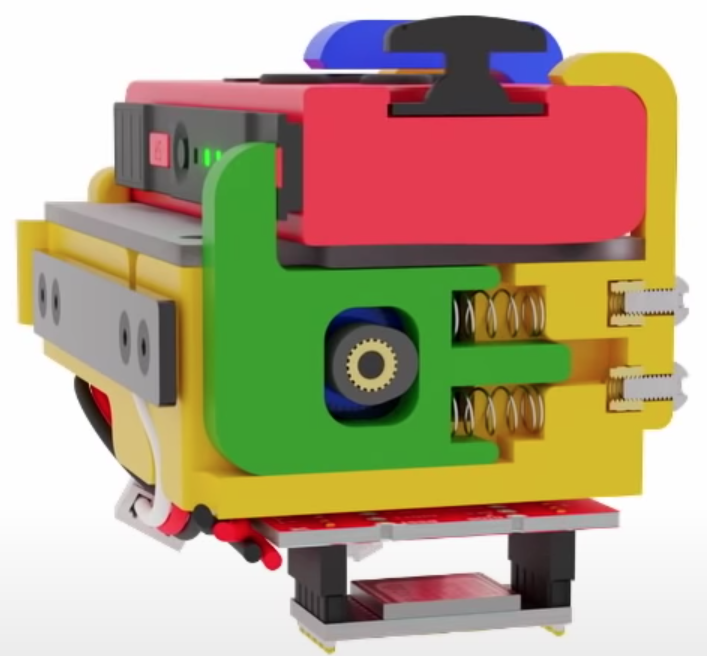
Each little RC car has its own ESP32 running the show, hooked up with a motor controller running a small DC gear motor at each wheel. Power is from a lithium-polymer battery on board the car, which is charged via USB C. 3D-printed components form the chassis and body of the vehicle. [Stuck at Prototype] set the cars up so they could be controlled via a smartphone app, or via a custom RC controller of his own design. He liked the latter solution after he realized how hard apps were to maintain. He also gave the cars a little color sensor so they could detect color patches on the ground, so they could change their behavior in turn. This was to create gameplay like Mario Kart, where hitting a color patch might make the car go fast, go slow, or spin out.

The video goes into great detail about everything these tiny tabletop racers can do. The racer cars were initially intended to be a Kickstarter funded project, but it never quite reached its goal. Instead, [Stuck at Prototype] decided to release the designs online instead, putting the relevant files on Github.

We’ve seen some other neat RC projects before, too. Video after the break.

Continue reading “Little RC Car Project Takes Inspiration From Mario Kart”

Swapping Nunchucks For A Steering Wheel

Rather than chasing pure performance and high quality graphics like other gaming companies, Nintendo has made a name for themselves over the last few decades by favoring not only artistic design and gameplay, but the physical design of the game systems. Of course the hybrid handheld Switch console is among these, but it also includes things like the novel design of the Nintendo 64 controller and, of course, the Wii nunchuck controllers. They’re not always met with resounding approval, though. Some of us tend to prefer more traditional gamepad design, and will go to extreme lengths to get it like this D-pad for playing Mario Kart Wii.

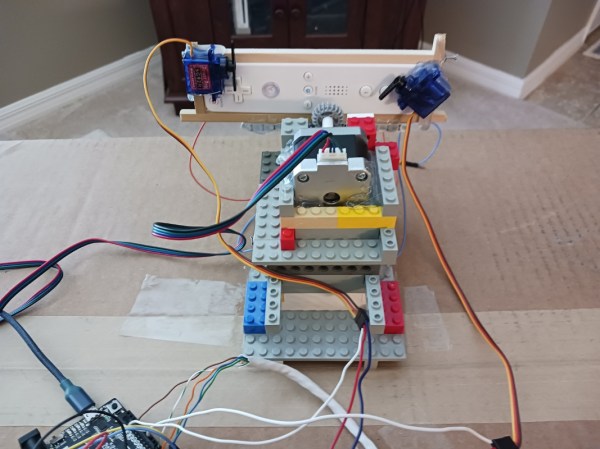
Rather than simply building a compatible controller for the Wii, or even using a GameCube controller, this controller setup takes a more roundabout approach. A Wiimote is placed in a holster built from Lego, and the game is set up to recognize it as if it were being used in its steering wheel mode. The Lego holster has a servo attached which can tilt the Wiimote from side to side, mimicking a player holding it to play the game, with another set of servos set up to press the various buttons. To control the controller, a homebrew D-pad built on perfboard with an Arduino at its core is used to send commands to the servos, allowing for a more standard controller layout to be used for the classic kart racing game than the steering wheel Wiimote allows.

While it’s quite obvious that there are simpler, easier solutions that avoid the sometimes awkward nature of using Wiimotes, we certainly appreciate the Rube Goldberg-like approach to setting up your gaming experience exactly the way you like. Whether that’s setting up an antique CRT effect for the authentic retro gaming experience or building a complete racing simulator from scratch, the gaming experience is ripe for personalization and unique builds like this one.

Continue reading “Swapping Nunchucks For A Steering Wheel”

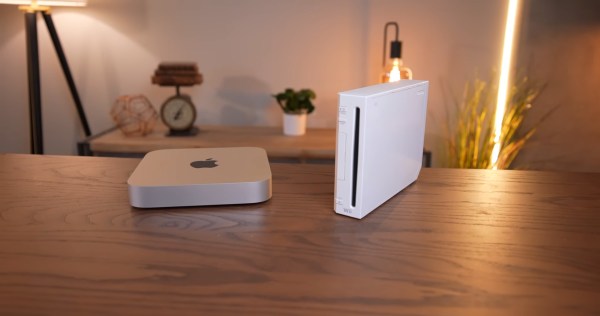
An M1 Mac mini sits next to a white Wii on a wooden table. In the background are various Edison-style LED light fixtures with an incadescent-like light profile.

This Wii Has An Apple M1 Inside

The conveniently tiny logic board of the M1 Mac mini has lead to it giving the Mini ITX format a run for its money in case mods. The latest example of this is [Luke Miani]’s M1 Wii. (Youtube via 9to5Mac)

[Miani] chose the Wii as a new enclosure for this Mac mini given its similar form factor and the convenient set of doors in the top to maintain access to the computer’s I/O, something he wasn’t able to do with one of his previous M1 casemods. The completed build is a great stealth way to have a Mac mini in your entertainment center. [Miani] even spends the last several minutes of the video showing the M1 Wii running Wii, GameCube, and PS2 games to really bring it full circle.

A Microsoft Surface power brick was spliced into the original Wii power cable since the Wii PSU didn’t have enough wattage to supply the Mac mini without significant throttling. On the inside, the power runs through a buck converter before making its way to the logic board. While the Mini’s original fan was too big to fit inside the Wii enclosure, a small 12V fan was able to keep performance similar to OEM and much higher than running the M1 fanless without a heat spreader.

If you’d like to see some more M1 casemods, check out this Lampshade iMac or the Mac Mini Mini.

Continue reading “This Wii Has An Apple M1 Inside”

This Joy-Con Grip Steers Its Way To Sweaty Victory

Here at Hackaday we’re always exited to see hacks that recycle our favorite childhood consoles into something new and interesting. In that context, it’s not so uncommon to see mods which combine new and unusual control methods with old devices in ways that their manufacturers never intended. What [Mike Choi] has built with the Labo Fit Adventure Kit is the rare hack that combines radically new control schemes with a modern console: without actually modifying any hardware.

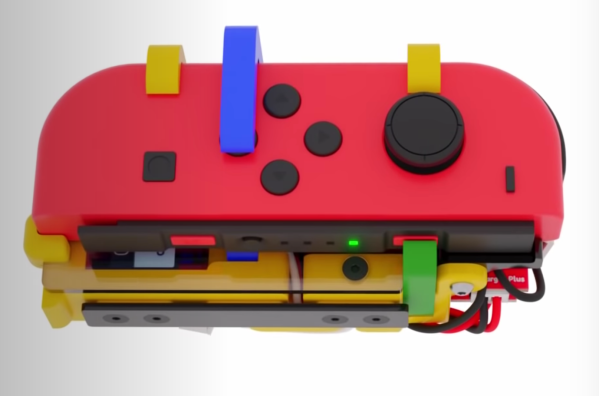
Face button pusher in blue

In short, the Labo Fit Adventure Kit lets the player play Mario Kart on the Nintendo Switch by riding a stationary exercise bike, steering with a wheel, and squeezing that wheel to use items. The Fit Kit combines the theme of Labo, Nintendo’s excellent cardboard building kit for the Nintendo Switch with the existing Ring-Con accessory for the unrelated Nintendo game Ring Fit Adventure plus a collection of custom hardware to tie it all together. That hardware senses cadence on the stationary bike, watches for the user to squeeze the handheld wheel controller, and translates those inputs to button presses on the controller to play the game.

Shoulder button pusher in green

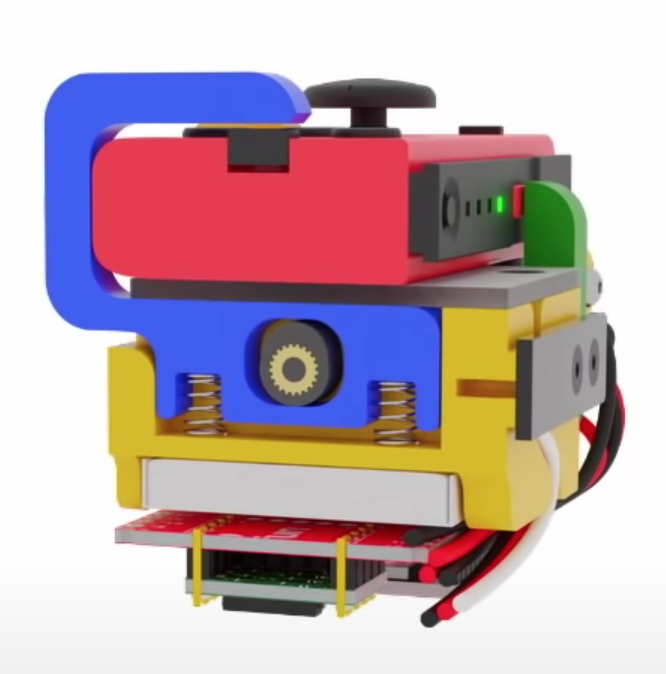
The most fascinating element of this project is the TAPBO module which adapts the Joy-Con controller to remote input. The module includes electronics, actuators, and a clever mechanical design to allow it to be mounted to the Ring-Con in place of an unmodified Joy-Con. Electrically the components will be familiar to regular Hackaday readers; there is a breakout board for a Teensy which also holds an XBee module to receive inputs remotely and drive a pair of servos. The entire module is described in detail starting at 4:42 in the video.

Mechanically the TAPBO relies on a pair of cam-actuated arms which translate rotational servo motion into linear action to press shoulder or face buttons. The module directly measures flex of the Ring-Con with an added flexible resistor and receives cadence information from another module embedded in the stationary bike via Zigbee. When these inputs exceed set thresholds they drive the servos to press the appropriate controller buttons to accelerate or use an item.

We’ve focused pretty heavily on the technical aspects of this project, but this significantly undersells the level of polish and easy to understand documentation [Mike] has produced. It includes a TAPBO Amiibo in customized packaging, and more. Check out the full video to get the complete scope of this project.

Continue reading “This Joy-Con Grip Steers Its Way To Sweaty Victory”

Does This Demo Remind You Of Mario Kart? It Should!

Here’s a slick-looking VGA demo written in assembly by [Yianni Kostaris]; it’s VGA output from an otherwise stock ATmega2560 at 16MHz with no external chips involved. If you’re getting some Super Mario Kart vibes from how it looks, there’s a good reason for that. The demo implements a form of the Super Nintendo’s Mode 7 graphics, which allowed for a background to be efficiently texture-mapped, rotated, and scaled for a 3D effect. It was used in racing games (such as Super Mario Kart) but also in many others. A video of the demo is embedded below.

[Yianni] posted the original demo a year earlier, but just recently added detailed technical information on how it was all accomplished. The AVR outputs VGA signals directly, resulting in 100×120 resolution with 256 colors, zipping along at 60 fps. The AVR itself is not modified or overclocked in any way — it runs at an entirely normal 16MHz and spends 93% of its time handling interrupts. Despite sharing details for how this is done, [Yianni] hasn’t released any code, but told us this demo is an offshoot from another project that is still in progress. It’s worth staying tuned because it’s clear [Yianni] knows his stuff.

Continue reading “Does This Demo Remind You Of Mario Kart? It Should!”

Electric Go Kart has More Features than a Tesla

Making Mario Kart Real

If you’ve ever had a casual go-kart experience, you might be able to relate to [HowToLou]. He noticed that whenever he tried to race, the same situation inevitably always happened. One racer would end up in front of the pack, and no one else would be able to pass them. The result was more of a caravan of go-karts than an actual race. That’s when he realized that video games like Mario Kart had already figured out how to fix this problem long ago. [Lou] took ideas from these games and implemented them onto a real life go-kart in order to improve the experience. The result is what he calls a Flash Kart.

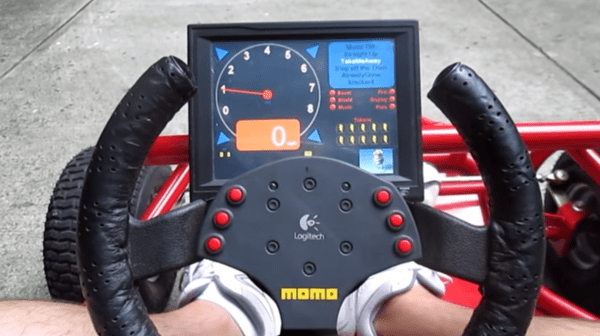
The key to improving the experience was to add more features that you don’t normally get in a real word go-karting experience. The Flash Kart uses an electronic drive system that is controlled by computer. This setup allows the computer to limit the speed of the kart so they are all the same. The system includes a Logitech gaming steering wheel with built-in control buttons. There is also a color LCD screen mounted as a heads up display. The screen displays the racer’s speed in miles per hour, as well as multiple MP3 music tracks to choose from. The system provides the user with a limited number of speed boost tokens, listed on the heads up display. The user can also view their current ranking, their location on the track, or even get a view directly behind them.

The back of the kart includes a 23″ LCD screen that shows other players who you are and what team you are on. For added fun, the rider can display taunting messages to other racers using this screen. The front of the kart includes a laser cannon for shooting other karts as well as a “token scoop” sensor. This allows the riders to pick up virtual items such as laser cannon ammo, shields, or extra speed boost tokens.

To pack in all of this added functionality, [Lou] started with a typical go-kart chassis. From there, he built a custom fiber glass shell for the back-end. This houses most of the sensitive electronics. The system is powered by three 12V deep cycle batteries. A 15HP electric motor drives the rear wheels. The throttle is controlled with a gas pedal that simply feeds to a sensor that is hooked up to the control computer. The heart of the system is a computer that runs on a 2.6Ghz small footprint Zotac motherboard with Windows XP. The software is custom written in C#. The computer is plugged into a miniLAB 1008 interface board. This is how it communicates with all of the various sensors. The interface board is also used to control a number of relays which in turn control the speed of the kart.

Unfortunately [Lou] built this kart years ago and doesn’t include many details about what sensors he is using, or how the software works. Still, this was such a cool idea that we had to share it. Be sure to watch [Lou’s] video below to see the kart in action. Continue reading “Making Mario Kart Real”

RomoCart, Indoor Robot Racing

Your Living Room Becomes Next Mario Kart Course

[Ken] likes his living room and he is on a continual mission to make it more interesting. Recently, he has made a giant leap forward with a racing game project he calls RomoCart. Think of it as a partially-physical game of Mario Kart. You are able to race others around a track while still having the ability to fire projectiles or drop defensive measures in efforts to win the race!

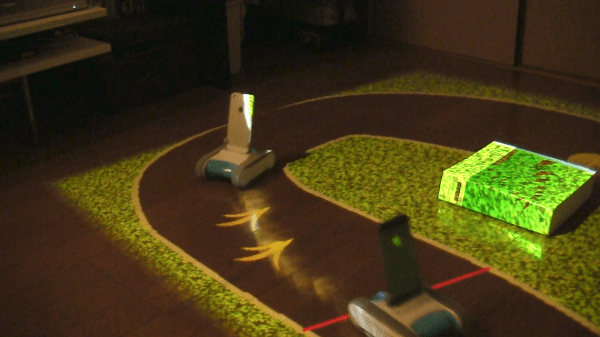
First, lets talk about the hardware required. The racers are standard Romo educational robots. Wireless game controllers provide the means for the drivers to control the Romos. Hanging from the ceiling is an Xtion motion sensing camera and a video projector, both pointed down at the floor.

To get started, the system scans the floor and determines a race course based on the room layout and any physical objects in the vicinity. A course is then generated to avoid the obstacles and is projected onto the floor. At this point it would still be a pretty neat project but [Ken] went way further. The ceiling-mounted camera tracks the motion of the Romos driving around the track and the video projector displays a smoke trail behind each racer. Randomly displayed on the track are items to help you win the race, including an acceleration item that makes your Romo go twice as fast for a short time.

Have a tailgater? No problem, just pick up some bananas and drop them on the track. If a following competitor drives into one, they spin out. If you want to get super rude, pick up some missiles and fire them at the racers ahead of you. A direct hit will stop them right in their tracks.

[Ken] is no stranger to HaD, he’s had a few of his projects covered here before. Check out his Tempescope, Moving Window and his Autonomous Lighting System.

Check out a video of the racing in action after the break. It is amazing!

Continue reading “Your Living Room Becomes Next Mario Kart Course”