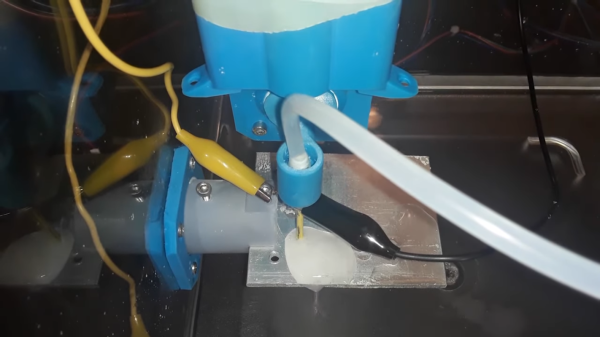
Plasma Cutter Gets CNC Treatment At Low Cost

[Daniel] has been metalworking on a budget for a while now. Originally doing things like plasma cutting on old bricks, he used his original plasma cutter to make an appropriate plasma cutting table complete with a water bath which we presume was not only safer but better for his back. Since then he’s stepped up a little more with what might be the lowest-cost CNC plasma cutter that can reliably be put together.

The CNC machine uses a handheld plasma cutting torch as its base, which uses a blowback start mechanism making it usable in an automated CNC setup without interfering with the control electronics. This is a common issue with other types of plasma cutters not originally meant for CNC. The torch head only needs slight modifications to fit in a 3D printed housing designed for the CNC machine which involves little more than slightly changing the angle of the incoming copper tubing and wire and changing the location of the trigger.

With those modifications done, the tool head is ready to be mounted to the CNC machine. [Daniel] has put together a bill of materials for building the entire project for less than $400, which includes the sub-$200 plasma cutter. It’s an impressive bit of sleuthing to get the price down this low, but if you’re still using your plasma cutter by hand on bricks in the yard like [Daniel] used to do make sure to check out that DIY plasma cutting table he built a few years ago too.

Continue reading “Plasma Cutter Gets CNC Treatment At Low Cost”

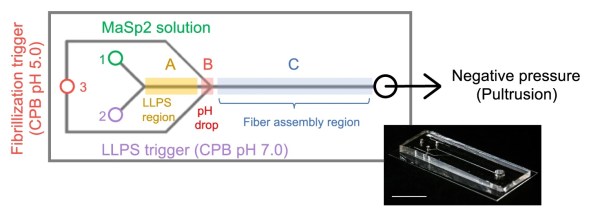
A line-art diagram of the microfluidic device. On the left, in red text, it says "Fibrillization trigger (CPB pH 5.0). There is a rectangular outline of the chip in grey, with a sideways trapezoid on the left side narrowing until it becomes an arrow on the right. At the right is an inset picture of the semi-transparent microfluidic chip and the text "Negative Pressure (Pultrusion)." Above the trapezoid is the green text "MaSp2 solution" and below is "LLPS trigger (CPB pH 7.0)" in purple. The green, purple, and red text correspond with inlets labeld 1, 2, and 3, respectively. Three regions along the arrow-like channel from left to right are labeled "LLPS region," "pH drop," and in a much longer final section "Fiber assembly region."

Synthetic Spider Silk

While spider silk proteins are something you can make in your garage, making useful drag line fibers has proved a daunting challenge. Now, a team of scientists from Japan and Hong Kong are closer to replicating artificial spider silk using microfluidics.

Based on how spiders spin their silk, the researchers designed a microfluidic device to replicate the chemical and physical gradients present in the spider. By varying the amount of shear and chemical triggers, they tuned the nanostructure of the fiber to recreate the “hierarchical nanoscale substructure, which is the hallmark of native silk self-assembly.”

We have to admit, keeping a small bank of these clear, rectangular devices on our desk seems like a lot less work than keeping an army of spiders fed and entertained to produce spider silk Hackaday swag. We shouldn’t expect to see a desktop microfluidic spider silk machine this year, but we’re getting closer and closer. While you wait, why not learn from spiders how to make better 3D prints?

If you’re interesting in making your own spider silk proteins, checkout how [Justin Atkin] and [The Thought Emporium] have done it with yeast. Want to make your spider farm spiders have stronger silk? Try augmenting it with carbon.

Transform An Original Xbox Controller To A 360 Controller

If you’re looking for a controller for your computer or mobile device, you could certainly do worse than one of the latest iterations of the Xbox pad. They might not be perfect, but they’re fairly well-made, not particularly expensive, use standard USB and Bluetooth interfaces, and even have decent support in the open-source community. So if you’re gaming on Linux or working on any other kind of retro gaming rig it’ll likely be plug-and-play.

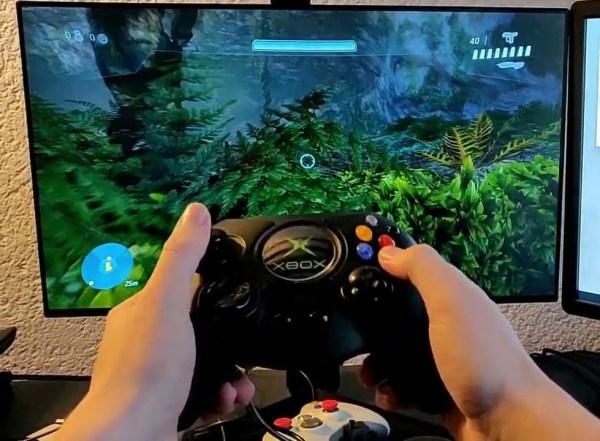
This wasn’t the case with the first generation Xbox controller, though, and although its proprietary connector was actually using USB, the controller scheme wasn’t as open. This is [Tom]’s effort of upcycling his original Xbox controller to work indistinguishably from a stock Xbox 360 controller.

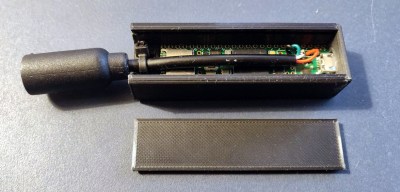
For those asking why anyone would want to do this, [Tom] is actually one of the few who enjoyed the original bulky Xbox “Duke” controller that released with the console in 2001. It wasn’t a popular choice in the larger gaming community and a year later Microsoft released a smaller version, but we all have our quirks. A Teensy 4.1 is attached to the end of the controller cable and acts as an intermediary to intercept the proprietary signalling coming from this controller and convert it into something usable. Since the controller doesn’t even show up as a standard USB HID device it took a little more sniffing of the protocol to decipher what was going on at all, but eventually some help was found within this other driver that gave [Tom] the clues he needed to get it working.

There were some other headaches to this project as well, especially since USB debugging USB connections while using USB isn’t exactly a streamlined process, but after a couple of breakthroughs the Teensy pass-through interface began working and [Tom] can use his controller of choice across multiple platforms now. If you’re looking to upgrade in other ways take a look at this build which seeks to recalibrate, rather than replace, an older Xbox controller experiencing drift on its analog control sticks.

Continue reading “Transform An Original Xbox Controller To A 360 Controller”

Mouse Charging Mod Shows Even Simple Hacks Can End Up Complex

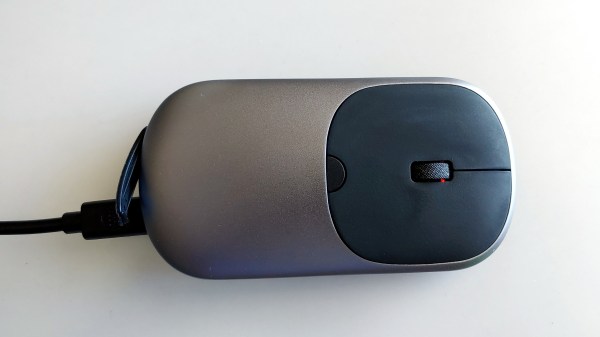
Hardware hacks have something in common with renovations that involve taking down a wall: until one actually gets started and opens things up, there’s no telling what kind of complications might be lurking. [voussoir] has a project that demonstrates this nicely: modifying a rechargeable mouse to use USB-C instead of micro-B turned out to have quite a few little glitches in the process. In fact, changing the actual receptacle was the simplest part!

On one hand, the mouse in question seems like a perfect candidate for easy modification. The enclosure isn’t too hard to open, there is ample space inside, and USB is used only for recharging the battery. So what was the problem? The trouble is something familiar to anyone who has worked on modifying an existing piece of hardware: existing parts are boundaries to hacking work, and some are less easily modified than others. Continue reading “Mouse Charging Mod Shows Even Simple Hacks Can End Up Complex”

3D Printer Cuts Metal

Every now and then we’ll see a 3D printer that can print an entire house out of concrete or print an entire rocket out of metal. But usually, for our budget-friendly hobbyist needs, most of our 3D printers will be printing small plastic parts. If you have patience and a little bit of salt water, though, take a look at this 3D printer which has been modified to cut parts out of any type of metal, built by [Morlock] who has turned a printer into a 5-axis CNC machine.

Of course, this modification isn’t 3D printing metal. It convers a 3D printer’s CNC capabilities to turn it into a machining tool that uses electrochemical machining (ECM). This process removes metal from a work piece by passing an electrode over the metal in the presence of salt water to corrode the metal away rapidly. This is a remarkably precise way to cut metal without needing expensive or heavy machining tools which uses parts that can easily be 3D printed or are otherwise easy to obtain. By using the 3D printer axes and modifying the print bed to be saltwater-resistant, metal parts of up to 3 mm can be cut, regardless of the type of metal used. [Morlock] also added two extra axes to the cutting tool, allowing it to make cuts in the metal at odd angles.

Using a 3D printer to perform CNC machining like this is an excellent way to get the performance of a machine tool without needing to incur the expense of one. Of course, it takes some significant modification of a 3D printer but it doesn’t need the strength and ridigity that you would otherwise need for a standard CNC machine in order to get parts out of it with acceptable tolerances. If you’re interested in bootstraping one like that using more traditional means, though, we recently featured a CNC machine that can be made from common materials and put together for a minimum of cost.

Continue reading “3D Printer Cuts Metal”

THICC GBA SP Mod Gets Easy Install Ahead Of Release

Back in August we covered a unique modification for the Nintendo Game Boy Advance SP which replaced the handheld’s rear panel with an expanded version that had enough internal volume for an upgraded battery, a Bluetooth audio transmitter, and support for both Qi wireless and USB-C charging. The downside was that getting the 10 mm 3D printed “backpack” installed wasn’t exactly the most user-friendly operation.

But today we’re happy to report that the dream team behind the so-called THICC BOI SP have not only made some huge improvements to the mod, but that they intend to release it as a commercial kit in the next few months. The trick to making this considerable upgrade a bit more forgiving is the use of a bespoke flat flex cable that easily allows the user to solder up all the necessary test points and connections, as well as a custom PCB that pulls together all the hardware required.

In the video below, [Tito] of Macho Nacho Productions goes over the latest version of the mod he’s been working on with [Kyle] and [Helder], and provides a complete step-by-step installation tutorial to give viewers an idea of what they’ll be in for once the kit goes on sale. While it’s still a fairly involved modification, the new design is surprisingly approachable. As we’ve seen with previous console modifications, the use of flat flex technology means the installation shouldn’t pose much of a challenge for anyone with soldering experience.

The flat flex cable allows for an exceptionally clean install.

Some may be put off by the fact that the replacement rear panel is even thicker this time around, but hopefully the unprecedented runtime made possible by the monstrous 4,500 mAh LiPo battery pack hiding inside the retrofit unit will help ease any discomfort (physical or otherwise) you may have from carrying around the chunkier case. Even with power-hungry accouterments like an aftermarket IPS display and a flash cart, the new battery can keep your SP running for nearly 20 hours. If you still haven’t beaten Metroid: Zero Mission by then, it’s time to take a break and reflect on your life anyway.

According to [Tito], the logistical challenges and considerable upfront costs involved in getting the new rear panels injection molded in ABS is the major roadblock holding the release of the kit back right now. The current prototypes, which appear to have been 3D printed in resin, simply don’t match the look and feel of the GBA SP’s original case well enough to be a viable option. A crowd funding campaign should get them over that initial hump, and we’ll be keeping an eye out for more updates as things move along towards production.

The previous version of this mod was impressive enough as a one-off project, but we’re excited to see the team taking the next steps towards making this compelling evolution of the GBA more widely available. It’s a fantastic example of what’s possible for small teams, or even individuals, when you leverage all the tools in the modern hardware hacking arsenal.

Continue reading “THICC GBA SP Mod Gets Easy Install Ahead Of Release”

Custom Keyfob Fixes Mazda Design Mistake

While Mazda has made some incredible advances in fuel efficient gasoline engines over the past few years, their design group seems to have fallen asleep at the wheel in the meantime, specifically in regards to the modern keyfob design. The enormous size and buttons on the side rather than the face are contrary to what most people need in a keyfob: small size and buttons that don’t accidentally get pressed. Luckily, though, the PCB can be modified with some effort.

This particular keyfob has a relatively simple two-layer design which makes it easy to see where the connections are made. [Hack ‘n’ Tink] did not need the panic button or status LED which allowed him to simply cut away a section of the PCB, but changing the button layout was a little trickier. For that, buttons were soldered to existing leads on the face of the board using 30-gage magnet wire and silicone RTV. From there he simply needed to place the battery in its new location and 3D print the new enclosure.

The end result is a much smaller form factor keyfob with face buttons that are less likely to accidentally get pressed in a pocket. He also made sure that the battery and button relocation wouldn’t impact the antenna performance. It’s a much-needed improvement to a small but crucial part of the car; the only surprise is that a company that’s usually on point with technology and design would flop so badly on such a critical component.

Thanks to [Brian] for the tip!

Continue reading “Custom Keyfob Fixes Mazda Design Mistake”