Emulating Oric-1 Floppy Disk Hardware

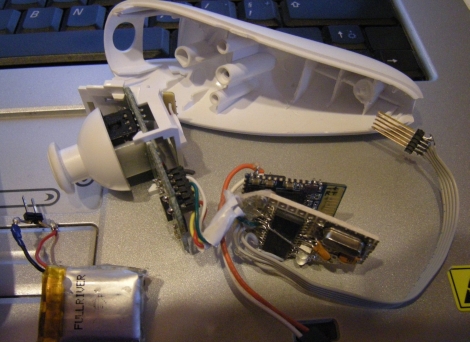
This device is called the Cumulus and it’s used to emulate the floppy disk hardware for Oric-1 and Oric Atmos computers. These 1980’s era computers included an expansion slot to which you could connect a floppy drive. That module, called a Microdisc system, also included the driver circuit which means you can’t just use a modern-day floppy drive as a replacement. [Retromaster] sidestepped the need for magnetic media all together by building an SD card interface which emulates the original module. We can tell by the use of a color screen and clean board layout that a lot of love went into the project. A CPLD implements the communications protocol used by the Microdisc system and creates all of the registers that would have been found on the original hardware. A PIC takes care of the SD card communications and the user interface.

With the exception of comforting noises, we’d bet there are few who have fond memories of using floppy disks. No wonder we’ve been seeing hacks to replace them quite a bit lately.

wireless_nunchuck

Bluetooth-enabled Wii Nunchuck

The wireless controller for the Nintendo Wii has been used in many a hack due to its simple to use Bluetooth interface. The nunchuck portion of the controller however, has always required a physical tether to the wireless controller, or an aftermarket wireless dongle. [Rousselmanu] is looking to change that with his Bluetooth-enabled wireless Wii nunchuck. He is able to retrieve a slew of data from the nunchuck, including information from all of the accelerometers, buttons, as well as the joystick. The data is read into a PIC MCU and relayed via serial to a Bluetooth module he purchased online.

The Bluetooth module looks fairly easy to interface in Linux, and [Rousselmanu] has a video showing off how well the nunchuck can be used to interact with 3D models. He admits that the controller is a bit ugly at the moment as all the components don’t quite fit so well, but future revisions will surely remedy that.

Keep reading to see a video of the nunchuck in action.

Continue reading “Bluetooth-enabled Wii Nunchuck”

Fingertip Heart Rate Monitor

[Embedded lab] has a nice tutorial on building your own heart rate monitor. The monitor works by shining infrared light into the fingertip and looking at the changes in the reflected infrared signal caused by a heartbeat.  The IR detector produces a very small AC signal so a couple of op-amps are used to filter and amplify the signal. The output of the filter circuit is then read in by a PIC16F628A, which counts the beats and displays it on a seven segment display.  This might be a good project to try if you’ve got your microcontrollers down and you are looking to learn some analog electronics. Its noted at the end that the two main problems with building a circuit like this are going to be cross talk and adjusting the filters. The infrared diode and receiver should be close to each other to allow maximum reflection but you also need to make sure that you don’t allow the emitter to shine directly into the detector because the reflected light will be drowned out by the bright emitter.

[via make]

Classical’s Greatest Hits On Hardware’s Greatest Flops

We get a lot of tips about old hardware playing recognizable tunes. But once in a while one of these projects goes above and beyond the others and this is a shining example of great hardware music. [FunToTheHead] put together a music video (embedded after the break) that shows his custom MIDI device playing Bach’s Toccata in d minor. He left some comments that clue us into the way he did it. Most obviously, he’s using the stepper motors from four floppy drives to create precisely pitched sounds. Internally, a PIC 18F14K50 acts as a MIDI-over-USB device, taking commands for all 128 MIDI notes as well as the pitch bends associated with them. The first four channels are played directly on each drive and the other twelve are triaged among the hardware by the microprocessor. But for the results heard in the video you’ll need to code your MIDI files by hand.

Bonus points to the video editor for the Phantom’s floppy-laden appearance in the video… it’s good to laugh!

Continue reading “Classical’s Greatest Hits On Hardware’s Greatest Flops”

38 KHz IR Communications Tutorial

Learning about how infrared remote controls work is a great way to expand your electronics knowledge. That’s because this technology is invisible to our eye, and happening faster than we can comprehend without help from test equipment. This tutorial over at Pyroelectro talks about the theory behind how the data is transferred and shows you how to build a couple of circuits to experiment with and communicate through infrared light transmissions.

Instead of going with an IR receiver module you’ll build your own using a photo-transistor and an operational amplifier. The Opamp is used to amplify and invert the signal picked up from the IR transmission of a common home entertainment remote control. From there the digital signal is read by a PIC 18F452 microcontroller for processing. But if you want to use a different microcontroller there’s still more than enough usable information to get you across the finish line.

What Development Board To Use? (Part Two)

We asked for responses to our last Development Board post, and you all followed through. We got comments, forum posts, and emails filled with your opinions. Like last time, there is no way we could cover every board, so here are a few more that seemed to be popular crowd choices. Feel free to keep sending us your favorite boards, we may end up featuring them at a later date!

Continue reading “What Development Board To Use? (Part Two)”

NES Game Pad Guided Robotic Arm

nes_robotic_arm

Instructables user [Bruno] sent in his most recent creation, a robotic arm controlled using an old NES game pad. He scavenged the majority of his parts from a pair of old HP printers, including motors pulleys, belts and more. In fact, most of the metal and plastic components that he used come from the old printer chassis as well. He has included copies of the templates he used when manufacturing both the plastic and metal components, which should come in handy should anyone try to replicate his work.

[Bruno] also included all of the source code for the robotic arm and mentions that the project required two PICs due to pinout requirements. He ultimately decided to use two cheaper models over a single more expensive unit that would have supplied all of the pins he needed. His cost conscious build is impressive and undoubtedly demonstrates just how many old components can be reused in new projects if you really put some thought into it. Great job with this build, keep up the good work!

Be sure to keep reading to see some video of the arm in action.

Continue reading “NES Game Pad Guided Robotic Arm”