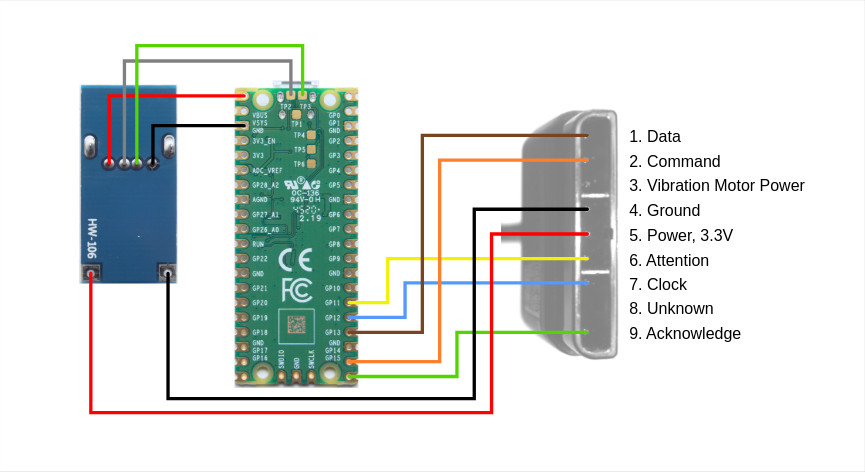
PicoEMP EMFI tool

Glitch Your Way To Reverse-Engineering Glory With The PicoEMP

Most of our projects are, to some extent, an exercise in glitch-reduction. Whether they’re self-inflicted software or hardware mistakes, or even if the glitches in question come from sources beyond our control, the whole point of the thing is to get it running smoothly and predictably.

That’s not always the case, though. Sometimes inducing a glitch on purpose can be a useful tool, especially when reverse engineering something. That’s where this low-cost electromagnetic fault injection tool could come in handy. EMFI is a way to disrupt the normal flow of a program running on an embedded system; properly applied and with a fair amount of luck, it can be used to put the system into an exploitable state. The PicoEMP, as [Colin O’Flynn] dubs his EMFI tool, is a somewhat tamer version of his previous ChipSHOUTER tool. PicoEMP focuses on user safety, an important consideration given that its business end can put about 250 volts across its output. Safety features include isolation for the Raspberry Pi Pico that generates the PWM signals for the HV section, a safety enclosure over the HV components, and a switch to discharge the capacitors and prevent unpleasant surprises.

In use, the high-voltage pulse is applied across an injection tip, which is basically a ferrite-core antenna. The tip concentrates the magnetic flux in a small area, which hopefully will cause the intended glitch in the target system. The video below shows the PicoEMP being used to glitch a Bitcoin wallet, as well as some tests on the HV pulse.

If you’re interested in the PicoEMP and glitching in general, be sure to watch out for [Colin]’s 2021 Remoticon talk on the subject. Until that comes out, you might want to look into glitching attacks on a Nintendo DSi and a USB glitch on a Wacom tablet.

Continue reading “Glitch Your Way To Reverse-Engineering Glory With The PicoEMP”

Digital Rain Animation Crammed Into Pi Pico

With a new Matrix movie now in cinemas, we’ve all been reminded of those screensavers that were just the coolest thing ever when the original film dropped in 1999. [en0b] decided to recreate the classic “digital rain” effect on the Raspberry Pi Pico, using up all the little microcontroller’s storage in the process.

Rather than rely on existing graphics libraries, [en0b] set about using a high-quality GIF for the animation. The original file was 8 MB, which was far too big to fit on the Pico. After some finagling in an image editor and with the help of a custom Python script, however, [en0b] managed to fit the 127-frame animation at 240 x 135 resolution into the 2 MB Flash onboard the chip. With the microcontroller hooked up to the 1.14″ IPS “Pico Display” from Pimoroni, the final looks great and faithfully recreates the aesthetic seen in the film.

[en0b]’s technique could reliably be used for displaying any GIF that you can cut down to 14 to 16 colors without losing too much quality. It’s not the world’s highest-end graphics format, but it does the job for little animations like these.

We’ve seen similar builds before too, using more heavy-duty hardware to build a magic 8-ball in much the same way. Meanwhile, if you’ve got your own neat little GIF hacks or Pico projects, don’t hesitate to send them in!

Raspberry Pi Pico Gets A Tiny Keyboard On Its Back

With hackers and makers building custom computing devices that don’t necessarily follow conventional design paradigms, there’s been a growing demand for smaller and smaller keyboards. Many of the cyberdecks we’ve seen over the last couple of years have used so-called 60% or even 40% keyboards, and there’s been a trend towards repurposing BlackBerry keyboards for wearables and other pocket-sized gadgets. But what if you need something even smaller?

Enter this incredibly diminutive keyboard created by [TEC.IST]. With 59 keys crammed into an area scarcely larger than three US pennies, it may well be the smallest keyboard ever made. The PCB has been designed to mount directly onto the back of a Raspberry Pi Pico, which is running some CircuitPython code to read the switch matrix and act as a standard USB Human Interface Device. The board design files as well as the source code for the Pico have been released on the project’s Hackaday.io page, giving you everything you need to spin up your own teeny tiny input device.

The Pi Pico’s castellated pads make attaching the PCB a snap.

Of course, you probably won’t be breaking any speed records when banging out text on this thing. We know from past Hackaday badges that an array of microswitches make for a functional, if somewhat unpleasant, method of text entry.

Continue reading “Raspberry Pi Pico Gets A Tiny Keyboard On Its Back”

A pair of RP2040-based USB microphones

Mico Is A USB Microphone Based On A Pi Pico

When [Mahesh Venkitachalam] was experimenting with machine learning for audio applications on a Raspberry Pi, he found himself looking for a simple USB microphone. A cheap one was easy to find, but the sound quality and directionality left much to be desired. A large, studio-quality mic would be overkill, so [Mahesh] decided to simply build exactly what was needed: a compact, yet high-quality USB microphone that he called Mico.

The sensing device is a MEMS microphone that outputs a pulse density modulated (PDM) signal. There are chips available to directly interface such a microphone to a USB port, but [Mahesh] found them difficult to work with and therefore settled on something he knew already: the Raspberry Pi Pico platform. Luckily, someone had already figured out how to read out a microphone and present a USB device to a PC, so all that was needed was to put all the bits together into a convenient form factor.

The great thing about the Pico platform is that its main controller chip, the RP2040, is available as a separate component. [Mahesh] designed a sleek little PCB that holds the RP2040 along with the MEMS microphone and a USB connector. The end result looks tidy enough that it might have come out of a mass-produced gizmo. Those don’t usually come with full schematics and source code, but the Mico does: everything is available on its GitHub page for anyone to re-use and improve.

You can judge the sound quality for yourself in the video embedded below. If you like DIY USB microphones, you’re in luck: we’ve featured one based on an STM32 as well as a beautiful recreation of a studio-quality mic.

Continue reading “Mico Is A USB Microphone Based On A Pi Pico”

PicoMite Gives Your Pico A Deluxe BASIC

What makes developing a microcontroller project quick and easy? Tops on our list are an interactive shell and comprehensive libraries that handle all the low-level peripheral stuff. You think we’re talking MicroPython? Not today! MMBasic has just been ported to the Raspberry Pi Pico dev board, and it has all the batteries included.

Just to give you a taste, it has built-in support for SD cards, all sorts of displays, touch screens, real-time clocks, IR remotes, numerous sensors, and of course WS2812 LED strips. And because all of this is baked into the BASIC, writing code to use any of these peripherals is straightforward.

Now, there’s BASIC and there’s BASIC. This is a modern BASIC: it has loops, functions, arrays, floating point, and a built-in full-screen editor. You connect to the Pico via UART, and you’re off to the races. If you’ve got a Pico sitting around, flash it and give it a try. Or check out the GitHub repository if you want to poke around in the internals.

This is a port of the BASIC that’s used on the Maximite virtual retrocomputer platform, which means that there are many working examples out there for you to crib from, and even a forum. Add in the incredibly nice user manual and tutorial (PDF), and you’ve got the perfect weekend afternoon.

Think MicroPython killed BASIC? Think again. BASIC is small enough that it can run where Python can’t, but that’s of course a more minimal experience. In contrast, MMBasic looks like it’s got all the toppings. The whole enchilada. It’s like BASIC Deluxe.

A conventiongoer plays Pokemon on a working Color Game Boy costume.

Convention Plays Pokemon On Giant Color Game Boy Costume

Standard cosplay is fun and all, but what is there for admirers to do but look you up and down and nitpick the details? Interactive cosplay, now that’s where it’s at. [Jaryd Giesen] knows this, and managed to pull together a working color Game Boy costume in a few days.

The original plan was to use a small projector on an arm, like one of those worm lights that helped you see the screen, but [Jaryd] ended up getting a secondhand monitor and strapping it to his chest. Then he took the rest of the build from there. Things are pretty simple underneath all that cardboard: there’s a Raspberry Pi running the RetroPie emulator, a Pico to handle the inputs, and two batteries — one beefy 12,000 mAH battery for the monitor, and a regular power pack for the Pi and the Pico.

As you’ll see in the build and demo video after the break, nearly 100 people stopped to push [Jaryd]’s buttons. They didn’t get very far in the game, but it sure looks like they had fun trying.

Since we’re still in a pandemic, you may want to consider incorporating a mask into your Halloween costume this year. Just a thought.

Continue reading “Convention Plays Pokemon On Giant Color Game Boy Costume”

Raspberry Pi Pico Used As A Transputer

You can’t fake that feeling when a $4 microcontroller dev board can stand in as cutting-edge 1980s technology. Such is the case with the working transputer that [Amen] has built using a Raspberry Pi Pico.

For a thorough overview of the transputer you should check out [Jenny List’s] longer article on the topic but boiled down we’re talking about a chip architecture mostly forgotten in time. Targetting parallel computing, each transputer chip has four serial communication links for connecting to other transputers. [Amen] has wanted to play with the architecture since its inception. It was expensive back then and today, finding multiple transputers is both difficult and costly. However, the RP2040 chip found on the Raspberry Pi Pico struck him as the perfect way to emulate the transputer design.

The RP2040 chip on the Pico board has two programmable input/output blocks (PIOs), each with four state machines in them. That matches up perfectly with the four transputer links (each is bi-directional so you need eight state machines). Furthermore, the link speed is spec’d at 10 MHz which is well within the Pico’s capabilities, and since the RP2040 runs at 133 MHz, it’s conceivable that an emulated core can get close to the 20 MHz top speed of the original transputers.

Bringing up the hardware has been a success. To see what’s actually going on, [Amen] sourced some link adapter chips (IMSC011), interfacing them through an Arduino Mega to a computer to use the keyboard and display. The transputer architecture allows code to be loaded via a ROM, or through the links. The latter is what’s running now. Future plans are to figure out a better system to compile code, as right now the only way is by running the original INMOS compiler on DOS in a VM.

Listen to [Amen] explain the project in the first of a (so far) six video series. You can find the links to the rest of those videos on his YouTube channel.

Continue reading “Raspberry Pi Pico Used As A Transputer”