Before Sending A Probe To The Sun, Make Sure It Can Take The Heat

This past weekend, NASA’s Parker Solar Probe took off for a journey to study our local star. While its mission is well covered by science literate media sources, the equally interesting behind-the-scenes information is a little harder to come by. For that, we have Science News who gave us a look at some of the work that went into testing the probe.

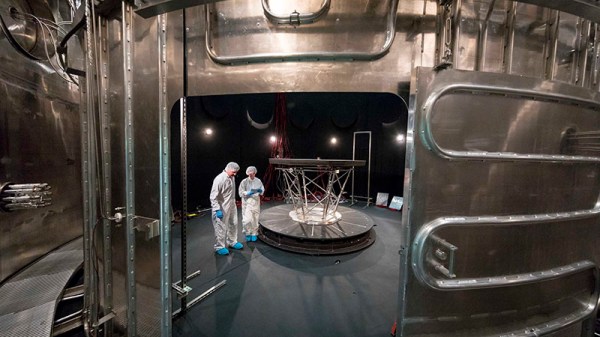
NASA has built and tested space probes before, but none of them were destined to get as close to the sun as Parker will, creating new challenges for testing the probe. The lead engineer for the heat shield, Elizabeth Congdon, was quoted in the article: “Getting things hot on Earth is easier than you would think it is, getting things hot on Earth in vacuum is difficult.” The team used everything from a concentrated solar facility to hacking IMAX movie projector lenses.

The extreme heat also posed indirect problems elsewhere on the probe. A rocket launch is not a gentle affair, any cargo has to tolerate a great deal of shock and vibration. A typical solution for keeping fasteners in place is to glue them down with an epoxy, but they’d melt where Parker is going so something else had to be done. It’s not all high technology and exotic materials, though, as when the goal was to verify that the heat shield was strong enough to withstand up to 20G of acceleration expected during launch, the test team simulated extra weight by stacking paper on top of it.

All that testing should ensure Parker can perform its mission and tell us a lot of interesting things about our sun. And if you got in on the publicity campaign earlier this year, your name is along for the ride.

Not enough space probe action for the day? We’ve also recently featured how creative hacking gave the exoplanet hunter Kepler a second lease on life.

Tiny Solar Energy Module (TSEM) Brings Big Performance

The Tiny Solar Energy Module (TSEM) by [Jasper Sikken] is not only physically tiny at one-inch square, but it is all about gathering tiny amounts of solar energy — amounts too small to be useful in a conventional sense — and getting meaningful work done, like charging a battery for later use. Elements that make this board easy to integrate into other projects include castellated vias, 1.8 V and 3.3 V regulated outputs that are active when the connected battery has a useful charge, and a low battery warning that informs the user of impending shutdown when the battery runs low. The two surface-mount solar cells included on the tiny board are capable of harvesting even indoor light, but the board also has connection points for using larger external solar cells if needed.

The board shows excellent workmanship and thoughtful features; it was one of the twenty Power Harvesting Challenge finalists chosen to head to the final round of The Hackaday Prize. The Hackaday Prize is still underway, with the Human-Computer Interface Challenge running until August 27th. That will be followed by the Musical Instrument Challenge before the finals spin up. If you haven’t started yet, there’s still time to make your mark. All you need is a documented idea, so start your entry today.

PTPM Energy Scavenger Aims For Maintenance-Free Sensor Nodes

[Mile]’s PTPM Energy Scavenger takes the scavenging idea seriously and is designed to gather not only solar power but also energy from temperature differentials, vibrations, and magnetic induction. The idea is to make wireless sensor nodes that can be self-powered and require minimal maintenance. There’s more to the idea than simply doing away with batteries; if the devices are rugged and don’t need maintenance, they can be installed in locations that would otherwise be impractical or awkward. [Mile] says that goal is to reduce the most costly part of any supply chain: human labor.

The prototype is working well with solar energy and supercapacitors for energy storage, but [Mile] sees potential in harvesting other sources, such as piezoelectric energy by mounting the units to active machinery. With a selectable output voltage, optional battery for longer-term storage, and a reference design complete with enclosure, the PPTM Energy Scavenger aims to provide a robust power solution for wireless sensor platforms.

High Efficiency, Open-Sourced MPPT Solar Charger

A few years ago, [Lukas Fässler] needed a solar charge controller and made his own, which he has been improving ever since. The design is now mature, and the High Efficiency MPPT Solar Charger is full of features like data logging, boasts a 97% efficiency over a range of 1 to 75 Watts, and can be used as a standalone unit or incorporated as a module into other systems. One thing that became clear to [Lukas] during the process was that a highly efficient, feature-rich, open-sourced hardware solution for charge controllers just didn’t exist, at least not with the features he had in mind.

Data logging and high efficiency are important for a charge controller, because batteries vary in their characteristics as they recharge and the power generated from things like solar panels varies under different conditions and loads. An MPPT (Maximum Point Power Tracking) charger is a smart unit optimized to handle all these changing conditions for maximum efficiency. We went into some detail on MPPT in the past, and after three years in development creating a modular and configurable design, [Lukas] hopes no one will have to re-invent the wheel when it comes to charge controllers.

DIY solar panel vs. commercial solar panel

DIY Vs. Commercially Made Solar Panel

The price of commercially made solar panels on eBay is around $1 per watt and have been for a few years, but the price of individual solar cells are likewise at a low price per watt, around $0.48.  Looking at those prices, it’s tempting to say that it’d be cheaper to just buy the solar cells and put together your own panels. But is it? Simply adding up all the costs might seem like a good way to tell, but you’d need to make a panel to really see what works and what doesn’t.

Part US$ Euros €
solar cells 53 45
aluminum U-channel 20 17
plexiglass 43 37
adhesive 8 7
clear epoxy resin 40 34
Total $164 140€

And so [GreatScott] did just that, with his own side-by-side comparison. He made a 100-watt solar panel and mounted it on his roof beside his commercially produced 100-watt one and compared their output.

The cost of his DIY panel rose quickly. To make a somewhat comparable panel he needed to buy aluminum U-channels, clear epoxy resin, and more. Shown here is the breakdown of his costs.

His commercial 100 watt solar panel would cost him $103 today (87.90€). Compare that to his $164 DIY panel. Also, his DIY one likely won’t weather as well as the commercial one and may not handle high temperatures as well either. You can see the results of his testing in the video below, along with all his construction steps.

Another component open to DIYers in a solar system is the charge controller which takes the solar panel’s output and uses it to charge the battery, with added features like MPPT. Check out this DIY charge controller with MPPT and WiFi for data logging.

Continue reading “DIY Vs. Commercially Made Solar Panel”

SPINES Design Makes For Modular Energy Harvesting

The SPINES (Self-Powered IoT Node for Environmental Sensing) Mote is a wireless IoT environmental sensor, but don’t let the neatly packed single PCB fool you into thinking it’s not hackable. [Macro Yau] specifically designed SPINES to be highly modular in order to make designing an energy harvesting sensor node an easier task. The way [Macro] sees it, there are two big hurdles to development: one is the energy harvesting itself, and the other is the software required to manage the use of every precious joule of that harvested energy.

[Macro] designed the single board SPINES Mote in a way that the energy harvesting portion can be used independently, and easily integrated into other designs. In addition, an Arduino library is being developed to make it easy for the power management to be done behind the scenes, allowing a developer to concentrate on the application itself. A solar-powered wireless sensor node is one thing, but helping people get their ideas up and running faster in the process is wonderful to see.

Row Your Bike To China

If you’re a fan of endurance racing motor vehicles, there’s one that puts the 24 Hours of Le Mans, the Dakar Rally, and the Baja 1000 to shame, and the race doesn’t even involve cars. Indeed, the vehicles used for this massive trek from France to China are electric bicycles, powered only by solar panels. This is the epic Sun Trip endurance race, and one of its competitors built a unique tandem bike that is powered both by pedaling, rowing, and the solar panels.

The tandem bike is interesting on its own since the atypical design uses a back-to-back layout which means one person is facing backward, but the storage space is dramatically increased over the normal forward-facing layout. The person in the rear doesn’t pedal, though. [Justin_le] built an upper-body-powered rowing station for that spot so that the person riding back there can rest their legs but still help propel the vehicle. Of course, there’s also a solar panel roof so the two riders can pedal and row in the shade, which includes MPPT and solar tracking which drives a small electric motor on board as well.

This race started in June but is still going on. There’s a live GPS feed so you can keep up with the teams, and if you get really inspired you can go ahead and sign up for the 2019 race as well. This particular bike was also featured on Radio Canada as well if you’d like to learn more about it.

Thanks to [Arthur] for the tip!