Chiptunes On A Solar Panel

With its vintage sound, there’s no mistaking the unique 8-bit sound of video games from the 80s and 90s. It became so popular that eventually sparked its own genre of music known as “chiptune” for which musicians are still composing today. The music has some other qualities though, namely that it’s relatively simple from a digital standpoint. [Robots Everywhere] found that this simplicity made it perfect as a carrier for wireless power transmission.

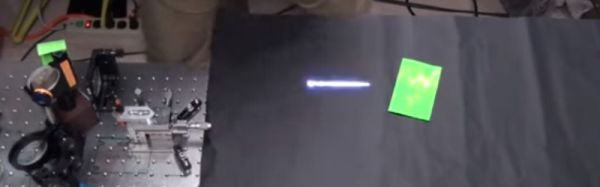
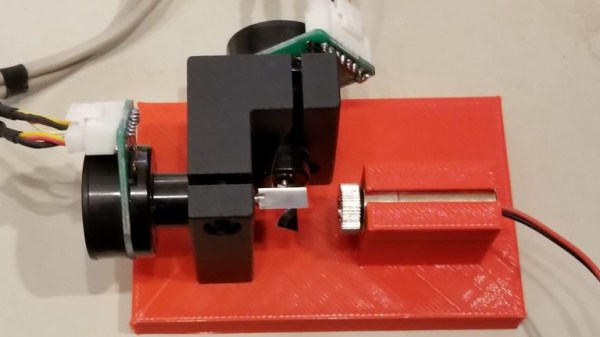
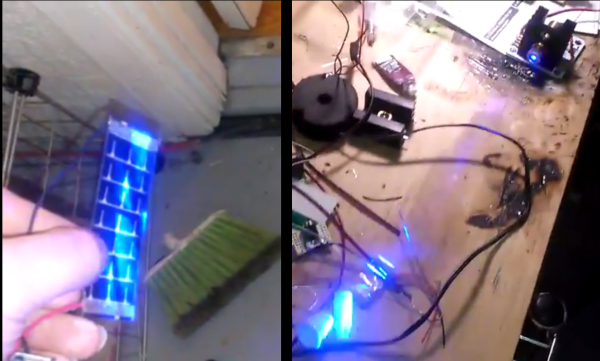
The project acts more like a radio transmitter and receiver than it does a true wireless power transmitter, but the principle is the same. It uses a modified speaker driver and amplifier connected to a light source, rather than to a speaker. On the receiving end, there is a solar panel (essentially a large photodetector) which is wired directly to a pair of earbuds. When the chiptune is played through the amplifier, it is sent via light to the solar panel where it can be listened to in the earbuds.

The project is limited to 24,000 bytes per second which is a whole lot more useful than just beaming random audio files around your neighborhood, although that will still work. You can also use something like this to establish a long-distance serial link wirelessly, which can be the basis of a long distance communications network.

Thanks to [spiritplumber] for the tip!

Continue reading “Chiptunes On A Solar Panel”

US Military Developing Laser Plasma Speakers

It probably won’t surprise you to know that the US military is very interested in using lasers as weapons. Directed energy weapons such as lasers have many advantages over more traditional kinetic weaponry, not least of which the fact that you don’t need to cart around ammunition for them. But somewhat surprisingly, some of the most promising laser developments have been in the field of non-lethal weaponry. While the mental image of a laser is usually a destructive one, recent demonstrations by the Joint Non-Lethal Weapons Program show lasers can do more than blow holes your target.

As reported by [Patrick Tucker] of Defense One, a radical new laser-powered sonic weapon was shown off at the “Directed Energy to DC Exhibition”. The system uses two lasers: one to generate a ball of plasma when it hits the target, and another to modulate the plasma ball in open air. The result is a variation of the classic plasma speaker demonstration, where plasma is used as a a driver for a massless speaker.

Currently the system is capable of generating a deafening crack at the target area, with a measured intensity as high as 140 dB. That’s about as loud as fireworks or a shotgun going off at close distance, and in theory is enough to drive off whoever is unlucky enough to be targeted with the beam.

In time, the researchers hope to refine their secondary modulation laser to the point that they can play audio over the plasma. This would allow the beam to be used as a directed loud speaker of sorts, which could prove useful for defensive applications. Only the target would be able to hear the audio, which could be a recording telling them they were entering a secured area. A disembodied voice telling you to turn around sounds like a extremely effective non-violent deterrent to us. The voices in our head don’t have to tell us twice.

We recently looked at the possibility of targeted sonic weapons being used in Cuba, and of course, we’ve covered many plasma speakers on Hackaday over the years. Plasma speakers have always been more or less nothing more than a fun high voltage demonstration, so to see them potentially weaponized is a crossover episode we weren’t expecting.

Continue reading “US Military Developing Laser Plasma Speakers”

What’s Inside A Neonode Laser Sensor?

Every once in a while, you get your hands on a cool piece of hardware, and of course, it’s your first instinct to open it up and see how it works, right? Maybe see if it can be coaxed into doing just a little bit more than it says on the box? And so it was last Wednesday, when I was at the Embedded World trade fair, and stumbled on a cool touch display floating apparently in mid-air.

The display itself was a sort of focused Pepper’s Ghost illusion, reflected off of an expensive mirror made by Aska3D. I don’t know much more — I didn’t get to bring home one of the fancy glass plates — but it looked pretty good. But this display was interactive: you could touch the floating 2D projection as if it were actually there, and the software would respond. What was doing the touch response in mid-air? I’m a sucker for sensors, so I started asking questions and left with a small box of prototype Neonode zForce AIR sensor sticks to take apart.

The zForce sensors are essentially an array of IR lasers and photodiodes with some lenses that limit their field of view. The IR light hits your finger and bounces back to the photodiodes on the bar. Because the photodiodes have a limited angle over which they respond, they can be used to triangulate the distance of the finger above the display. Scanning quickly among the IR lasers and noting which photodiodes receive a reflection can locate a few fingertips in a 2D space, which explained the interactive part of the floating display. With one of these sensors, you can add a 2D touch surface to anything. It’s like an invisible laser harp that can also sense distance.

The intended purpose is fingertip detection, and that’s what the firmware is good at, but it must also be the case that it could detect the shape of arbitrary (concave) objects within its range, and that was going to be my hack. I got 90% of the way there in one night, thanks to affordable tools and free software that every hardware hacker should have in their toolbox. So read on for the unfortunate destruction of nice hardware, a tour through some useful command-line hardware-hacking tools, and gratuitous creation of animations from sniffed SPI-like data pulled off of some test points.

Continue reading “What’s Inside A Neonode Laser Sensor?”

Review: NEJE DK-8-KZ Laser Engraver

When I got my first 3D printer I was excited, but now that I’m contemplating adding a forth to my collection, I have to come to the terms with the fact that these machines have all the novelty of a screwdriver at this point. Which is fine; getting the cost down and availability up is the key to turning a niche piece of technology into a mainstream tool, and the more people with 3D printers at home or in their workshop the better, as far as I’m concerned. But still, there’s a certain thrill in exploring the cutting edge, and I’ve been looking for something new to get excited about as of late.

NEJE DK-8-KZ

Lasers seem like an interesting next step in my quest towards complete in-house fabrication capability, so I started researching cheap setups to get my feet wet. In the course of looking up diode-powered laser cutters, I came across the NEJE DK-8-KZ. At only 1W, there’s no question this device isn’t going to be cutting a whole lot. In fact, it’s specifically sold as an engraver. But given the fact that you can get one of these little guys for around $70 USD shipped, it’s hard to complain.

Now I wasn’t 100% sure what I would do with a laser engraver, but I thought it would be a good way to test the waters before putting serious money (and time) into something more powerful. Plus, if I’m being totally honest, I wanted to start on something on the lower end of the power spectrum because I’m terrified of blinding myself.

So what kind of laser do you get for $70? Let’s find out… Continue reading “Review: NEJE DK-8-KZ Laser Engraver”

Cat laser on a pan-tilt robot

Robotic Laser Keeps Cat Entertained While You Hack

Whether it’s our own cat or a neighbor’s, many of us have experienced the friendly feline keeping us company while we work, often contributing on the keyboard, sticking its head where our hands are for a closer look, or sitting on needed parts. So how to keep the crafty kitty busy elsewhere? This roboticized laser on a pan-tilt mechanism from the [circuit.io team] should do the trick.

The laser is a 650 nm laser diode mounted on a 3D printed pan-tilt system which they found on Thingiverse and modified for attaching the diode’s housing. It’s all pretty lightweight so two 9G Micro Servos do the grunt work just fine. The brain is an Arduino UNO running an open-source VarSpeedServo library for smooth movements. Also included are an HC-05 Bluetooth receiver and an Android app for controlling the laser from your phone. Set it to Autoplay or take a break and use the buttons to direct the laser yourself. See the video below for build instructions and of course their cat, [Pepper], looking like a Flamenco dancer chasing the light.

Continue reading “Robotic Laser Keeps Cat Entertained While You Hack”

The Fine Art Of Acid Etching Brass

If you were building a recreation of the James Watt micrometer, where would you start? If you’re [rasp], the answer would be: “Spend a year trying to find the best way to make etched brass discs.” Luckily for us, he’s ready to share that information with the rest of the world. While it’s rather unlikely anyone else is working on this specific project, the methods he details for getting museum-quality results on brass are absolutely fascinating.

The process starts with sanding down the bare brass and applying a layer of clear packing tape to the metal. [rasp] then covers the piece with LaserTape, which is a special tape designed to make laser-cut masks for sandblasting. But the masking principle works just as well for painting or chemical etching.

With the LaserTape in place, the piece is then put into the laser and the mask is cut out. Once cut, there’s the tedious task of peeling off all the cut pieces of tape, which [rasp] does with a dental pick. Once the pieces are pulled off, the brass is ready for its acid bath.

Anyone who’s etched their own PCB with ferric chloride will recognize these next steps. The piece is put into the acid bath and agitated every 10 minutes or so. It’s interesting to note that [rasp] places the piece in the bath upside-down, using little 3D printed “feet” to suspend the brass sheet off the bottom of the container. This allows the debris from the etching process to fall down and away from the piece. After about an hour out in the sun, the piece is pulled out of the bath and carefully washed off.

Once clean off, the piece is sprayed with black spray paint to darken up the etched areas. The moment of truth comes when the paint has dried and the layers of tape are carefully peeled back to reveal the etching. [rasp] then wet sands the piece with 1000 and 2000 grit paper, and a final pass with polishing compound brighten up the surface to a mirror-like shine. It’s quite a bit of manual labor, but the end result really is spectacular.

In the video after the break, [rasp] breaks down the entire process, including the additional machine work required to turn these brass plates into functional components of the final machine. As an added bonus, he even includes a lot of his failed attempts in an effort to keep others from making the same mistakes. Something we love to see here at Hackaday.

The process used here is similar to the snazzy brass name plates we showed earlier in the year, and has even been done without a laser using photoresist.

[via /r/DIY]

Continue reading “The Fine Art Of Acid Etching Brass”

Laser Galvo Control Via Microcontroller’s DAC

Mirror galvanometers (‘galvos’ for short) are the worky bits in a laser projector; they are capable of twisting a mirror extremely quickly and accurately. With two of them, a laser beam may be steered in X and Y to form patterns. [bdring] had purchased some laser galvos and decided to roll his own control system with the goal of driving the galvos with the DAC (digital to analog) output of a microcontroller. After that, all that was needed to make it draw some shapes was a laser and a 3D printed fixture to hold everything in the right alignment.

The galvos came with drivers to take care of the low-level interfacing, and [bdring]’s job was to make an interface to translate the 0 V – 5 V output range of his microcontroller’s DAC into the 10 V differential range the driver expects. He succeeded, and a brief video of some test patterns is embedded below.

Continue reading “Laser Galvo Control Via Microcontroller’s DAC”