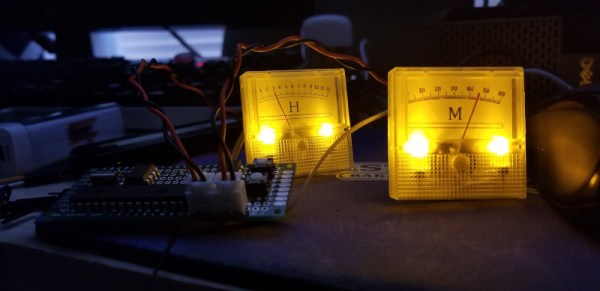
The microcontroller at the heart of the build is a PIC16F886. An 8-bit micro from the Microchip brand, it features no Arduino bootloader or USB interface, being flashed via a dedicated programmer. This is combined with a DS1302 real-time clock to keep accurate time, and a MCP4922 DAC which is responsible for generating the output to drive the dials. The dials themselves are sourced from eBay, being simple voltmeters. They’re given a new backing to display hours and minutes instead of volts, and backlit with LEDs for style.
In this day and age, we’re more used to seeing high-end micros used with integrated DACs and USB programming, but it’s nice to see the parts of yesteryear being used, too. It’s not the first clock we’ve seen from [sjm4306], either. Video after the break.
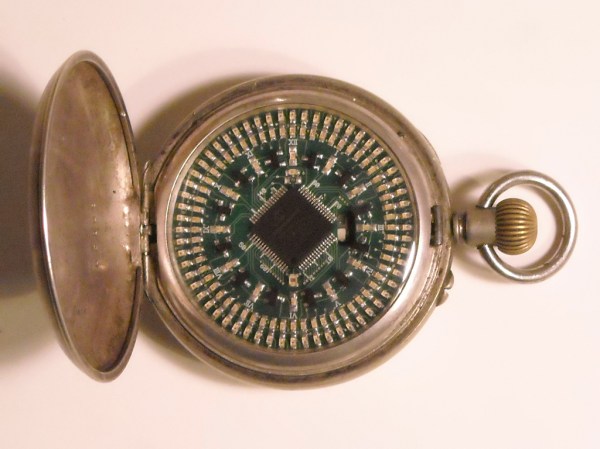
Here at Hackaday we have a bit of a preoccupation with timepieces. Maybe it’s the deeply personal connection to an object you wear on your body, or the need for ultimate reliability. Perhaps it’s just a fascination with the notion of time itself. Whatever the case, we don’t seem to be alone as there is a constant stream of time-related projects coming through our virtual doors. For this article we’ve unearthed the LED Pocketwatch 1.0 by [Dr. Pauline Pounds] from way back in 2009 (ironically via a post about a wristwatch from last year!). Fortunately for us the Internet Archive has saved this heirloom nouveau from the internet dustbin so we can appreciate the craftsmanship involved in [Dr. Pounds]’ work.
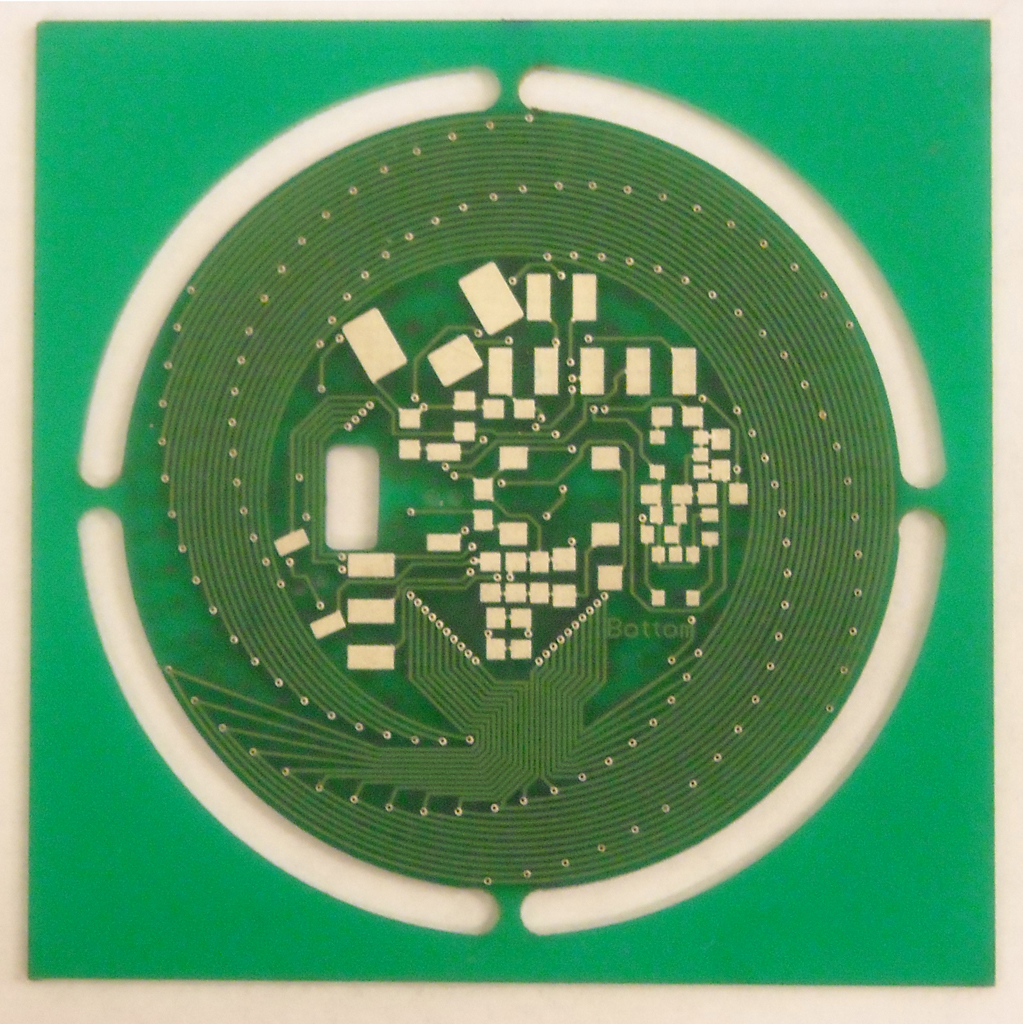
Check out the wonderful, spiral routing!
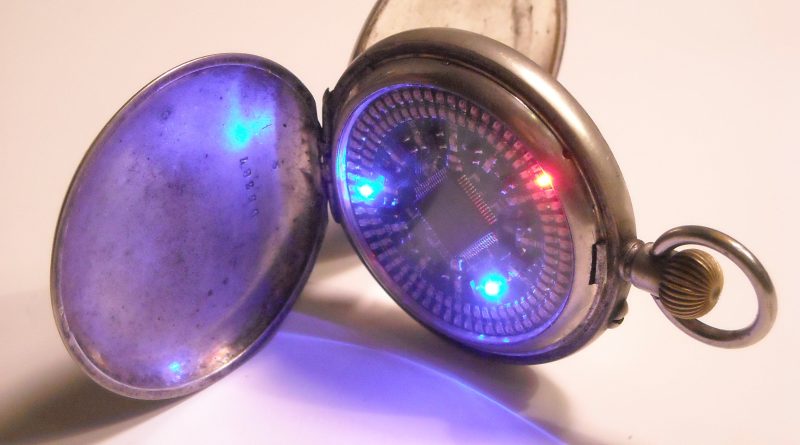
My how far we’ve come; a decade after this project was posted a hacker might choose to 3d print a case for a new wearable, but in 2009 that would have been an entire project by itself! [Dr. Pounds] chose to use the casing from an antique Elgin pocket watch. Even through the mists of a grainy demo video we can imagine how soft the well-worn casing must be from heavy use. This particular unit was chosen because it was a hefty 50mm in diameter, leaving plenty of room inside for a 44mm double sided PCBA with 133 0603 LEDs (60 seconds, 60 minutes, 12 hours), a PIC 16F946, an ERM, and a 110mAh LiPo. But what really sets the LED Pocketwatch 1.0 apart is the user interface.
The ERM is attached directly to the rear of the case in order to best conduct vibration to the outside world. For maximum authenticity it blips on the second, to give a sense that the digital watch is mechanically ticking like the original. The original pocket watch was designed with a closing lid which is released when the stem is pressed. [Dr. Pounds] integrated a button and encoder with the end of the stem (on the PCBA) so the device can be aware of this interaction; on lid open it wakes the device to display the time on the LEDs. The real pièce de résistance is that he also integrated a minuscule rotary encoder, so when the stem is pressed you can rotate it to set the time. It’s all quite elegantly integrated and imminently usable.
At this point we’d love to link to sources, detailed drawings, or CAD files, but unfortunately we haven’t found any. If this has you inspired check out some of the otherpocket watches we’ve posted about in the past. If you’re interested in a live demo of the LED Pocketwatch 1.0, check out the original video after the break.
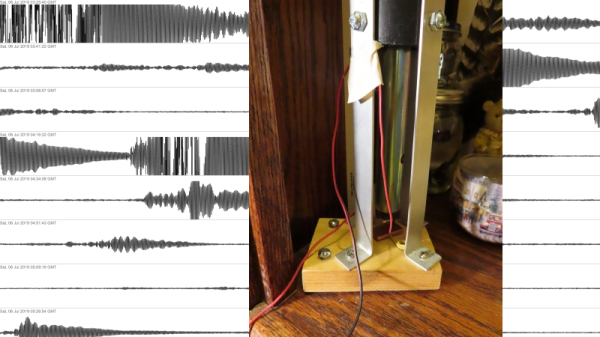
When an earthquake strikes, it’s usually hard to miss. At least that’s the case with the big ones; the dozens or hundreds of little quakes that go largely unnoticed every day are interesting too, and make sense to track. That’s usually left to the professionals, with racks of sensitive equipment and a far-flung network of seismic sensors. That doesn’t mean you can’t keep track of doings below your feet yourself, with something like this DIY seismograph.
Technically, what [Alex] built is better called a “seismic detector” since it’s not calibrated in any way. It’s just a simple sensor for detecting ground vibrations, whether they be due to passing trucks or The Big One. [Alex] lives in California, wedged between the Hayward, Calaveras, and San Andreas faults in San Jose, so there is plenty of opportunity for testing his device. The business end is a simple pendulum sensor, with a heavy metal bob hanging from a long wire inside a length of plastic pipe. Positioned close to the bob is a copper plate; the bob and the plate form an air-dielectric variable capacitor that controls the frequency of a simple 555 oscillator. The frequency is measured by a PIC microcontroller and sent to a Raspberry Pi, which displays the data on a graph. You can check in on real-time seismic activity in San Jose using the link above, or check out historical quakes, like the 7.1 magnitude Ridgecrest quake in July. [Alex]’s sensor is sensitive enough to pick up recent quakes in Peru, Fiji, and Nevada, and he even has some examples of visualizing the Earth’s core using data from the sensor. How cool is that?
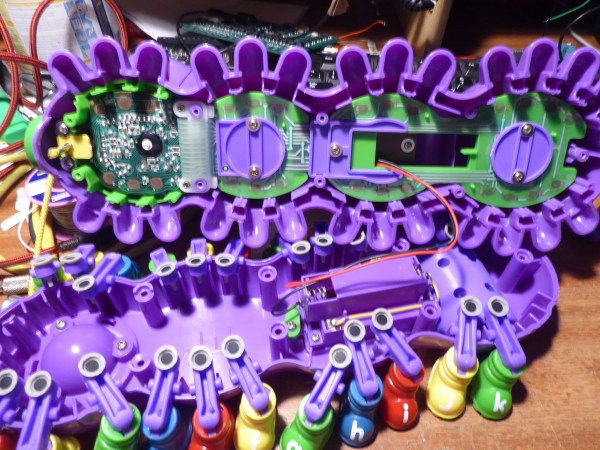
Leapfrog make some pretty awesome kids electronics. Especially admirable is the low cost, the battery life, and the audio quality of these devices. This circuit bending hack takes advantage of those audio circuits by turning the Alphabet Pal into your lead vocalist. The performance in the demo video begins with some impressive tricks, but just wait for it because by the end the little purple caterpillar proves itself an instrument worthy of a position beside that fancy Eurorack you’ve been assembling.
The image above provides a great look inside the beastie. [Jason Hotchkiss] mentions he’s impressed by the build quality, and we have to agree. Plus, look at all of those inputs — this is begging to leave toyland and join the band. With an intuitive sense that can only be gained through lots of circuit-bending experience, he guessed that the single through-hole resistor on the PCB was used to dial in the clock speed. That made it easy to throw in a trimpot for pitch-bending and he moved on to figure out individual note control.
All of those caterpillar feet are arranged in a keyboard matrix to detect button presses. After pulling out the oscilloscope for a bit of reverse engineering, [Jason] grabbed a PIC microcontroller and added it to the same solder points as the stock ribbon connector. The result is that the buttons on the feet still work, but now the Alphabet Pal also has MIDI control.
Take a look at the writeup for full details, and the video after the break to hear it in action. If you’re a fan of circuit-bent toys, this pretty pink keyboard hack always impressed us, especially the spring reverb that was added!
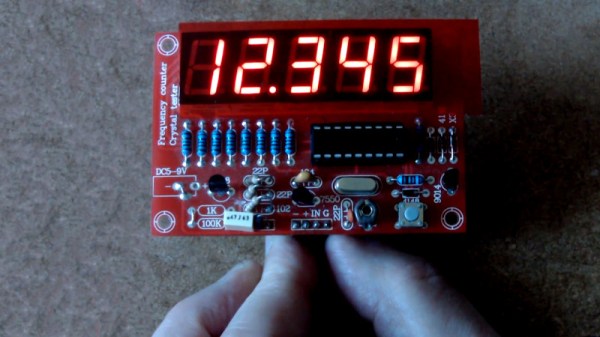
The frequency counter in question is a common clone version of [Wolfgang “Wolf” Büscher]’s minimalist PIC design. Using little more than a PIC16F628 and some seven-segment displays, it’s a competent frequency counter for general use. Clone versions often add a crystal oscillator tester and are available on eBay for a fairly low price.
[TheHWCave] found that the modifications were less than useful, and developed a way to turn the tester components into a more useful signal preamp instead. Not content to stop there, custom firmware was developed to both improve the resolution and also add a tachometer feature. This allows the device to display its output in revolutions per minute as opposed to simply displaying in hertz. By combining this with an optical pickup or other RPM signal, it makes a handy display for rotational speed. If you’re unfamiliar with the theory, read up on our phototachometer primer. If you’re looking to modify your own kit, modified firmware is available on Github.
We’ve seen other eBay kit specials modified before. Being cheap and using commodity microcontrollers makes them a ripe platform for hacking, whether you just want to make a few tweaks or completely repurpose the device.
What prosthetic limbs can do these days is nothing short of miraculous, and can change the life of an amputee in so many ways. But no matter what advanced sensors and actuators are added to the prosthetic, it has to interface with the wearer’s body, and that can lead to problems.
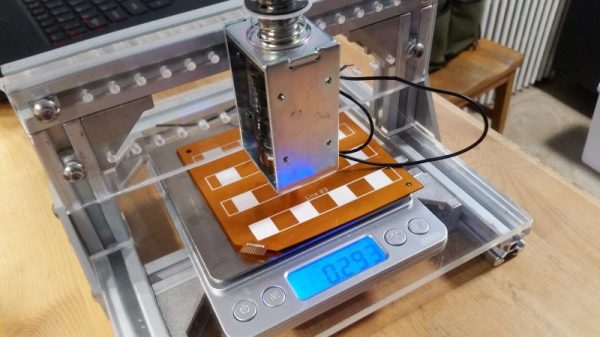
Measuring and mapping the pressure on the residual limb is the business of this flexible force-sensing matrix. The idea for a two-dimensional force map came from one of [chris.coulson]’s classmates, an amputee who developed a single-channel pressure sensor to help him solve a painful fitting problem. [chris.coulson] was reminded of a piezoresistive yoga mat build from [Marco Reps], which we featured a while back, and figured a scaled-down version might be just the thing to map pressure points across the prosthetic interface. Rather than the expensive and tediously-applied web of copper tape [Marco] used, [chris] chose flexible PCBs to sandwich the Velostat piezoresistive material. An interface board multiplexes the 16 elements of the sensor array to a PIC which gathers and records testing data. [chris] even built a test stand with a solenoid to apply pressure to the sensor and test its frequency response to determine what sorts of measurements are possible.
We think the project is a great application for flex PCBs, and a perfect entry into our Flexible PCB Contest. You should enter too. Even though [chris] has a prototype, you don’t need one to enter: just an idea would do. Do something up on Fritzing, make a full EAGLE schematic, or just jot a block diagram down on a napkin. We want to see your ideas, and if it’s good enough you can win a flex PCB to get you started. What are you waiting for?
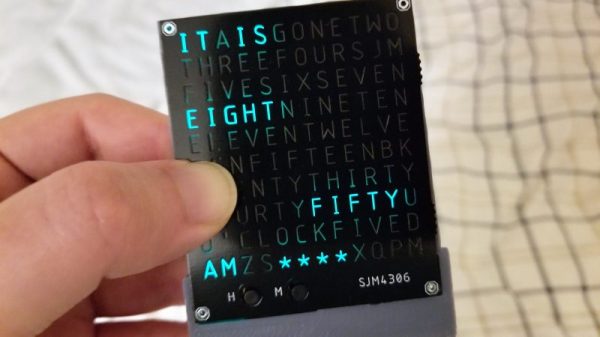
Everyone seems to love word clocks. Maybe it’s the mystery of a blank surface lighting up to piece together the time in fuzzy format, or maybe it hearkens back to those “find-a-word” puzzles that idled away many an hour. Whatever it is, we see a lot of word clock builds, but there’s something especially about this diminutive PCB word clock that we find irresistible.
Like all fun projects, [sjm4306] found himself going through quite the design process with this one. The basic idea – using a PCB as the mask for the character array – is pretty clever. We’ve always found the laser-cut masks to be wanting, particularly in the characters with so-called counters, those enclosed spaces such as those in a capital A or Q that would be removed by a laser cutter. The character mask PCB [sjm4306] designed uses both the copper and a black solder mask to form the letters, which when lit by the array of SMD LEDs behind it glow a pleasing blue-green color against a dark background. Try as he might, though, the light from adjacent cells bled through, so he printed a stand that incorporates baffles for each LED. The clock looks great and even has some value-added modes, such as a falling characters display a la The Matrix, a Pong-like mode, and something that looks a bit like Tetris. Check out the video below for more details.
We’ve seen word clocks run afoul of the counter problem before, some that solved it by resorting to a stencil font, others that didn’t. We’re impressed by this solution, though, enough so that we hope [sjm4306] makes the PCB files available so we can build one.
 The image above provides a great look inside the beastie. [Jason Hotchkiss] mentions he’s impressed by the build quality, and we have to agree. Plus, look at all of those inputs — this is begging to leave toyland and join the band. With an intuitive sense that can only be gained through lots of circuit-bending experience, he guessed that the single through-hole resistor on the PCB was used to dial in the clock speed. That made it easy to throw in a trimpot for pitch-bending and he moved on to figure out individual note control.