A Unique Display Makes An Unusual Clock

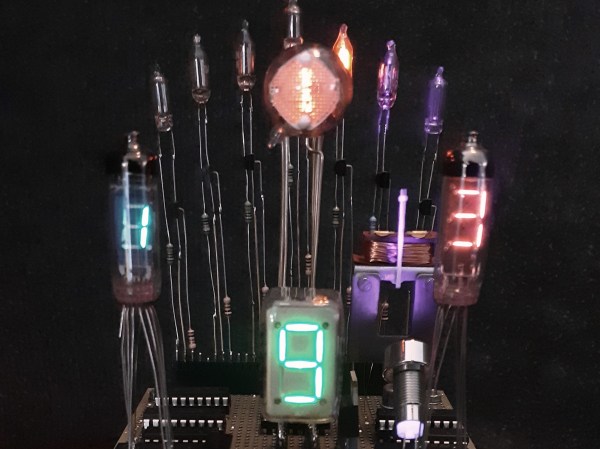
Do you know the clock speed of the computer you’re reading this article on? Maybe Hackaday readers are more likely to reply “Yes!” to that question than the general public, but if there’s a takeaway it’s that for most computer users their clock speed is now an irrelevance. It’s quick enough for the job in hand and that’s all that matters. This was not always the case though, and a few decades ago the clock speed of a PC was its major selling point. Beige boxes would have seven-segment displays lit up with the figure, and it was an unusual example of one that [Ken Yap] used to produce a clock that he believes is one-of-a-kind; unless by some slim chance somebody else has rescued the same part.

The displays were hard wired without any signals from the processor, and what makes this one unusual is that as well as having a couple of digits in yellow it also sports a segmented “MHz” in red. This would have been quite a big deal on your 486 back in about 1994. To make a clock from this unpromising start required a little creative thinking, and he manages it by using the “M” and the “H” digits to represent minutes and hours, and displaying each figure in turn. The display is wired on a piece of protoboard with an STM8 dev board, and yes, as you can see in the very short video below the break, it does tell the time.

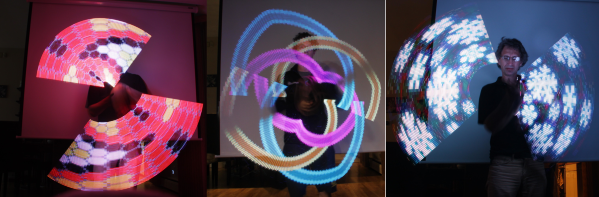
Custom displays are more usually seen in the world of LCDs than LEDs, so this one remains a rarity on these pages. Happily there are projects out there in which people spin their own takes on the idea.

Continue reading “A Unique Display Makes An Unusual Clock”

STM32 Gets Up Close And Personal With Mandelbrot

The Mandelbrot set is a curious mathematical oddity that, while interesting in its own right, is also a useful tool for benchmarking various types of computers. Its constant computing requirement when zooming in and out on the function, combined with the fact that it can be zoomed indefinitely, means that it takes some quality hardware and software to display it properly. [Thanassis] has made this a pet project of his, running Mandelbrot set visualizations in different ways on many different hardware platforms.

This particular one is based on an STM32 board called the Blue Pill, which [Thanassis] chose because he hadn’t yet done a continuous Mandelbrot zoom on a microcontroller yet. The display is handled by a tiny 16K IPS color screen, and some clever memory tricks had to come into play in order to get smooth video output since the STM has only 20 kB available. The integer multiplication is also tricky on a platform this small while keeping the continuous zoom function, so it’s limited to fixed point multiplication.

Even with the limitations of the platform, he is still able to achieve nearly double-digit FPS rates with this one. If you want to play around with graphics like this on an STM platform, [Thanassis] has released all of the source code on his GitHub page, but if you’d like to see more Mandelbrot manipulation you can check out one of his older projects where he built a similar project on an FPGA.

Continue reading “STM32 Gets Up Close And Personal With Mandelbrot”

Hackaday Links Column Banner

Hackaday Links: October 25, 2020

Siglent has been making pretty big inroads into the mid-range test equipment market, with the manufacturers instruments popping up on benches all over the place. Saulius Lukse, of Kurokesu fame, found himself in possession of a Siglent SPD3303X programmable power supply, which looks like a really nice unit, at least from the hardware side. The software it came with didn’t exactly light his fire, though, so Saulius came up with a Python library to control the power supply. The library lets him control pretty much every aspect of the power supply over its Ethernet port. There are still a few functions that don’t quite work, and he’s only tested it with his specific power supply so far, but chances are pretty good that there’s at least some crossover in the command sets for other Siglent instruments. We’re keen to see others pick this up and run with it.

From the “everyone needs a hobby” department, we found this ultra-detailed miniature of an IBM 1401 mainframe system to be completely enthralling. We may have written this up at an earlier point in its development, but it now appears that the model maker, 6502b, is done with the whole set, so it bears another look. The level of detail is eye-popping — the smallest features of every piece of equipment, from the operator’s console to the line printer, is reproduced . Even the three-ring binders with system documentation are there. And don’t get us started about those tape drives, or the wee chair in period-correct Harvest Gold.

Speaking of diversions, have you ever wondered how many people are in space right now? Or how many humans have had the privilege to hitch a ride upstairs? There’s a database for that: the Astronauts Database over on Supercluster. It lists pretty much everything — human and non-human — that has been intentionally launched into space, starting with Yuri Gagarin in 1961 and up to the newest member of the club, Sergey Kud-Sverchkov, who took off got the ISS just last week from his hometown of Baikonur. Everyone and everything is there, including “some tardigrades” that crashed into the Moon. They even included this guy, which makes us wonder why they didn’t include the infamous manhole cover.

And finally, for the machinists out there, if you’ve ever wondered what chatter looks like, wonder no more. Breaking Taps has done an interesting slow-motion analysis of endmill chatter, and the results are a bit unexpected. The footage is really cool — watching the four-flute endmill peel mild steel off and fling the tiny curlicues aside is very satisfying. The value of the high-speed shots is evident when he induces chatter; the spindle, workpiece, vise, and just about everything starts oscillating, resulting in a poor-quality cut and eventually, when pushed beyond its limits, the dramatic end of the endmill’s life. Interesting stuff — reminds us a bit of Ben Krasnow’s up close and personal look at chip formation in his electron microscope.

Iconic Yugoslavian Galaksija Computer Reborn, With A Documentary Too

One of the humbling things about writing for Hackaday is the breadth of experience among our colleagues, despite one’s own skills or achievements there is probably for all of us a level of impostor syndrome when we look at their work. This week provided a reminder of this, while taking a closer look at the crowdfunder for a documentary about the Galaksija, the Yugoslavian 8-bit computer from the 1980s designed by our colleague [Voja Antonić]. Not only will the documentary be produced, but also they are recreating the Galaksija as a kit, so you can experiment with this historic computer for yourself. The campaign has reached passed its goal a couple times over but still has a few days left, so jump in if you are interested.

Freshly made original Galaksija (top), and new double-sided Galaksija (bottom).

With the advantage of being able to reach out to [Voja] as a colleague, it was time to secure the straight dope on the project. Though he’s not spearheading it, aside from appearing in the documentary he’s also produced the new Galaksija PCB to take advantage of double-sided manufacture and remove the wire links that were a feature of the original.

In that sense this isn’t so much a clone of the original as an updated version from the same designer, with only a few other updates such as key switches and connectors where the exact original component could no longer be sourced. A particularly fascinating side-tale comes from a reprint of the first Galaksija magazine. Photo-reproductions of the original printed pictures did not yield good results, so [Voja] built from scratch an entirely original Galaksija, carefully recreating the framing of each step shown in those original photos.

This project has faced its fair share of obstacles before launching on Crowd Supply, so it’s very good indeed to see it receive its funding with time to spare. We look forward to seeing the results, meanwhile you can see a promo video in Serbian with Youtube’s English subtitling below the break. You can read [Voja]’s writing on the machine in Hackaday articles past, but don’t miss the opportunity to meet him at a live event — he’s the mastermind behind a number of hardware badges at Hackaday events.

Continue reading “Iconic Yugoslavian Galaksija Computer Reborn, With A Documentary Too”

Smoothing Big Fonts On Graphic LCDs

Here’s a neat little trick: take the jaggies out of scaled fonts on the fly! This technique is for use on graphic displays where you might want to scale your fonts up. Normally you’d just write a 2×2 block of pixels for every area where there would have been one pixel and boom, larger font. Problem is, that also multiplies each empty area and you end up with jagged edges in the transitions that really catch your eye.

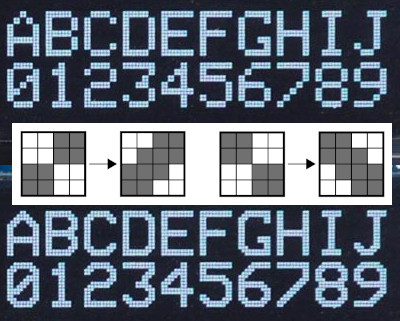
[David Johnson-Davies] entered big-brain mode and did something much cleverer than the obvious solution of using multiple font files. Turns out if you analyze the smoothing problem you’ll realize that it’s only the angled areas that are to blame, horizontal and vertical scaling are nice and smooth. [David’s] fix looks for checker patterns in what’s being drawn, adding a single pixel in the blank spots to smooth out the edge incredibly well!

The technique has been packaged up in a simple function that [David] wrote to play nicely in the Arduino ecosystem. However, the routine is straightforward and would be quick to implement no matter the language or controller. Keep this one in your back pocket!

Now if all you have on hand is an HD44780 character LCD, that one’s arguably even more fun to hack around on just because you’re so limited on going beyond the hard-coded font set. We’ve seen amazing things like using the custom character slots to play Tetris.

POV LED Staff Takes Art For A Spin

The human body does plenty of cool tricks, but one of the easiest to take advantage of is persistence of vision (POV). Our eyes continue to see light for a fraction of a second after the light goes off, and we can leverage this into fun blinkenlight toys like POV staffs. Sure, you can buy POV staffs and other devices, but they’re pretty expensive and you won’t learn anything that way. Building something yourself is often the more expensive route, but that’s not the case with [shurik179]’s excellent open-source POV staff.

There’s a lot to like about this project, starting with the detailed instructions. It’s based on the ItsyBitsyM4 Express and Adafruit’s Dotstar LED strips. You could use the Bluetooth version, but it’s already quite easy to load images to the staff because it shows up as a USB mass storage device. We like that [shurik179] added an IMU and coded the staff so that the images look consistent no matter how fast the staff is spinning. In the future, [shurik179] might make a Bluetooth version that’s collapsible. That sounds like quite the feat, and we can’t wait to see it in action.

As cool as it is to wave a POV staff around, there’s no real practical application. What’s more practical than a clock?

The Clock Under The Dome

In what can only be described as a work of art, [suedbunker] has created a clock under a glass dome. Sporting Nixie tubes, a DS3223, BCD encoders, and MPSA43 transistors driven by an MCP23008 I/O expander it is truly a sight to behold. [suedbunker] has previously created the Circus Clock, a similar clock that celebrated a diversity of ways of displaying the time.

The dome clock represents a continuation of that idea. Reading the clock requires looking at the horizontal and vertical numbers separately. The hours are on the horizontal and minutes are on the vertical. Monday to Sunday is represented in the neon bulbs on the back. The power supply at the bottom provides a wide range of voltages including 5 V, 12 V, 24 V, 45 V, 90 V, 150 V, and -270 V for all the various types of lights. For safety, an optocoupler is used on the -270 volts to drive the clear seven-segment display.

An Arduino Nano controls the whole clock by communicating with the DS3232 real-time clock module and the port expanders via I2C. The soldering and wiring work, in particular, is tidy and beautiful. We look forward to future clocks by [suedbunker] and his wife.

Continue reading “The Clock Under The Dome”