This Debug Connector Brings Your Issues To The Edge

Given an unknown PCBA with an ARM processor, odds are good that it will have either the standard 10 pin 0.05″ or 20 pin 0.1″ debug connector. This uncommon commonality is a boon for an exploring hacker, but when designing a board such headers require board space in the design and more components to be installed to plug in. The literally-named Debug Edge standard is a new libre attempt to remedy this inconvenience.

The name “Debug Edge” says it all. It’s a debug, edge connector. A connector for the edge of a PCBA to break out debug signals. Card edge connectors are nothing new but they typically either slot one PCBA perpendicularly into another (as in a PCI card) or hold them in parallel (as in a mini PCIe card or an m.2 SSD). The DebugEdge connector is more like a PCBA butt splice.

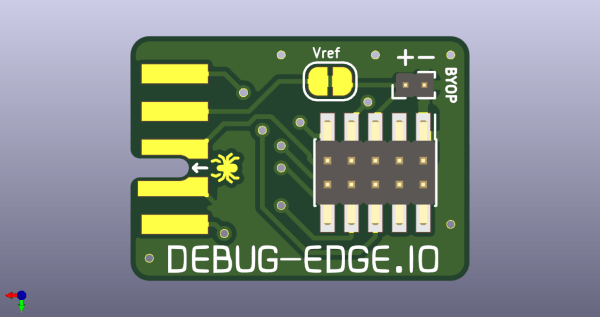
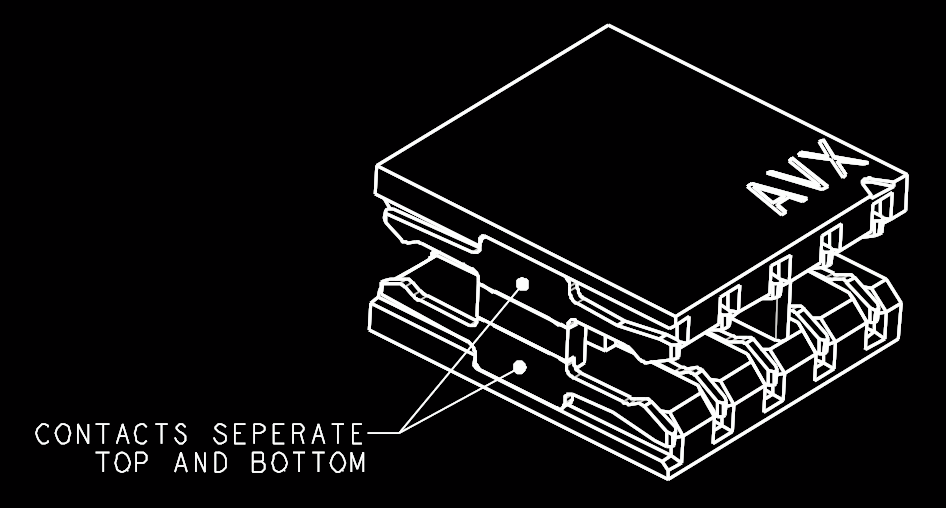
It makes use of a specific family of AVX open ended card edge connectors designed to splice together long rectangular PCBAs used for lighting end to end. These are available in single quantities starting as low as $0.85 (part number for the design shown here is 009159010061916). The vision of the DebugEdge standard is that this connector is exposed along the edge of the target device, then “spliced” into the debug connector for target power and debug.

Right now the DebugEdge exists primarily as a standard, a set of KiCAD footprints, and prototype adapter boards on OSHPark (debugger side, target side). A device making use of it would integrate the target side and the developer would use the debugger side to connect. The standard specifies 4, 6, 8, and 10 pin varieties (mapping to sizes of available connector, the ‘010’ in the number above specifies pincount) offering increasing levels of connectivity up to a complete 1:1 mapping of the standard 10 pin ARM connector. Keep in mind the connectors are double sided, so the 4 pin version is a miniscule 4mm x 4.5mm! We’re excited to see that worm its way into a tiny project or two.

We’ve seen plenty of part-free debug and programming connectors before. Have a favorite? Let us know in the comments!

Sims-Style Plumb Bob Broadcasts Your Mood

While there are a lot of objects from the Sims that we wish were real, we probably wish more than anything that everyone had a mood indicator hovering above their heads at all times. It would make working from home go a lot more smoothly, for instance. [8BitsAndAByte] made this Bluetooth-controlled plumb bob as part of their Sims Halloween costume, but we think it has real day-to-day value as this pandemic wears on, either as a mood ring or a portable free/busy indicator.

The hardware is about as simple as it gets — an Adafruit Feather nRF52 Bluefruit controls a pair of NeoPixel rings, one for each half of the translucent 3D-printed plumb bob. Power comes from a 500mAh battery, and all the electronics are situated inside of an attractive hat. Check out the build video after the break.

There’s more than one way to use color to convey information. This seven-segment temperature display does it with thermochromic film.

Continue reading “Sims-Style Plumb Bob Broadcasts Your Mood”

TMD-2: A Bigger, Better, More Collaborative Turing Machine

One of the things we love best about the articles we publish on Hackaday is the dynamic that can develop between the hacker and the readers. At its best, the comment section of an article can be a model of collaborative effort, with readers’ ideas and suggestions making their way into version 2.0 of a build.

This collegial dynamic is very much on display with TMD-2, [Michael Gardi]’s latest iteration of his Turing machine demonstrator. We covered the original TMD-1 back in late summer, the idea of which was to serve as a physical embodiment of the Turing machine concept. Briefly, the TMD-1 represented the key “tape and head” concepts of the Turing machine with a console of servo-controlled flip tiles, the state of which was controlled by a three-state, three-symbol finite state machine.

TMD-1

TMD-1 was capable of simple programs that really demonstrated the principles of Turing machines, and it really seemed to catch on with readers. Based on the comments of one reader, [Newspaperman5], [Mike] started thinking bigger and better for TMD-2. He expanded the finite state machine to six states and six symbols, which meant coming up with something more scalable than the Hall-effect sensors and magnetic tiles of TMD-1.

TMD-2 has a camera for computer vision of the state machine tiles

[Mike] opted for optical character recognition using a Raspberry Pi cam along with Open CV and the Tesseract OCR engine. The original servo-driven tape didn’t scale well either, so that was replaced by a virtual tape displayed on a 7″ LCD display. The best part of the original, the tile-based FSM, was expanded but kept that tactile programming experience.

Hats off to [Mike] for tackling a project with so many technologies that were previously new to him, and for pulling off another great build. And kudos to [Newspaperman5] for the great suggestions that spurred him on.

HackRF PortaPack Firmware Spoofs All The Things

The HackRF is an exceptionally capable software defined radio (SDR) transceiver, but naturally you need to connect it to a computer to actually do anything with it. So the PortaPack was developed to turn it into a stand-alone device with the addition of a touchscreen LCD, a few buttons, and a headphone jack. With all the hardware in place, it’s just a matter of installing a firmware capable enough to do some proper RF hacking on the go.

Enter MAYHEM, an evolved fork of the original PortaPack firmware that the developers claim is the most up-to-date and feature packed version available. Without ever plugging into a computer, this firmware allows you to receive, decode, and re-transmit a dizzying number of wireless protocols. From firing off the seating pagers at a local restaurant to creating a fleet of phantom aircraft with spoofed ADS-B transponders, MAYHEM certainly seems like it lives up to the name.

[A. Petazzoni] recently put together a detailed blog post about installing and using MAYHEM on the HackRF/PortaPack, complete with a number of real-world examples that show off just a handful of possible applications for the project. Jamming cell phones, sending fake pager messages, and cloning RF remotes is just scratching the surface of what’s possible.

It’s not hard to see why some have already expressed concern about the project, but in reality, none of these capabilities are actually new. This firmware simply brings them all together in one easy-to-use package, and while there might be an argument to be made about proliferation, we all know that the responsibility to behave ethically rests on the user and not the tools.

An IMac All-In-One’s New Life

There’s a sleek form factor for desktop computers known as an “all-in-one” that enrobes a computer in a monitor. While the convenience of having all your computing in a neat package has some nice benefits, it comes with an unfortunate downside. Someday the computer inside is going to be old and outdated in comparison to newer machines. While a new OS goes a long way towards breathing life into an old machine, [Thomas] has decided to take the path less travelled and converted an old iMac all-in-one into a discrete monitor.

The iMac in question is the 20″ iMac G5 iSight (A1145) with an LG-Philips LM201W01-STB2 LCD panel. Looking back, [Thomas] would recommend just ordering an LCD driver controller kit from your favourite auction house. But for this particular modification, he decided to do things a little bit more manually and we’re quite glad he did.

Luckily for [Thomas], the panel supports TMDS (which both DVI and HDMI are compatible with). So the next step was to figure out the signalling wires and proper voltages. After some trouble caused by a mislabeled power line on the iMac PCB silk-screen (12v instead of 3.3v), he had all the wires identified and a plan starting to form. The first step was a circuit to trick the inverter into turning on with the help of a relay. The female HDMI plug with a breakout board was added and sticks out through the old firewire port. The minuscule wires in the display ribbon cable to the monitor were separated and soldered onto with the help of [Thomas’] daughter’s microscope. Resistances were checked as HDMI relies on impedance matched pairs. To finish it off, an old tactile toggle switch offers a way to turn the monitor on and off with a solid thunk.

We love seeing old hardware being repurposed for new things. This project nicely complements the iMac G4 Reborn With Intel NUC Transplant we saw earlier this year, as they both try to preserve the form factor while allowing a new computer to drive the display.

He’s The Operator Of His Pocket Arduino

The band Kraftwerk hit the music scene with its unique electronic sound in the 70s in Germany, opening the door for the electronic music revolution of the following decade. If you’re not familiar with the band, they often had songs with a technology theme as well, and thanks to modern microcontroller technology it’s possible to replicate the Kraftwerk sound with microcontrollers as [Steven] aka [Marquis de Geek] demonstrates in his melodic build.

While the music is played on a Stylophone and a Korg synthesizer, it is fed through five separate Arduinos, four of which have various synths and looping samplers installed on them (and presumably represent each of the four members of Kraftwerk). Samplers like this allow pieces of music to be repeated continuously once recorded, which means that [Steven] can play entire songs on his own. The fifth Arduino functions as a controller, handling MIDI and pattern sequencing over I2C, and everything is finally channeled through a homemade mixer.

[Marquis] also dressed in Kraftwerk-appropriate attire for the video demonstration below, which really sells the tribute to the famous and groundbreaking band. While it’s a great build in its own right and is a great recreation of the Kraftwerk sound, we can think of one more way to really put this project over the top — a Kraftwerk-inspired LED tie.

Continue reading “He’s The Operator Of His Pocket Arduino”

Finally! The ROM You Wished Your Sinclair Spectrum Had!

If there is one thing that Sir Clive SInclair was famous for, it was producing electronic devices that somehow managed to squeeze near-impossible performance out of relatively meagre components. This gave us some impressive products, but it’s fair to say that sometimes this philosophy pushed the envelope a little too far. Thus even some of the most fondly remembered Sinclair products concealed significant flaws, and this extended to both their hardware and their software.

Sir Clive never gave us this!

The SInclair ZX spectrum’s ROM for example had more than its fair share of bugs, and its BASIC programming experience with single keypress was unique but also slow to run. It’s something [Jonathan Cauldwell] has addressed with his Arcade Game Designer ROM, a complete and ready to run replacement for the original Spectrum ROM that contains a scripting language, a compiler, editors for in-game assets, and a game engine upon which to run your games. It’s the ROM you wanted back in 1983, when you were struggling to fit a bit of Z80 code in a Sinclair Basic REM statement.

If you’re a Spectrum enthusiast and think this sounds a little familiar then you are of course correct. It builds upon his past work with his Arcade Game Designer, with the distribution by ROM allowing the developer to use the full 48k available on all but a very few early 16k machines. You’ll need your own EPROM on which to burn it, but we suspect that if you’re the kind of person who has a Spectrum and has writing these games in mind, you already have access to the relevant equipment.

If you’re new to all this Spectrum stuff and where its ROM came from, then maybe it’s time for a trip down memory lane.