$800 Mountain Bike Seat Post Chopped In Two

For those unfamiliar with the sport of mountain biking, it’s a wild hobby that is rife with hacking. It started in the early 70s when the first dedicated mountain bikers were hacking road bikes together to ride on trails to varying levels of success, but only in the last decade or so have there been a lot of electronics appearing in various bike parts that we can all tinker with as well. This video discusses some of the downsides with a very expensive electronic seat post on a mountain bike, and attempts to solve its shortcomings by cutting it in half.

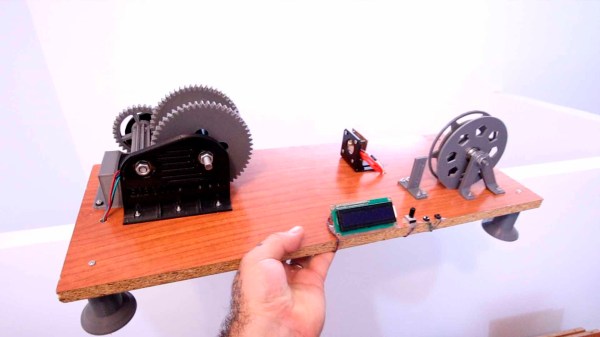
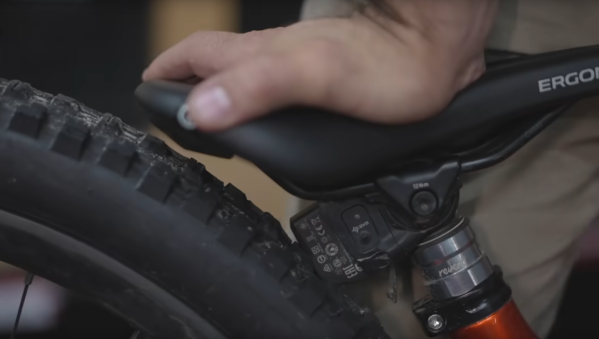
This build involves a dropper seat post, which is an adjustable seat for mountain biking that functions like an office chair. By pushing a button on the handlebars, the seat post can be rapidly adjusted up or down on-the-fly. Normally these seat posts use a cable to actuate, but this expensive version is wireless. The only problem is the battery will occasionally fly off when hitting big jumps, so [Berm Peak Express] decided to cut the existing proprietary battery system out and create a new housing for it. The new housing has a wired extension for the battery in its new location under the seat instead of behind it, and this gives it the clearance it arguably should have had from the manufacturer.

While not the most involved project of all time, it does take a certain mentality to take a hacksaw to a bike part that costs more than a large percentage of bicycles. It’s a niche product to be sure, but it also shows that some of the biggest annoyances with proprietary parts are not too difficult to overcome. And, it is interesting to see the ways that some people are hacking bikes outside of admittedly clever ebike conversions.

Continue reading “$800 Mountain Bike Seat Post Chopped In Two”

Giant 3D Printer Aims To Produce Life-Sized Boat

As 3D printers become more ubiquitous, the number of custom designs and styles of printers has skyrocketed. From different printing materials and technologies to the movements of the printing head, we’ve seen all kinds of different takes on these tools. But one thing that has been largely limited to commercial and industrial use has been large print sizes —  leaving consumer level prints to be split into several pieces to fit together later. Not so with this giant 3D printer from [Ivan], though.

The design goals for this build are to print an entire boat that [Ivan] can captain himself, and additionally an entire go kart chassis in a single piece. It’s part of a contest between him and another YouTuber and as far as we can tell he’s well on his way to completing the challenge. The printer will be able to churn through 4 kg of filament per day, and has a printable volume of 1000x1000x1420 millimeters, or just shy of 1.5 cubic meters.

While this video is just the first step of building the frame and the printer guides, we can’t wait to see the next steps in the process. It’s one of the largest 3D printers we’ve ever seen, at least outside of printers designed for building entire houses out of concrete.

Continue reading “Giant 3D Printer Aims To Produce Life-Sized Boat”

Automate Your Desk With The Upsy Desky

It might be surprising for some, but humans actually evolved to be long-distance runners. We aren’t very fast comparatively, but no other animal can run for as long or as far as a human can. Sitting at a desk, on the other hand, is definitely not something that we’re adapted to do, so it’s important to take some measures to avoid many of the problems that arise for those that sit at a desk or computer most of the day. This build takes it to the extreme, not only implementing a standing desk but also a ton of automation for that desk as well.

This project is an improvement on a prior build by [TJ Horner] called the WiFi Standing Desk Controller. This new version has a catchier name, and uses an ESP32 to run the show. The enclosure is 3D printed and the control board includes USB-C and a hardware UART to interface with the controller. The real perks of this device are the automation, though. The desk can automatically lift if the user has been sitting too long, and could also automatically lift if it detects no one is home (to help keep a cat off of the desk, for example). It also includes presets for different users, and can export data to other software to help analyze sitting and standing patterns.

The controller design is open source and could be adapted to work on a wide-array of powered desks. As we’ve seen in the past, with the addition of a motor, even hand-crank standing desks can be upgraded. If you haven’t gotten into the standing desk trend yet, we hope that you are at least occasionally going for a run.

PET Bottles Diligently Turned Into Filament

While the price of 3D printers has come down quite a lot in the past few years, filament continues to be rather pricey especially for those doing a lot of printing. This has led to some people looking to alternatives for standard filament, including recycling various forms of plastic. We’ve seen plenty of builds using various materials, but none so far have had this level of quality control in the final project.

What sets this machine apart from others is that it’s built around an Arduino Nano and includes controls that allow the user to fine-tune a PID controller during the conversion of the recycled plastic into filament. Different plastic bottles have different material qualities, so once the machine is started it can be adjusted to ensure that the filament produced has the exact specifications for the printer. The PCB is available for download, and the only thing that needs to be done by hand besides feeding the machine to start it is to cut the plastic into strips for the starter spool. There is also a separate 3D printed tool available to make this task easy, though.

Not only could this project save printing costs, but it also keeps harmful plastics out of landfills and other environments. Recycling plastic tends to be quite difficult since producing new plastic is incredibly cheap, and the recycled material can’t be used as often as other materials such as aluminum. But there are still plenty of people out there trying to reuse as much of it as they can.

Continue reading “PET Bottles Diligently Turned Into Filament”

Reactive Load For Amplifiers Teaches Lessons About Inductors

The sound produced by any given electric guitar is shaped not just by the instrument itself but by the amplifiers chosen to make that sound audible. Plenty of musicians swear by the warm sound of amplifiers with vacuum tube circuits, but they do have some limitations. [Collin] wanted to build a reactive load for using tube amps without generating a huge quantity of sound, and it resulted in an interesting project that also taught him a lot about inductors.

The reactive load is essentially a dummy load for the amplifier that replaces a speaker with something that won’t produce sound. Passive loads typically use resistor banks but since this one is active, it needs a very large inductor to handle the amount of current being produced by the amplifier. [Colin] has also built a headphone output into this load which allows it to output a much smaller quantity of sound to a headset while retaining the sound and feel of the amplifier tubes, and it additionally includes a widely-used tone control circuit as well.

There’s a lot going on in the design of the circuitry for this amplifier load, including a lot of research into low-frequency inductors that can handle a significant amount of current. [Collin] eventually ended up winding his own, but the path he took to it was long and winding. There’s a lot of other circuit theory discussed as well especially with regards to the Baxandall EQ that he built into it as well. And, if you’d like to learn more about tube amplifiers in general, take a look at this piece which notes one of the best stereo amps ever produced.

Macintosh Classic II With E-Ink Display

As various antique computers age, it becomes increasingly hard to operate them as hardware begins to physically fail. Keeping these systems up and running often requires scavenging parts from other machines which are only becoming harder to find as time goes on. But if you throw out the requirement of using only era-appropriate components, there are some interesting ways to revive older devices with a few touches of modern tech, like this Mac Classic with a unique display.

The Macintosh Classic II was the successor to the first Macintosh computer Apple sold that had a price tag under $1000. As such, there were some lower specs for this machine such as the monochrome 512×342 display. This one has been retrofitted with an e-ink display which actually gives it some of the same grayscale aesthetic as the original. The e-ink display is driven by a Raspberry Pi which displays a replica System 7 environment and a set of photos.

While the only part of the computer that’s original is the shell at this point, the project’s creator [Dave] also built in support for the Apple Desktop Bus through an Arduino so the original Apple mouse and keyboard can be used. While it’s largely an illusion of a working Mac Classic, we still appreciate the aesthetic.

If you’re more of a classic Apple purist, though, take a look at this SE/30 which uses almost entirely original parts with the exception of a Raspberry Pi to allow it to communicate with the modern Internet.

Continue reading “Macintosh Classic II With E-Ink Display”

2022 Hackaday Prize: Plant Monitoring System Grows To Include LoRa

Change on industrial scales is slow, but if you’re operating your own small farm or simply working in a home garden there are some excellent ways to use water more effectively. The latest tool from [YJ] makes it possible to use much less water while still keeping plant yields high.

This is an improvement on a previous project which automates watering and lighting of a small area or single pot. This latest creation, called FLORA, includes a LoRa module for communication up to 3 kilometers, and the ESP32 on board also handles monitoring of soil moisture, humidity and other sensors. It also includes a pump driver for managing irrigation systems so that smart decisions can be made about when to water. Using this device, the water usage when testing was reduced by around 30% compared to a typical timed irrigation system.

Using a smart system like this is effective for basically any supply of water, but for those who get water from something like an off-grid rainwater system or an expensive water utility, the gains are immediate. If you aren’t already growing your own food to take advantage of tools like this, take a look at this primer to get you started.