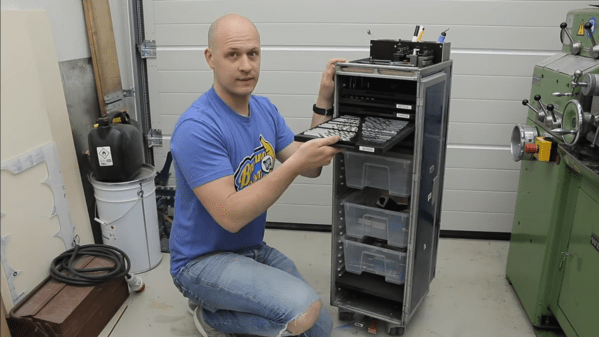
Differential Drive Doesn’t Quite Work As Expected

Placing two motors together in a shared drive is a simple enough task. By using something like a chain or a belt to couple them, or even placing them on the same shaft, the torque can be effectively doubled without too much hassle. But finding a way to keep the torque the same while adding the speeds of the motors, rather than the torques, is a little bit more complicated. [Levi Janssen] takes us through his prototype gearbox that attempts to do just that, although not everything works exactly as he predicts.

The prototype is based on the same principles as a differential, but reverses the direction of power flow. In something like a car, a single input from a driveshaft is sent to two output shafts that can vary in speed. In this differential drive, two input shafts at varying speeds drive a single output shaft that has a speed that is the sum of the two input speeds. Not only would this allow for higher output speeds than either of the two motors but in theory it could allow for arbitrarily fine speed control by spinning the two motors in opposite directions.

The first design uses two BLDC motors coupled to their own cycloidal drives. Each motor is placed in a housing which can rotate, and the housings are coupled to each other with a belt. This allows the secondary motor to spin the housing of the primary motor without impacting the actual speed that the primary motor is spinning. It’s all a lot to take in, but watching the video once (or twice) definitely helps to wrap one’s mind around it.

The tests of the drive didn’t go quite as planned when [Levi] got around to measuring the stall torque. It turns out that torque can’t be summed in the way he was expecting, although the drive is still able to increase the speed higher than either of the two motors. It still has some limited uses though as he notes in the video, but didn’t meet all of his expectations. It’s still an interesting build and great proof-of-concept otherwise though, and if you’re not clear on some of the design choices he made there are some other builds out there that take deep dives into cycloidal gearing or even a teardown of a standard automotive differential.

Continue reading “Differential Drive Doesn’t Quite Work As Expected”

Radio Build Goes Outside The Box

It’s easy to get caught up in a build and forget that the final version usually needs some sort of enclosure, especially things with sensitive electronics in them. The [Director of Legal Evil] at the LVL1 Louisville Hackerspace notes as much in his recent radio build. It seems as though the case was indeed an afterthought, but rather than throwing it in a nondescript black project enclosure it was decided to turn the idea of a project enclosure itself inside-out.

The radio build is based on an SI4732 radio receiver which is a fairly common radio module and is easily adaptable. It needs a microcontroller to run though, so a Maple STM32 platform was chosen to do all of the heavy lifting. The build includes a screen, some custom analog controls, and a small class D audio amplifier, but this is the point it begins to earn its name: the Chaos Radio. While playing around with the project design in CAD, a normal design seemed too bland so one was chosen which makes the radio look like the parts are exploding outward from what would have been a more traditional-style enclosure.

While the project includes a functioning radio receiver, we have to complement the creator for the interesting display style for this particular set of hardware. It can get boring designing the same project enclosures time after time, so anything to shake things up is often welcomed especially when it puts all of the radio components on display like this. In fact, it’s reminiscent of some of [Dmitry]’s projects, an artist known for deconstructing various common household appliances like this CD Player.

Thanks to [Jose] for the tip!

Full Size 3D-Printed Wind Turbine

Wind energy isn’t quite as common of an alternative energy source as solar, at least for small installations. It’s usually much easier just to throw a few panels and a battery together than it is to have a working turbine with many moving parts that need to be maintained when only a small amount of power is needed. However, if you find yourself where the wind blows but the sun don’t shine, there are a few new tools available to help create the most efficient wind turbine possible, provided you have a 3D printer.

[Jan] created this turbine with the help of QBlade, a piece of software that helps design turbine blades. It doesn’t have any support for 3D printing though, such as separating the blades into segments, infill, and attachment points, so [Jan] built YBlade to help take care of all of this and made the software available on the project’s GitHub page. The blades are only part of this story, though. [Jan] goes on to build a complete full-scale wind turbine that can generate nearly a kilowatt of power at peak production, although it does not currently have a generator attached and all of the energy gets converted to heat.

While we hope that future versions include a generator and perhaps even pitched blades to control rotor speed, [Jan] plans to focus his efforts into improving the blade design via the 3D printer. He is using an SLA printer for these builds, but presumably any type of printer would be up to the task of building a turbine like this. If you need inspiration for building a generator, take a look at this build which attempted to adapt a ceiling fan motor into a wind turbine generator.


Adding In-Game Reset To Classic Playstations

The first Playstation is quickly approaching three decades since its release, and while this might make some of us who were around for that event feel a little aged, the hardware inside these machines isn’t getting any younger either. Plenty of people are replacing the optical drive in the original hardware with an optical drive emulator as they begin to fail, and with that comes the option for several other modifications to the hardware like this in-game reset mod.

In-game reset is a function that allows a console to be reset via a controller button combination rather than pressing the console’s reset button directly. Especially for devices modified with either the XStation or PSIO drive emulators, this can be a handy feature to have as this method can more easily take the user back to the emulator menu as well as physically reset the device. The modification is a small PCB which attaches to the controller port and, unlike previous versions, only requires a single pin to be soldered to the Playstation’s control board.

If you’re someone who enjoys playing games on original hardware rather than a patchwork of emulators, this could be an excellent addition to your PS1 that still allows most of the original feel and experience the PS1 offered. The drive emulator can greatly expand the range of the hardware as well, much like this NES cartridge which similarly expands the capabilities of that much older system.

Chainsaw Cuts More Than Timber

We often take electricity for granted, to the point of walking into a room during a power outage and still habitually flipping the light switch. On the other hand, there are plenty of places where electricity isn’t a given, either due to poor infrastructure or an otherwise remote location. To get common electric power tools to work in areas like these requires some ingenuity like that seen in this build which converts a chainsaw to a gas-driven grinder that can be used for cutting steel or concrete. (Video, embedded below.)

All of the parts needed for the conversion were built in the machine shop of [Workshop from scratch]. A non-cutting chain was fitted to it first to drive the cutting wheel rather than cut directly, so a new bar had to be fabricated. After that, the build shows the methods for attaching bearings and securing the entire assembly back to the gas-powered motor. Of course there is also a custom shield for the grinding wheel and also a protective housing for the chain to somewhat limit the danger of operating a device like this.

Even though some consideration was paid to safety in this build, we would like to reiterate that all the required safety gear should be worn. That being said, it’s not the first time we’ve seen a chainsaw modified to be more useful than its default timber-cutting configuration, like this build which turns a chainsaw into a metal cutting chop saw.

Continue reading “Chainsaw Cuts More Than Timber”

Robot Arm Adds Freedom To 3D Printer

3D printers are an excellent tool to have on hand, largely because they can print other tools and parts rapidly without needing to have them machined or custom-ordered. 3D printers have dropped in price as well, so it’s possible to have a fairly capable machine in your own home for only a few hundred dollars. With that being said, there are some limitations to their function but some of them can be mitigated by placing the printer head on a robot arm rather than on a traditional fixed frame.

The experimental 3D printer at the University of Nottingham adds a six-axis robotic arm to their printer head, which allows for a few interesting enhancements. Since the printer head can print in any direction, it allows material to be laid down in ways which enhance the strength of the material by ensuring the printed surface is always correctly positioned with respect to new material from the printer head. Compared to traditional 3D printers which can only print on a single plane, this method also allows for carbon fiber-reinforced prints since the printer head can follow non-planar paths.

Of course, the control of this printer is much more complicated than a traditional three-axis printer, but it is still within the realm of possibility with readily-available robotics and microcontrollers. And this is a hot topic right now: we’ve seen five-axis 3D printers, four-axis 3D printers, and even some clever slicer hacks that do much the same thing. Things are finally heating up in non-planar 3D printing!

Thanks to [Feinfinger] for the tip!

Continue reading “Robot Arm Adds Freedom To 3D Printer”

Ground Effect Drone Flies Autonomously

There are a number of famous (yet fictional) sea monsters in the lakes and oceans around the world, but in the Caspian Sea one turned out to be real. This is where the first vehicles specifically built to take advantage of the ground effect were built by the Soviet Union, and one of the first was known as the Caspian Sea Monster due to the mystery surrounding its discovery. While these unique airplane/boat hybrids were eventually abandoned after several were built for military use, the style of aircraft still has some niche uses and can even be used as a platform for autonomous drones.

This build from [Think Flight] started off as a simple foam model of just such a ground effect vehicle (or “ekranoplan”) in his driveway. With a few test flights the model was refined enough to attach a small propeller and battery. The location of the propeller changed from rear-mounted to front-mounted and then back to rear-mounted for the final version, with each configuration having different advantages and disadvantages. The final model includes an Arudino running an autopilot program called Ardupilot, and with an air speed sensor installed the drone is able to maintain flight in the ground effect and autonomously navigate pre-programmed waypoints around a lake at high speed.

For a Cold War technology that’s been largely abandoned by militaries in favor of other modes of transportation due to its limited use case and extremely narrow flight tolerances, ground effect vehicles are relatively popular as remote controlled vehicles. This RC ekranoplan used the same Ardupilot software but paired with a LIDAR system instead of GPS to navigate its way around its environment.

Thanks to [TTN] for the tip!

Continue reading “Ground Effect Drone Flies Autonomously”