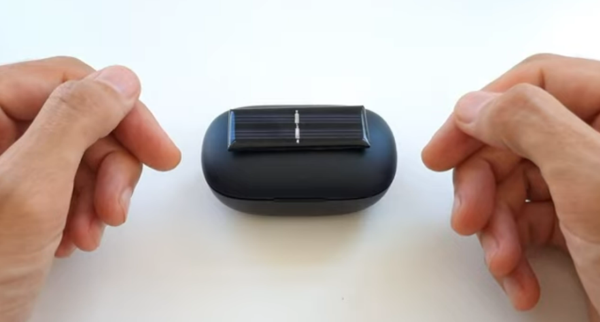
Can The Solenoid Engine Power A Car?

[Emiel] aka [The Practical Engineer] makes all kinds of fun projects in his fully-featured shop, and one of his tangents has been building a series of solenoid engines. These engines mimic the function of an internal combustion engine, with each solenoid acting as a piston. The only problem with [Emiel]’s concept engines, though, was that he never actually put them into a vehicle to prove their effectiveness. This build finally proves that they can work at powering a vehicle.

The project starts with a new engine. [Emiel] chose a V4 design using four solenoids and an Arduino-based controller. After some trouble getting it to operate properly, he scavenged a small circuit board he built in his V8 solenoid engine to help with timing. With that installed, the solenoids click away and spin the crankshaft at a single constant speed. The vehicle itself was mostly 3D printed, with two aluminum tubes as support structures to mount the engine. Even the wheels were 3D printed with a special rubber coating applied to them. With a small drive train assembled, it’s off to the races for this tiny prototype.

While the small car doesn’t have steering and only goes at a constant speed, the proof of concept that these tiny electric engines actually work is a welcomed addition to [Emiel]’s collection of videos on these curious engines. Of course they’re not as efficient as driving the wheels directly with an electric motor, but we all know there’s no fun in that. If you haven’t seen his most intricate build, the V8 is certainly worth checking out, and also shows off the timing circuitry he repurposed for this car.

Continue reading “Can The Solenoid Engine Power A Car?”

VGA From Scratch On A Homebrew 8-bit Computer

[James Sharman] has built an impressive 8-bit homebrew computer. Based on TTL logic chips, it has a pipelined design which makes it capable of Commodore-level computing, but [James] hasn’t quite finished everything yet. While it is currently built on its own custom PCB, it has a limiting LCD display which isn’t up to the standards of the rest of the build. To resolve this issue, he decided to implement VGA from scratch.

This isn’t a bit-bang VGA implementation, either. He plans for full resolution (640×480) which will push the limits of his hardware. He also sets goals of a 24-bit DAC which will allow for millions of colors, the ability to use sprites, and hardware scrolling. Since he’s doing all of this from scratch, the plan is to keep it as simple as possible and make gradual improvements to the build as he goes. To that end, the first iteration uses a single latching chip with some other passive components. After adding some code to the CPU to support the new video style, [James] is able to display an image on his monitor.

While the image of the parrot he’s displaying isn’t exactly perfect yet, it’s a great start for his build and he does plan to make improvements to it in future videos. We’d say he’s well on his way to reproducing a full 8-bit retrocomputer. Although VGA is long outdated for modern computers, the standard is straightforward to implement and limited versions can even be done with very small microcontrollers.

Thanks to [BaldPower] for the tip!

Continue reading “VGA From Scratch On A Homebrew 8-bit Computer”

Tiny Tesla Valves Etched In Glass

While it’s in vogue right now to name fancy new technology after Tesla, the actual inventor had plenty of his own creations that would come to bear his namesake, including Tesla coils, Tesla oscillators, Tesla turbines and even the infamous Tesla tower. One of the lesser known inventions of his is the Tesla valve, a check valve that allows flow in one direction without any moving parts, and [Huygens Optics] shows us a method of etching tiny versions of these valves into glass.

The build starts out with a fairly lengthy warning, which is standard practice when working with hydroflouric acid. The acid is needed to actually perform the etching, but it’s much more complicated than a typical etch due to the small size of the Tesla valves. He starts by mixing a buffered oxide etch, a mix of the hydroflouric acid, ammonia, and hydrochloric acid, which gives a much more even etching than any single acid alone. Similar to etching PCBs, a protective mask is needed to ensure that the etch only occurs where it’s needed. For that there are several options, each with their own benefits and downsides, but in the end [Huygens Optics] ends up with one of the smallest Tesla valves ever produced.

In fact, the valves are so small that they can only be seen with the aid of a microscope. While viewing them under the microscope he was able to test with a small drop of water to confirm that they do work as intended. And, while the valves that he is creating in this build are designed to work on liquids, [Huygens Optics] notes that the reason for making them this small was to make tiny optical components which they are known for.

Continue reading “Tiny Tesla Valves Etched In Glass”

Using Heaters To Display Time

We’re always fans of interesting clock builds around here, whether it’s a word clock, marble clock, or in this case a clock using a unique display method. Of course, since this is a build by Hackaday’s own [Moritz v. Sivers] the display that was chosen for this build was a custom thermochromic display. These displays use heat-sensitive material to change color, and his latest build leverages that into one of the more colorful clock builds we’ve seen.

The clock’s display is built around a piece of thermochromic film encased in clear acrylic. The way the film operates is based on an LCD display, but using heat to display the segments. For this build, as opposed to his previous builds using larger displays, he needed to refine the method he used for generating the heat required for the color change. For that he swapped out the Peltier devices for surface mount resistors and completely redesigned the drivers and the PCBs around this new method.

Of course, the actual clock mechanism is worth a mention as well. The device uses an ESP8266 board to handle the operation of the clock, and it is able to use its wireless capabilities to get the current time via NTP. All of the files needed to recreate this are available on the project page as well, including code, CAD files, and PCB layouts. It’s always good to have an interesting clock around your home, but if you’re not a fan of electronic clocks like this we can recommend any number of mechanical clocks as well.

Continue reading “Using Heaters To Display Time”

APRS Implemented At Low Cost And Small Size

Before smartphones and Internet of Things devices were widely distributed, the Automatic Packet Reporting System (APRS) was the way to send digital information out wirelessly from remote locations. In use since the 80s, it now has an almost hipster “wireless data before it was cool” vibe, complete with plenty of people who use it because it’s interesting, and plenty of others who still need the unique functionality it offers even when compared to more modern wireless data transmission methods. One of those is [Tyler] who shows us how to build an APRS system for a minimum of cost and size.

[Tyler]’s build is called Arrow and operates on the popular 2 metre ham radio band. It’s a Terminal Node Controller (TNC), a sort of ham radio modem, built around an ESP32. The ESP32 handles both the signal processing for the data and also uses its Bluetooth capability to pair to an Android app called APRSDroid. The entire module is only slightly larger than the 18650 battery that powers it, and it can be paired with a computer to send and receive any digital data that you wish using this module as a plug-and-play transceiver.

While the build is still has a few limitations that [Tyler] notes, he hopes that the project will be a way to modernize the APRS protocol using methods for radio transmission that have been improved upon since APRS was first implemented. It should be able to interface easily into any existing ham radio setup, although even small balloon-lofted radio stations can make excellent use of APRS without any extra equipment. Don’t forget that you need a license to operate these in most places, though!

A 3D Printer With An Electromagnetic Tool Changer

The versatility of 3D printers is simply amazing. Capable of producing a wide variety of prototypes, miscellaneous parts, artwork, and even other 3D printers, it’s an excellent addition to any shop or makerspace. The smaller, more inexpensive printers might do one type of printing well with a single tool, but if you really want to take a 3D printer’s versatility up to the next level you may want to try one with an automatic tool changing system like this one which uses magnets.

This 3D printer from [Will Hardy] uses an electromagnet to attach the tool to the printer. The arm is able to move to the tool storage area and quickly deposit and attach various tools as it runs through the prints. A failsafe mechanism keeps the tool from falling off of the head of the printer in case of a power outage, and several other design features were included to allow others to tweak this design to their own particular needs, such as enclosing the printer and increasing or decreasing the working area of the Core-XY printer as needed.

While the project looks like it works exceptionally well, [Will] notes that it is still in the prototyping phase and needs work on the software in order to refine its operation and make it suitable for more general-purpose uses. It’s an excellent design though and shows promise. It also reminds us of this other tool-changing system we featured a few months ago, albeit with a less electromagnetic twist.

Continue reading “A 3D Printer With An Electromagnetic Tool Changer”

Hi-Fi Combines Best Of 60s And 90s Technology

The 90s were a dark time for audio equipment, literally and figuratively. Essentially the only redeeming quality from the decade of nondescript black plastic boxes was the low cost. Compared to the audio equipment of the 60s, largely produced in high-end enclosures with highly desirable tube amplifiers, the 90s did not offer much when it came to hi-fi stereo sound. However, those cheap black boxes from the 90s turn out to be surprisingly perfect for project enclosures for other amplifier builds, such as this 60s-era tube amp recreation.

This mesh of the best of two distinct decades comes from [Alvenh] and begins by preparing the old enclosure for its new purpose. This means a lot of work fabricating a custom metal face plate for the new amplifier and significantly modifying the remaining case. After the box is complete, the amplifier build began. It uses a tube-based preamp and a solid-state power amplifier since [Alvenh]’s experience suggested that the warm tube sound was generated mostly in the preamp. This means that his design is a hybrid but still preserves the essential qualities of a full tube build.

The build also includes a radio module that has the ability to cover the 2m and 70cm bands popular in ham radio. This module also has been found to have much better audio quality than the standard AM/FM receiver typically used in projects like this. With the radio module added to the custom enclosure, as well as a phono amp and a power supply, [Alvenh] has an excellent audio amplifier in an inexpensive case which preserves the tube sound from the true hi-fi eras of decades past.

Continue reading “Hi-Fi Combines Best Of 60s And 90s Technology”