Hacking When It Counts: Setting Sail In A Submarine

By the early 20th century, naval warfare was undergoing drastic technological changes. Ships were getting better and faster engines and were being outfitted with wireless communications, while naval aviation was coming into its own. The most dramatic changes were taking place below the surface of the ocean, though, as brave men stuffed themselves into steel tubes designed to sink and, usually, surface, and to attack by stealth and cunning rather than brute force. The submarine was becoming a major part of the world’s navies, albeit a feared and hated one.

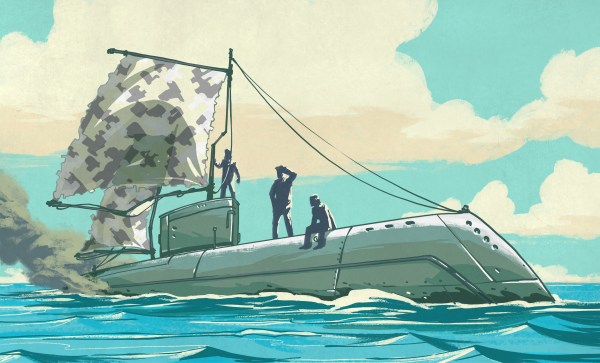
For as much animosity as there was between sailors of surface vessels and those that chose the life of a submariner, and for as vastly different as a battleship or cruiser seems from a submarine, they all had one thing in common: the battle against the sea. Sailors and their ships are always on their own dealing with forces that can swat them out of existence in an instant. As a result, mariners have a long history of doing whatever it takes to get back to shore safely — even if that means turning a submarine into a sailboat.

Continue reading “Hacking When It Counts: Setting Sail In A Submarine”

The Science Of Landing On An Asteroid

Exploiting the resources of the rock-strewn expanse of space between Mars and the outer planets has been the stuff of science fiction for ages. There’s gold in them ‘thar space rocks, or diamonds, or platinum, or something that makes them attractive targets for capitalists and scientists alike. But before actually extracting the riches of the asteroid belt, stuck here as we are at the bottom of a very deep gravity well that’s very expensive to climb out of, we have to answer a few questions. Like, how does one rendezvous with an asteroid? What’s involved with maneuvering near a comparatively tiny celestial body? And most importantly, how exactly does one land on an asteroid and do any useful work?

Back in June, a spacecraft launched by the Japanese Aerospace Exploration Agency (JAXA) finally caught up to an asteroid named Ryugu after having chased it for the better part of four years. The Hayabusa2 was equipped to answer all those questions and more, and as it settled in close to the asteroid with a small fleet of robotic rovers on board, it was about to make history. Here’s how they managed to not only land on an asteroid, but how the rovers move around on the surface, and how they’ll return samples of the asteroid to Earth for study.

Continue reading “The Science Of Landing On An Asteroid”

Dymo Rides Again With This Dot-Matrix Label Embosser

For a five-year-old future Hackaday scribe, there could be no greater day than that on which a Dymo label maker appeared in the house. With its spinny daisy-wheel to choose a character and its squeezy handle to emboss the letter into the plastic tape, there would follow a period of going nuts kerchunking out misspelled labels and slapping them on everything. Plus the things look like space guns, so there would have been a lot of pew-pewing too.

This Dymo dot-matrix label maker bears no resemblance to our long-lost label blaster, but it’s pretty cool in its own right. The product of collaborators [Felix Fisgus] and [Timo Johannes] and undertaken as a project for their digital media program, the only thing the labeler has in common with the Dymos of old is the tape. Where the manual labelers press the characters into the tape with a punch and die, their project uses a dot-matrix approach. Messages are composed on an old PS/2 keyboard through an Arduino and a 16×2 LCD display, and punched onto the tape a dot at a time. The punch is a large darning needle riding on the remains of an old CD drive and driven by a solenoid. When it comes time to cut the label, servo driven scissors do the job. It’s a noisy, crazy, Rube Goldberg affair, and we love it. Check it out in action in the video below.

We applaud [Felix] and [Timo] for carrying the torch of embossed label making. It’s a shame that we’ve turned to soulless thermal printers to handle most of our labeling needs; then again, we’ve seen some pretty neat hacks for those too.

Continue reading “Dymo Rides Again With This Dot-Matrix Label Embosser”

Measuring The Stiffness Of 3D-Printed Parts

How do you choose filament when you want strong 3D-printed parts? Like most of us, you probably take a guess, or just use what you have on hand and hope for the best. But armed with a little knowledge on strength of materials, you might be able to make a more educated assessment.

To help you further your armchair mechanical engineer ambitions, [Stefan] has thoughtfully put together this video of tests he conducted to determine the stiffness of common 3D-printing plastics. He’s quick to point out that strength and stiffness are not the same thing, and that stiffness might be more important than strength in some applications. Strength measures how much stress can be applied to an element before it deforms, while stiffness describes how well an element returns to its original state after being stressed. The test rig [Stefan] built for the video analyzes stiffness by measuring the deflection of printed parts under increasing loads. Graphing the applied force versus the deflection gives an indication of the rigidity of the part, while taking the thickness of the material into account yields the bending modulus. The results are not terribly surprising, with polypropylene being the floppiest material and exotic composite filaments, like glass fiber or even “nanodiamond” reinforced PLA coming out as the stiffest. PLA, the workhorse filament, comes in around the middle of the pack.

[Stefan] did some great work here, but as he points out, in the final analysis it almost doesn’t matter what the stiffness and strength of the filament are since you can easily change your design and add more material where it’s needed. That only works up to a point, of course, but it’s one of the many advantages of additive manufacturing.

Continue reading “Measuring The Stiffness Of 3D-Printed Parts”

Down The DIY Rabbit Hole With A Shop AC Installation

There’s a fine line between a successful DIY project and one that ends in heartbreak. It’s subjective too; aside from projects that end up with fire trucks or ambulances in the driveway, what one DIYer would consider a disaster might be considered a great learning opportunity to someone else.

We’re pretty sure [Cressel] looks at his recent DIY mini-split AC installation for his shop as a series of teachable moments. Most folks leave HVAC work to the pros, but when you run a popular YouTube channel where you make your own lathe from scratch, you might be persuaded to give anything a go. [Cressel] did everything possible to do this job like a pro, going so far as to get training in the safe handling of refrigerants and an EPA certification so he knew how to charge the system correctly. He also sunk quite a bit of money into tools; between the manifold gauge set, vacuum pump, and various plumbing bits, that was a hefty $300 bite alone.

The install went well until he started charging the refrigerant, when a mistake with a fitting caused him to contaminate his nice, new batch of R-410A. Rather than back out and call a pro to finish up, [Cressel] stuck with it, to the tune of $900 in extra tools and materials needed to recover the old refrigerant safely and replace it with virgin R-410A. The video below has a condensed version of the whole tale.

It all worked out in the end, but at a cost that probably meets or exceeds what an HVAC contractor would have charged. [Cressel] seems like a glass-half-full kind of guy, though, so we expect he’s happy to have learned something new, and to have a bunch of neat new tools to boot.

Continue reading “Down The DIY Rabbit Hole With A Shop AC Installation”

Seeing A Webcam’s PCBs In A Whole Different Light

When it comes to inspection of printed circuits, most of us rely on the Mark I eyeball to see how we did with the soldering iron or reflow oven. And even when we need the help of some kind of microscope, our inspections are still firmly in the visible part of the electromagnetic spectrum. Pushing the frequency up a few orders of magnitude and inspecting PCBs with X-rays is a thing, though, and can reveal so much more than what the eye can see.

Unlike most of us, [Tom Anderson] has access to X-ray inspection equipment in the course of his business, so it seemed natural to do an X-ray enhanced teardown and PCB inspection. The victim for this exercise was nothing special – just a cheap WiFi camera of the kind that seems intent on reporting back to China on a regular basis. The guts are pretty much what you’d expect: a processor board, a board for the camera, and an accessory board for a microphone and IR LEDs. In the optical part of the spectrum they look pretty decent, with just some extra flux and a few solder blobs left behind. But under X-ray, the same board showed more serious problems, like vias and through-holes with insufficient solder. Such defects would be difficult to pick up in optical inspection, and it’s fascinating to see the internal structure of both the board and the components, especially the BGA chips.

If you’re stuck doing your inspections the old-fashioned way, fear not – we have tips aplenty for optical inspection. But don’t let that stop you from trying X-ray inspection; start with this tiny DIY X-ray tube and work your way up from there.

Thanks for the tip, [Jarrett].

Bird Beats Cancer With The Help Of A 3D-Printed Prosthetic

It’s a reasonable certainty that 3D-printing is one day going to be a huge part of medicine. From hip implants to stents that prop open blood vessels to whole organs laid down layer by layer, humans will probably benefit immensely from medical printing. But if they do, the animals will get there first; somebody has to try this stuff out, after all.

An early if an unwilling adopter of 3D-printed medical appliances is [Jary], a 22-year-old Great Pied Hornbill, who recently received a 3D-printed replacement for his casque, the large, mostly hollow protuberance on the front the bird’s skull leading out over the upper beak. There’s no known function for the casque, but it had to be removed since cancer was destroying it and [Jary] wouldn’t have fared well post-surgically without one. Working from CT scans, the veterinary team created a model of the casque as well as a jig to guide the saw during surgery. There’s no word on what filament was used, but we’d guess PLA since it’s biocompatible and available in medical grades. The video below shows some of the surgery; it’s interesting to note that the prosthetic started out natural colored but quickly turned yellow as [Jary] preened with oils from glands near his tail feathers, just like a natural casque would.

Hornbills live to about 40 years old, so [Jary] is just middle-aged. Here’s hoping that he lives a long, happy life in return for being a pioneer in 3D-printing for medical and surgical appliances.

Continue reading “Bird Beats Cancer With The Help Of A 3D-Printed Prosthetic”