A 3D-Printed Bowl Feeder For Tiny SMD Parts

[Andrzej Laczewski] has something big in mind for small parts, specifically SMD resistors and capacitors. He’s not talking much about that project, but from the prototype 3D-printed bowl feeder he built as part of it, we can guess that it’s going to be a pretty cool automation project.

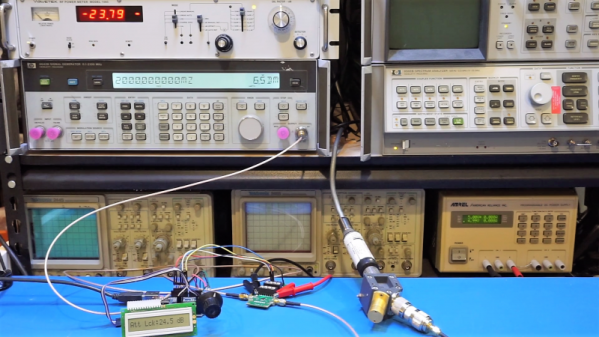
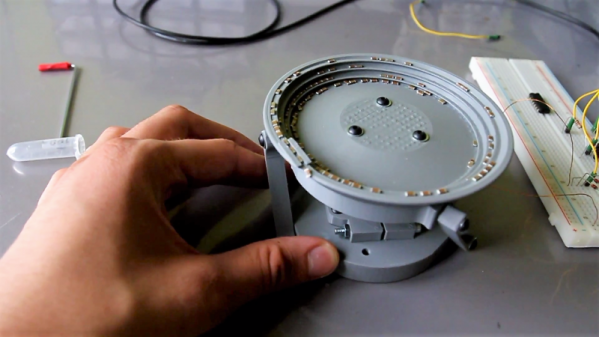
Bowl feeders are common devices in industrial automation, used to take a big pile of parts like nuts and bolts and present them to a process one at a time, often with some sort of orientation step so that all the parts are the right way around. They accomplish this with a vibratory action through two axes, which [Andrzej] accomplishes with the 3D-printed ABS link arms supporting the bowl. The spring moment of the arms acts to twist the bowl slightly when it’s pulled down by a custom-wound electromagnet, such that the parts land in a slightly different place every time the bowl shifts. For the parts on the shallow ramp spiraling up the inside of the bowl, that means a single-file ride to the top. It’s interesting to see how changing the frequency of the signal sent to the coil impacts the feed; [Andrzej] used a function generator to find the sweet spot before settling on a dedicated circuit. Watch it in action below.

We’re really impressed with the engineering that went into this, even if we wonder what the vibration will do to the SMD components. Still, we can’t wait to see this in a finished project – perhaps it’ll be integrated like this Arduino-fied bowl feeder.

Continue reading “A 3D-Printed Bowl Feeder For Tiny SMD Parts”

Digital Attenuator Goes From Manual To Arduino Control

[Kerry Wong] comes across the coolest hardware, and always manages to do something interesting with it. His widget du jour is an old demo board for a digital RF attenuator chip, which can pad a signal in discrete steps according to the settings of some DIP switches. [Kerry]’s goal: forget the finger switch-flipping and bring the attenuator under Arduino control.

As usual with his videos, [Kerry] gives us a great rundown on the theory behind the hardware he’s working with. The chip in question is an interesting beast, an HMC624LP4E from Hittite, a company that was rolled into Analog Devices in 2014. The now-obsolete device is a monolithic microwave integrated circuit (MMIC) built on a gallium arsenide substrate rather than silicon, and attenuates DC to 6-GHz signals in 64 steps down to -31.5 dBm. After a functional check of the board using the DIP switches, he whipped up a quick Arduino project to control the chip with its built-in serial interface. It’s just a prototype for now, but spinning the encoder is a lot handier than flipping switches, and once this is boxed up it’ll make a great addition to [Kerry]’s RF bench.

If this video puts you in an RF state of mind, check out some of [Kerry]’s other videos, like this one about temperature-compensated crystal oscillators, or the mysteries of microwave electronics.

Continue reading “Digital Attenuator Goes From Manual To Arduino Control”

Sharpies And Glue Sticks Fight The Gummy Metal Machining Blues

“Gummy” might not be an adjective that springs to mind when describing metals, but anyone who has had the flutes of a drill bit or end mill jammed with aluminum will tell you that certain metals do indeed behave in unhelpful ways. But a new research paper seeks to shed light on the gummy metal phenomenon, and may just have machinists stocking up on office supplies.

It’s a bit counterintuitive that harder metals like steel are often easier to cut than softer metals; especially aluminum but also copper, nickel alloys, and some stainless steel alloys. But it happens, and [Srinivasan Chandrasekar] and his colleagues at Purdue University wanted to find out why, and what can be done about it. So the first job was to get up close and personal with the interface between a cutting tool and metal stock, to observe the dynamics of cutting. In a fascinating bit of video, they saw that softer metals tend to fold in sinuous patterns rather than breaking on defined shear planes.

Source: American Physical Society.

Having previously noted that cutting through Dykem, a common machinist’s marking fluid, changes chip formation in soft metals, the researchers tested everything from Sharpies to adhesive tape and even correction fluid, and found that they all helped to reduce the gumming action to some degree. Under their microscope they can clearly see that chips form differently once the cutting edge hits the treated surface, tending to act more brittle and ejecting rather than folding. They also noted a marked decrease in cutting force for the treated metal, and much-improved surface finish to boot.

Will Sharpies and glue sticks enter the book of old machinist’s tricks like gauge-block wringing? Only time will tell. But for now, this is a pretty fascinating bit of research that you might be able to put to the test in your shop. Let us know what you find in the comments.

Continue reading “Sharpies And Glue Sticks Fight The Gummy Metal Machining Blues”

Harley-Hardened Wire Helps High-Gain Antenna Hack

What does a Harley-Davidson motorcycle have to do with building antennas? Absolutely nothing, unless you happen to have one and need to work-harden copper wire to build a collinear antenna for LoRa.

We’ll explain. Never being one to settle, [Andreas Spiess] needed a better antenna for his LoRa experiments. Looking for high gain and an omnidirectional pattern, he bought a commercial colinear antenna, which is a wire with precisely spaced loops that acts like a stack of dipoles. Sadly, in a head-to-head test [Andreas] found that the commercial antenna was no better than lower gain antennas in terms of range, and so he decided to roll his own.

Copper wire is a great material for antennas since it can be easily formed without special tools and it solders like a champ. But the stuff you get at the home center is nowhere near stiff enough for a free-standing vertical whip. This is where the Harley came in: [Andreas] used his Hog to stretch out the 1.75-mm diameter (a little bigger than #14 AWG) copper wire. Not only did the work-hardening stiffen the wire, it reduced its diameter to the 1.4 mm needed for the antenna design. His vector network analyzer told him that ground-plane elements and a little fiddling with the loop diameter were needed to get the antenna to resonate at 868 MHz, but in the end it looks like the antenna is on track to deliver 5-dBi of gain.

Of course there are plenty of other ways to stretch out a wire — you could just stretch it out with hanging weights, or even with a go-kart motor-powered winch if you’re ambitious. But if you’ve got a bike like that, why not flaunt it?

Continue reading “Harley-Hardened Wire Helps High-Gain Antenna Hack”

DIY Tube Oven Brings The Heat To Homebrew Semiconductor Fab

Specialized processes require specialized tools and instruments, and processes don’t get much more specialized than the making of semiconductors. There’s a huge industry devoted to making the equipment needed for semiconductor fabrication plants, but most of it is fabulously expensive and out of reach to the home gamer. Besides, where’s the fun in buying when you can build your own fab lab stuff, like this DIY tube oven?

A tube oven isn’t much more complicated than it sounds — it’s just a tube that gets hot. Really, really hot — [Nixie] is shooting for 1,200 °C. Not just any materials will do for such an oven, of course, and this one is built out of blocks of fused alumina ceramic. The cavity for the tube was machined with a hole saw and a homebrew jig that keeps everything aligned; at first we wondered why he didn’t use his lathe, but then we realized that chucking a brittle block of ceramic would probably not end well. A smaller hole saw was used to make trenches for the Kanthal heating element and the whole thing was put in a custom stainless enclosure. A second post covers the control electronics and test runs up to 1,000°C, which ends up looking a little like the Eye of Sauron.

We’ve been following [Nixie]’s home semiconductor fab buildout for a while now, starting with a sputtering rig for thin-film deposition. It’s been interesting to watch the progress, and we’re eager to see where this all leads.

Fail Of The Week: When Good Foundries Go Bad

Like many of us, [Tony] was entranced by the idea of casting metal, and set about building the tools he’d need to melt aluminum for lost-PLA casting. Little did he know that he was about to exceed the limits of his system and melt a hole in his patio.

[Tony]’s tale of woe begins innocently enough, and where it usually begins for wannabe metal casters: with [The King of Random]’s homemade foundry-in-a-bucket. It’s just a steel pail with a homebrew refractory lining poured in place, with a hole near the bottom to act as a nozzle for forced air, or tuyère. [Tony]’s build followed the plans pretty faithfully, but lacking the spent fire extinguisher [The King] used for a crucible in the original build, he improvised and used the bottom of an old propane cylinder. A test firing with barbecue charcoal sort of worked, but it was clear that more heat was needed. So [Tony] got hold of some fine Welsh anthracite coal, which is where the fun began. With the extra heat, the foundry became a mini-blast furnace that melted the thin steel crucible, dumping the molten aluminum into the raging coal fire. The video below shows the near catastrophe, and we hope that once [Tony] changed his pants, he hustled off to buy a cheap graphite or ceramic crucible for the next firing.

All kidding aside, this is a vivid reminder of the stakes when something unexpected (or entirely predictable) goes wrong, and the need to be prepared to deal with it. A bucket of dry sand to smother a fire might be a good idea, and protective clothing is a must. And it pays to manage your work area to minimize potential collateral damage, too — we doubt that patio will ever be the same again.

Continue reading “Fail Of The Week: When Good Foundries Go Bad”

Getting The Lead Out Of Lithium Battery Recycling

When that fateful morning comes that your car no longer roars to life with a quick twist of the key, but rather groans its displeasure at the sad state of your ride’s electrical system, your course is clear: you need a new battery. Whether you do it yourself or – perish the thought – farm out the job to someone else, the end result is the same. You get a spanking new lead-acid battery, and the old one is whisked away to be ground up and turned into a new battery in a nearly perfect closed loop system.

Contrast this to what happens to the battery in your laptop when it finally gives up the ghost. Some of us will pop the pack open, find the likely one bad cell, and either fix the pack or repurpose the good cells. But most dead lithium-based battery packs are dropped in the regular trash, or placed in blue recycling bins with the best of intentions but generally end up in the landfill anyway.

Why the difference between lead and lithium batteries? What about these two seemingly similar technologies dictates why one battery can have 98% of its material recycled, while the other is cheaper to just toss? And what are the implications down the road, when battery packs from electric vehicles start to enter the waste stream in bulk?

Continue reading “Getting The Lead Out Of Lithium Battery Recycling”