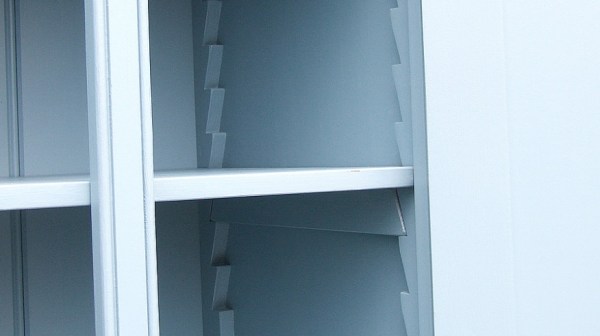
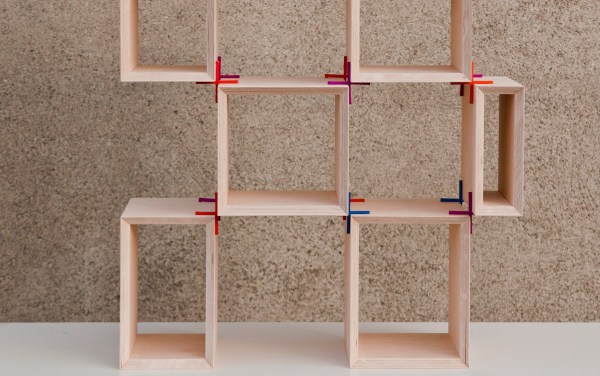
A profile view of a medical training mannequin with a tube down its "throat." A ventillation bag is in the gloved hand of a human trainee.

Making Medical Simulators Less Expensive With 3D Printing And Silicone

Medical training simulators are expensive, but important, pieces of equipment. [Decent Simulators] is designing simulators that can easily be replicated using Fused Deposition Modeling (FDM) printers and silicone molds to bring the costs down.

Each iteration of the simulators is sent out for testing by paramedics and doctors around the world, and feedback is integrated into the next revision. Because the trainers are designed to be easily replicated, parts can easily be replaced or repaired which can be critical to keep personnel trained, especially in remote areas.

While not open source, some models are freely available on the [Decent Simulators] website like wound packing trainers or wound prostheses which could be great if you’re trying to get a head start on next year’s Halloween costumes. More complicated models will be on sale starting in January as either just the design files or a kit containing the files and the printed and/or silicone parts.

Interested in more medical hacks? Check out this Cyberpunk Prosthetic Eye or this Arduino Hearing Test Device.

A multi-colored chair with a stainless steel frame sits on wooden legs against a grey background.

Recycled Chairs Bring The Subway To Your Living Room

Public transit seats have a rough life. Enduring a number of wear cycles that would make your sofa weep, they take a beating and have to keep looking presentable. When trains and buses are retired, where do the old seats go? A team from the MIT Hobby Shop investigated what was happening to the seats from retiring MBTA Red Line cars and recycled them into stylish chairs.

After some sleuthing and many emails, the MBTA relinquished a number of old subway seats to the team. Since the subway seats didn’t have legs, wood from old church pews was used to create bases. It took one pew end support to create each set of legs, which were cut out on a bandsaw. The old dark stain was sanded off, and the bases were finished with three coats of gel topcoat, letting the natural beauty of the old oak shine through.

We love seeing old things given new life here at Hackaday. If you want to see some more recycled furniture, check out this tire table, this upcycled jeans chair, or these best practices for making box forts.

A man and a woman stand at opposite ends of a wooden-framed bicycle. It has 20" tires and a long, black seat. A rack extends over the front tire for carrying small items.

Plywood Bicycle Makes Frame Building More Accessible

Bike frames are simple on the surface, but can quickly become complicated if you want to fabricate one yourself. Brazing and welding tend to be less common skills than knowing how to bolt things together, so [Arquimaña] has brought us the OpenBike to make the process accessible to more people.

An open-source set of files designed for CNCs and 3D printers, the OpenBike uses readily available materials like sheet plywood to make a sturdy, if unconventional-looking, bicycle. Like many other consumer goods, most bike frames are currently built in Asia. This allows for economies of scale, but removes locals from the design process. By using simpler tools, OpenBike allows for more local direction of what features might be needed for a particular region.

Shifting even a small portion of trips to more active forms of transport is an important part of lowering carbon emissions, so making bikes a more attractive means of transportation is always welcome. What might be important in one region might be superfluous and expensive in another (multiple gears in a hilly region, for example). OpenBike could be especially useful as a way to rapid-prototype different feature sets for a particular region before committing to a more traditional frame-building technique for larger batches of bikes.

If you want to see some other bike hacks, why not check out this extending bicycle, this steampunk recumbent trike, or these bike hacks from around the world?


via Yanko Design

A blue cabinet. Inside, along the front and back are wooden sawteeth holding a cleat. On the cleat sits the shelf itself.

Adjusting Shelves Like It’s 1899

In most modern homes, any adjustable shelves or cabinets have metal shelf pins set inside conveniently spaced holes. Before the accoutrements of modern life, like easily replicated metal parts, you may have found a sawtooth shelf doing the same job with just wood.

The system comprises three parts: a series of “sawteeth” running up and down the front and back edge of a cabinet, a cleat to sit between the teeth, and a shelf with notched corners that can then be set down on the cleats on either side.

While not as convenient as running a drill through a shelf pin jig, this method has a certain charm and sturdiness that isn’t present in more modern methods of making adjustable shelves. We can see this being particularly useful for restoration projects of homes from the 19th Century or earlier where you want some of those aforementioned accoutrements without things looking too anachronistic.

If you want some shelving that’s decidedly more 21st Century, check out this MP3 Player Shelf or this Smart Shelf with Serious Functionality.

A wooden table with a puzzle on top of it sits in an off white room with a light wood floor. A red chair sits behind the table and the slats of the rolled away tambour top are visible.

Tambour Table With A Puzzling Secret

Some people really like puzzles. [Simone Giertz] is one of these serious puzzle lovers and built a transforming table (YouTube) to let her easily switch between puzzles and more mundane tasks, like eating.

While there are commercial solutions out there for game tables with removable tops and simpler solutions like hinged lids, [Giertz] decided to “make it more complicated and over-engineered than that.” A tambour top that rolls out of the way makes this a unique piece of furniture already, but the second, puzzle table top that can be raised flush with the sides of the table really brings this to the next level.

If that wasn’t already enough, the brass handles on the table are also custom made. In grand maker tradition, [Giertz] listened to her inner MYOG (Make Your Own Gnome) and got a lathe to learn to make her own handles instead of just buying some off the shelf.

If you’re less enamored of puzzles, you may want to see how Jigsaw Puzzles are Defeated. If you’re worried about losing pieces, check out these 3D Printed Sliding Puzzles.

Continue reading “Tambour Table With A Puzzling Secret”

A hand holding a paper cup pours orange resin into a mold. There are several different colors in a spiral inside a circular mold on a circular platform with holes around its perimeter sitting on a wooden table.

Reproducing Vinyl Records In Resin

While most are just plain, vinyl records can be found in a variety of colors, shapes, and some even glow in the dark. [Evan and Katelyn] decided to spruce up a plain old record by replicating it in bright, glow-in-the-dark resin.

By first making a silicone mold of the vinyl record and then pouring several different colors of resin into the resulting mold, [Evan and Katelyn] were able to make a groovy-looking record that still retained the texture necessary to transmit the original sounds of the record. The resulting piece has some static, but the music is still identifiable. That said, audiophiles would probably prefer to leave this up on the wall instead of in their phonograph.

Acrylic rings were laser cut and bolted together to build the form for the silicone mold with the original record placed at the bottom. To prevent bubbles, the silicone was degassed in a vacuum chamber before pouring over the record and the resin was cured in a pressure pot after pouring into the resulting mold.

If you’re interested in how records were originally made, check out this installment of Retrotechtacular. A more practical application of resin might be this technique to reproduce vintage plastic parts.

Continue reading “Reproducing Vinyl Records In Resin”

A segmented lamp made of circular slices of plywood. They are arranged as shutters around a long, skinny LED bulb in the center that gives off an incadescent-looking glow. A cord trails off to the left against the grey background.

Plywood Lamp Has Customizable Light Output

There’s something about light fixtures that attracts makers like moths to a flame. [danthemakerman] wanted something with a more configurable light output and built this Sculptural and Customizable Plywood Lamp.

In his detailed build log, [danthemakerman] describes how he wanted something “sort of like an analog dimmable light.” By using a stack of split plywood donuts hinged on a brass rod, he can vary the output and shape of the lamp. These shutters allow the lamp to go from bright to nightlight without using any electrical dimming components.

The plywood was rough cut on a bandsaw before being turned on a lathe. The light cover sections were then hollowed out with a Forstner bit and split in half. The tricky bit is the overlap of the cut on the hinge side of the shutters. Cutting the piece exactly in half would’ve required a lot more hardware to make this lamp work than what was achieved by patient woodworking.

If you’d like to see more ways to make light fixtures with plywood, check out this Hexagonal Lamp, these Upcycled Plywood and Glass Lamps, or this Laser-cut Sphere Lampshade that Packs Flat.