Tag Connect Programming Headers

A Small Replacement For Large Programming Headers

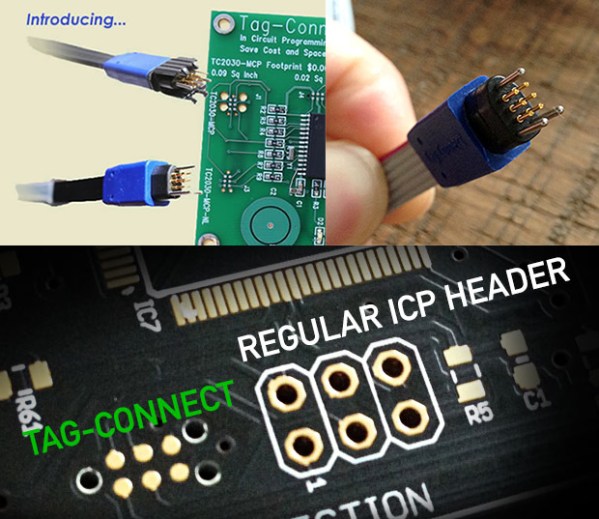
No matter how small you make your embedded projects, you still need a way to program the MCU. Standard programming headers can be annoyingly large for those very small projects. [Danny] wrote in to tell us how we can save room on our PCB designs using special spring loaded connectors, rather than large headers.

There are so many small embedded development systems, such as the Trinket that still rely on standard headers. Reducing the size of the programming headers and interface headers is an issue that deserves more attention than it currently receives. Based on Tag-Connect, a proprietary connector built around pogo-style pins, your PCB does not actually require any on-board mating connector. The PCB footprint simply has test-pads that connect with the pogo-pins and holes that allow for a rock solid connection. While the Tag-Connect header is a bit expensive (it costs about $34), you only need to buy it once.

It would be great to see even smaller Tag-Connect cables. Do you have a similar solution? What about something even smaller and more compact? Write in to tell us about any ultra-compact connector solutions you have been using!

Low-Power Orientation Tracker And An Optimized Math Library For The MSP430

MSP430 Orientation Tracker

Orientation trackers can be used for a ton of different applications: tracking mishandled packages, theft notification of valuables, and navigation are just a few examples! A recent blog post from Texas Instruments discusses how to build a low-cost and low-power orientation tracker with the MSP430.

Based on the MSP430 LaunchPad and CircuitCo’s Educational BoosterPack, the orientation tracker is very simple to put together. It can also be made wireless using any of the wireless BoosterPacks with a Fuel Tank BoosterPack, or by using the BLE Booster Pack with a built in Lithium Battery circuitry. TI provides all the necessary code and design files in their reference application for getting your orientation tracker up and running. Be sure to see the device in action after the break! This project not only involves building a low-power orientation tracker, but also showcases IQmathLib, a library of optimized fixed point math functions on the MSP430. One of the more challenging aspects of using small MCUs such as the MSP430 or Arduino is how inefficient built in math libraries are. Check out the IQmathLib, it greatly improves upon the built in math functions for the MSP430.

It would be interesting to see this project modified to be a DIY pedometer or be used on a self-balancing robot. It would also be interesting to see the IQmathLib ported to other micros, such as the Arduino. Take a look and see how you can use this reference design in your own projects!

Continue reading “Low-Power Orientation Tracker And An Optimized Math Library For The MSP430”

DIY Gas Can Speakers Blast Your Tunes

Gas Can Speaker

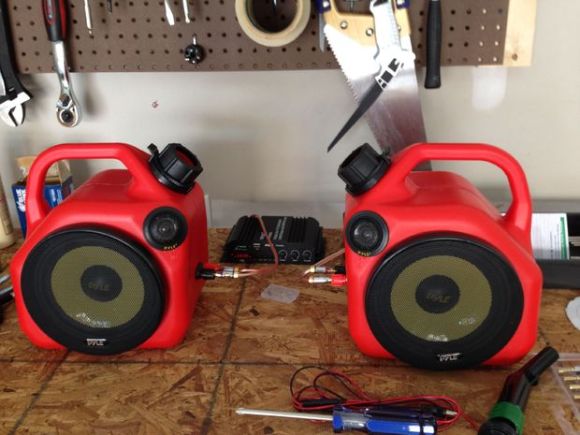
Have you ever wanted to build your own speakers, but were a bit overwhelmed with all the information out there on cases and packaging? A recent Instructable by [Txje] goes over how to build a set of simple gas can speakers.

While using gas cans as speaker housings will not result in the best audiophile quality sound or be the cheapest option out there, it sure looks awesome, and is a great way to get started with building your own speakers. After testing out the speakers and electronics, holes in the gas cans are cut and the terminals and speakers are installed. “As an added bonus, the pour spout serves to release pressure in the speaker can. You can get everything you need for ~$69 from Amazon and/or Home Depot.” Not a bad price point for two very cool looking speakers.  Once you have built the speakers, now you can experiment with different fill material to see what results in better sound quality.

This is a simple, yet fun looking build. Something like this can make a nice gift for someone who spends a lot of time in their garage. What other crazy objects have you used for speaker enclosures?

Gaming On An 8x8x8 LED Cube

LEDCube

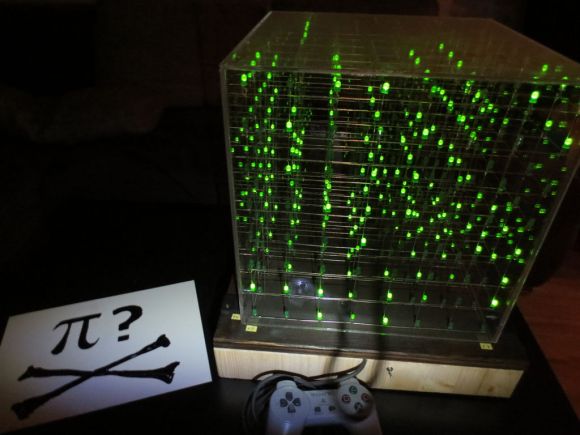
Building an LED cube is a great way to learn how to solder, while building something that looks awesome. Without any previous experience with soldering or coding, [Anred] set out to create a simple 8x8x8 LED cube gaming platform.

Rather than reinventing the wheel, [Andred] based the LED cube off of three separate Instructables. The resulting cube came out great, and the acrylic casing around it adds a very nice touch. Using an Arduino Mega, the 74HC574, and a few MOSFET’s to drive his LEDs, the hardware is fairly standard. What sets this project apart from many other LED cube builds, is the fact that you can game on it using a PlayStation 1 controller. All the necessary code to get up and running is included in the Instructable (commented in German). Be sure to see the cube in action after the break!

It would be great to see a wireless version of this LED cube game. What kind of LED cube will gaming be brought to next? A tiny LED cube? The biggest LED cube ever? Only time will tell.

Continue reading “Gaming On An 8x8x8 LED Cube”

Create Your Own J.A.R.V.I.S. Using Jasper

Tony Stark’s J.A.R.V.I.S. needs no introduction. With [Shubhro’s] and [Charlie’s] recent release of Jasper, an always on voice-controlled development platform for the Raspberry Pi, you too can start making your own J.A.R.V.I.S..

Both [Shubhro] and [Charlie] are undergraduate students at Princeton University, and decided to make their voice-controlled project open-source (code is available on GitHub). Jasper is build on inexpensive off-the-shelf hardware, making it very simple to get started. All you really need is an internet connected Raspberry Pi with a microphone and speaker. Simply install Jasper, and get started using the built in functionality that allows you to interface with Spotify, Facebook, Gmail, knock knock jokes, and more. Be sure to check out the demo video after break!

With the easy to use developer API, you can integrate Jasper into any of your existing Raspberry Pi projects with little effort. We could see Jasper integrated with wireless microphones and speakers to enable advanced voice control from anywhere in your home. What a great project! Thanks to both [Shubhro] and [Charlie] for making this open-source.

Continue reading “Create Your Own J.A.R.V.I.S. Using Jasper”

Building A Quadcopter With A CNC Mill And A 3D Printer

Quadcopter

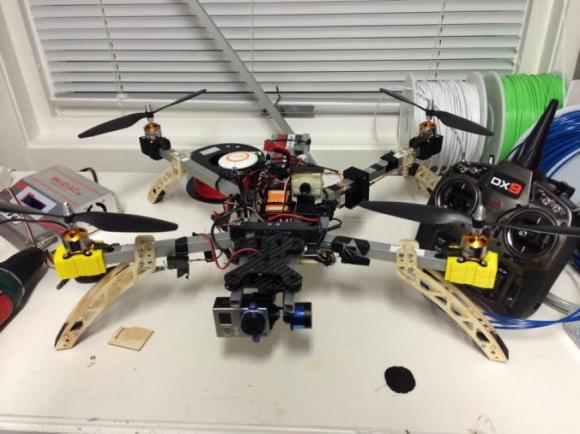
Quadcopters are a ton of fun to play with, and even more fun to build. [Vegard] wrote in to tell us about his amazing custom DIY quadcopter frame that uses a commercial flight control system.

Building a quadcopter is the perfect project to embark upon if you want to test out your new CNC mill and 3D printer. The mechanical systems are fairly simple, yet result in something unbelievably rewarding. With a total build time of 30 hours (including Sketchup modeling), the project is very manageable for weekend hackers. [Vegard’s] post includes his build log as well as some hard learned lessons. There are also tons of pictures of the build. Be sure to read to read the end of the post, [Vegard] discusses why to “never trust a quadcopter” and other very useful information. See it in action after the break.

While the project was a great success, it sadly only had about 25 hours of flight-time before a fatal bird-strike resulted in quite a bit of damage. Have any of your quadcopters had a tragic run-in with another flying object? Let us know in the comments.

Continue reading “Building A Quadcopter With A CNC Mill And A 3D Printer”

Web Interface For The FRAM LaunchPad

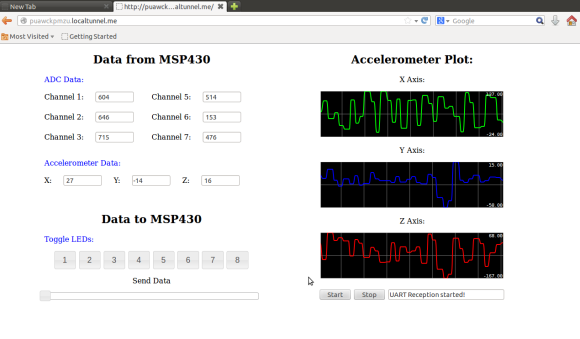
webUILaunchpad The Internet of Things is here in full force. The first step when adding to the Internet of Things is obvious, adding a web interface to your project. [Jaspreet] wrote in to tell us about his project that adds a web interface to his MSP430 based project, making it easy to add any project to the internet of things.

Creating a web interface can be a bit overwhelming if you have never done it before. This project makes it easy by using a dedicated computer running Linux to handle all of the web related tasks. The LaunchPad simply interfaces with the computer using USB and Python, and the computer hosts the webpage and updates it in real time using Node.js. The result is a very professional looking interface with an impressively responsive display that can control the on-board LEDs, read analog values from the integrated ADC, and stream accelerometer data. Be sure to see it in action after the break!

We could see this project being expanded to run on the Raspberry Pi with a multitude of sensors. What will you add a web interface to next? Home automation? A weather station? Let us know!

Continue reading “Web Interface For The FRAM LaunchPad”