Motorizing A Plasma Cutter On The Cheap

A hand-held plasma cutter is an excellent tool to have if you are working with sheet metal, but it’s not particularly well suited to making long or repetitive cuts. Which is why [workshop from scratch] worked his usual scrapheap magic and built his own motorized track for making perfectly straight cuts.

Most of the frame, and even the small truck that rides on it, is made out of square stock in various sizes. A couple of bearings are enough to make sure the movement is smooth and doesn’t have too much slop. Motion is provided by a long threaded rod and two nuts, which are welded to the side of the truck.

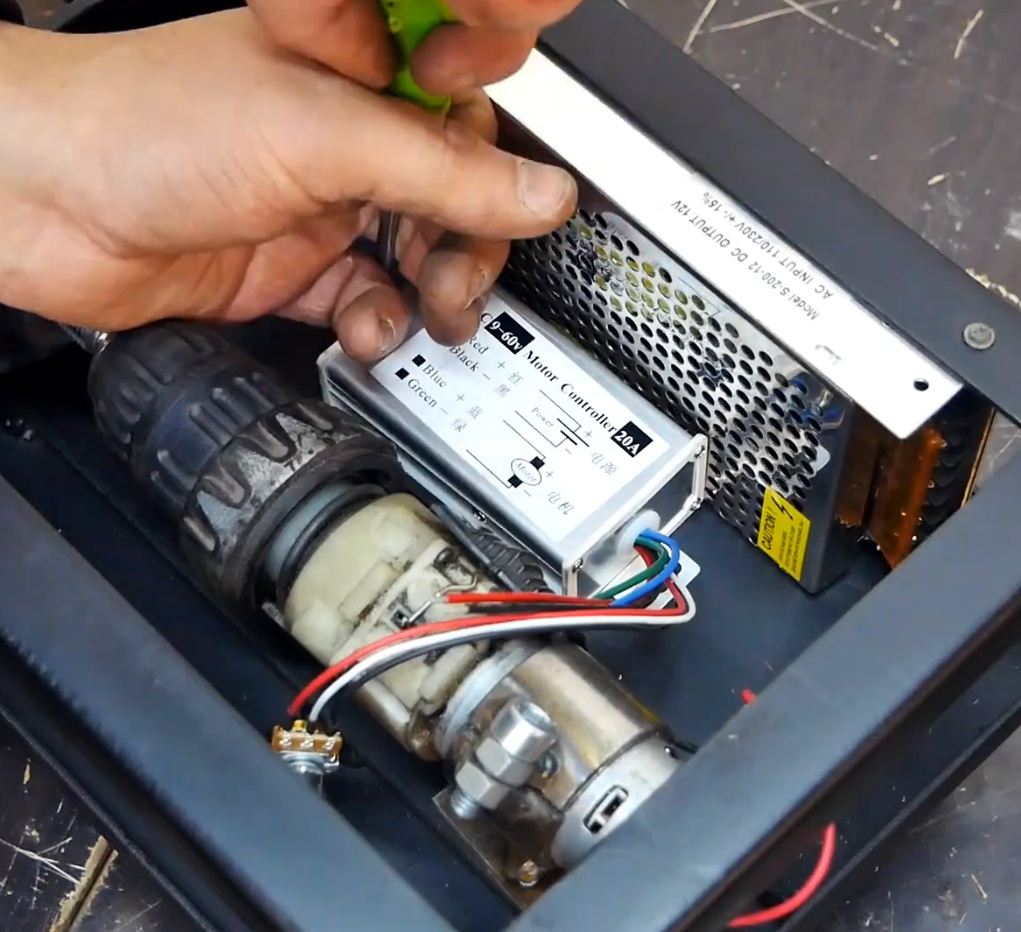
If you had the patience (and forearm strength) you could just put a crank on the rod and be done with it, but in this case [workshop from scratch] used the motor, gearbox, and chuck from an old electric drill to grab onto the threaded rod and do the spinning for him. He rigged up an enclosure for the side of the rack that holds the motor, DC power supply, and motor controller, along with a couple of switches and a knob to control the speed.

A modification allows him to enable the plasma cutter with one of the switches on the panel, which gives the setup a much more complete feel than just putting a zip tie on the trigger. With this design, the plasma cutter itself can still be removed from the mount and used normally. You can even remove the motorized component with a few bolts if you just wanted to do manual cuts on the bed.

In the video after the break, the keen-eyed viewer may notice a few familiar pieces of gear in the background, such as the hydraulic bench vise we covered earlier in the year. As the name of the channel implies, [workshop from scratch] is all about building the workshop tools that many take for granted, and they’ve all been phenomenally fascinating projects. While we admire the gumption it takes to try and build a lathe out of scrap granite slabs, there’s something to be said for DIY tools that end up looking nearly as good as commercial offerings.

Continue reading “Motorizing A Plasma Cutter On The Cheap”

Boeing’s Starliner Fails To Reach Space Station

After a decade in development, the Boeing CST-100 “Starliner” lifted off from pad SLC-41 at the Cape Canaveral Air Force Station a little before dawn this morning on its first ever flight. Officially referred to as the Boeing Orbital Flight Test (Boe-OFT), this uncrewed mission was intended to verify the spacecraft’s ability to navigate in orbit and safely return to Earth. It was also planned to be a rehearsal of the autonomous rendezvous and docking procedures that will ultimately be used to deliver astronauts to the International Space Station; a capability NASA has lacked since the 2011 retirement of the Space Shuttle.

Liftoff at 6:36 AM Eastern

Unfortunately, some of those goals are now unobtainable. Due to a failure that occurred just 30 minutes into the flight, the CST-100 is now unable to reach the ISS. While the craft remains fully functional and in a stable orbit, Boeing and NASA have agreed that under the circumstances the planned eight day mission should be cut short. While there’s still some hope that the CST-100 will have the opportunity to demonstrate its orbital maneuverability during the now truncated flight, the primary focus has switched to the deorbit and landing procedures which have tentatively been moved up to the morning of December 22nd.

While official statements from all involved parties have remained predictably positive, the situation is a crushing blow to both Boeing and NASA. Just days after announcing that production of their troubled 737 MAX airliner would be suspended, the last thing that Boeing needed right now was another high-profile failure. For NASA, it’s yet another in a long line of setbacks that have made some question if private industry is really up to the task of ferrying humans to space. This isn’t the first time a CST-100 has faltered during a test, and back in August, a SpaceX Crew Dragon was obliterated while its advanced launch escape system was being evaluated.

We likely won’t have all the answers until the Starliner touches down at the White Sands Missile Range and Boeing engineers can get aboard, but ground controllers have already started piecing together an idea of what happened during those first critical moments of the flight. The big question now is, will NASA require Boeing to perform a second Orbital Flight Test before certifying the CST-100 to carry a human crew?

Let’s take a look at what happened during this morning’s launch.

Continue reading “Boeing’s Starliner Fails To Reach Space Station”

Movie-Style Hacking With A Wall Of Glowing Hex

Over the years, the media has managed to throw together some pretty ridiculous visual depictions of computer hacking. But perhaps none have gone as far down the road of obfuscation as The Matrix, where the most experienced hackers are able to extract information from a display of cascading green glyphs like a cyberpunk version of reading tea leaves. It’s absolutely ridiculous, with zero basis in reality.

Well, maybe not anymore. Taking a page from these outlandish visions of hacking, [Erik Bosman] has constructed a dedicated hex dump display out of fourteen segment alphanumeric LEDs that looks like it could be pulled from a movie set. But make no mistake, it’s more than just a pretty face. By cleverly varying the brightness of the individual characters, he’s managed to make his so-called “hexboard” completely usable despite the fact that everything’s the same color.

While he says the project is not quite at 100% yet, he’s already released the firmware, computer-side software, and even the PCB design files for anyone who might want to build their own version. Though as you might imagine, it’s quite a tall order.

The display is broken up into segments holding eight Houkem-5421 LED modules apiece, each with its own STM32F030F4 and two TC7258E LED controllers. The bill of materials on this one is a bit intimidating, but when the end result look this good it’s hard to complain.

To build a somewhat smaller version that also features a more retro vibe, you might consider doing something similar by chaining together vintage LED “bubble” displays.

Degassing Epoxy Resin On The (Very) Cheap

Anyone who’s tried to encapsulate something in epoxy resin knows how much of a hassle air bubbles can be. If you’re trying to get a perfectly clear finish, the last thing you want is a bunch of microscopic bubbles frozen in time. The best way to prevent this is to put the parts in a vacuum chamber so all the air works its way out before the epoxy cures, but that’s a considerable investment for a one-off project.

But assuming your parts are small enough, [Jasper Sikken] has a great tip that allows you to construct a simple vacuum chamber for just a few dollars. He shows his homemade chamber off in the video after the break, and we think you’ll agree that the change between before and after is pretty dramatic. The best part is that if you want to build your own version, you only need two parts.

The first one is a airtight container large enough to hold the piece you’re working on. Remember that the larger the chamber is the more time it will take to pump down to a suitable vacuum, so avoid the temptation to use something larger than necessary. [Jasper] used a glass jar with a locking lid, which is not only cheap and readily available, but has a decently large internal volume.

Obviously, the second component is the vacuum pump itself. This might normally be a tall order, but [Jasper] recently found that you can buy small battery-powered gadgets designed for sucking the air out of food containers for as little as $5 USD from the usual import sites. All you need to do is pop a hole in the lid of your container, hold the device over the hole, and watch the magic.

This method is great for anything smaller than a paperweight, but if you’ve got something bigger than that, you’ll need to step up your chamber game. Luckily even larger vacuum chambers can be built cheaply at a pinch.

Continue reading “Degassing Epoxy Resin On The (Very) Cheap”

Escher: Etch-a-Sketch As A Service

For better or for worse, the tech world has fully committed to pushing as many of their products into “The Cloud” as possible. Of course, readers of Hackaday see right through the corporate buzzwords. It’s all just a fancy way of saying you have to poke some server over the Internet every time you want to use the service. In a way, [Matt Welsh] has perfectly demonstrated this concept with Escher. It’s a normal Etch-a-Sketch, but since somebody else owns it and you’ve got to have an active Internet connection to use it, that makes it an honorary citizen of the Cloud.

Escher takes the form of a 3D printed mount and replacement knobs for the classic drawing toy that allow two NEMA 17 steppers to stand in for human hands. Thanks to the clever design, [Matt] can easily pull the Etch-a-Sketch out and use it the old fashioned way, though admittedly the ergonomics of holding onto the geared knobs might take a little getting used to. But who wants to use their hands, anyway?

In terms of the electronics, the star of the show is the the Adafruit Feather HUZZAH32 development board, paired with a motor controller that can provide 12 V to the steppers. [Matt] even went through the trouble of making a custom voltage regulator PCB that steps down the stepper’s voltage to 5 V for the Feather. Totally unnecessary, just how we like it.

For the software folks in the audience, [Matt] goes into considerable detail about how he got his hardware talking to the web with Google Firebase. Even if the Internet of Sketches doesn’t quite tickle your fancy, we imagine his deep-dive on pushing G-Code files from the browser into the Feather will surely be of interest.

It probably will come as little surprise to hear this isn’t the first automatic Etch-a-Sketch that’s graced these pages over the years, but this might be the most fully realized version we’ve seen yet.

Commodore Tape Drive Emulator On A Raspberry Pi

We imagine most of the people reading Hackaday have an old Raspberry Pi or two laying around. It’s somewhat less likely you’ve still got an 8-bit Commodore in working condition, but we’d wager there’s more than a few in the audience that can count themselves among both groups. So why not introduce them?

[RhinoDevel] writes in to tell us about CBM Tape Pi , an open source Commodore tape drive emulator for Raspberry Pi that needs only a handful of passive components to get wired up. Even better, the project targets the older Pis that are more likely to be languishing around in the parts bin. In the video after the break, a Commodore PET can be seen happily loading content from the original Raspberry Pi with its quaint little composite video connector.

Without any special software on the Commodore itself, the project allows the user to load and save PRGs on the Pi’s SD card, as well as traverse directories. Don’t expect stellar I/O, as [RhinoDevel] notes that no fast loader is currently implemented. Of course if you’re enough of a devotee to still be poking around a VIC-20 or C64 this far into 21st century, then we imagine you’ve got enough patience to get by.

Continue reading “Commodore Tape Drive Emulator On A Raspberry Pi”

Prusa Dares You To Break Their Latest Printer

Two months after its surprise reveal at the 2019 East Coast RepRap Festival, the Prusa Mini has started shipping out to the first wave of early adopters. True to form, with the hardware now officially released to the public, the company has begun the process of releasing the design as open source. In their GitHub repository, owners can already find the KiCad files for the new “Buddy” control board and STLs for the machine’s printable parts.

But even so, not everyone feels that Prusa Research has made the Mini as “open” as its predecessors. Some concerned owners have pointed out that according to the documentation for the Buddy board, they’ll need to physically snap off a section of the PCB so they can flash custom firmware images via Device Firmware Upgrade (DFU) mode. Once this piece of the board has been broken off, which the documentation refers to as the Appendix, Prusa Research will no longer honor any warranty claims for the electronic components of the printer.

For the hardcore tinkerers out there, this news may come as something of a shock. Previous Prusa printers have enjoyed a fairly active firmware development community, and indeed, features that started out as user-developed modifications eventually made their way into the official upstream firmware. What’s more, certain hardware modifications require firmware tweaks to complete.

Prusa Research explains their stance by saying that there’s no way the company can verify the safety of community developed firmware builds. If thermal runaway protections have been disabled or otherwise compromised, the results could be disastrous. We’ve already seen it happen with other printers, so it’s hard to fault them for being cautious here. The company is also quick to point out that the installation of an unofficial firmware has always invalidated the printer’s warranty; physically breaking the board on the Mini is simply meant as a way to ensure the user understands they’re about to leave the beaten path.

How much support is a manufacturer obligated to provide to a user who’s modified their hardware? It’s of course an issue we’ve covered many times before. But here the situation is rather unique, as the user is being told they have to literally break a piece off of their device to unlock certain advanced functionality. If Prusa wanted to prevent users from running alternate firmware entirely they could have done so (or at least tried to), but instead they’ve created a scenario that forces the prospective tinkerer to either back down or fully commit.

So how did Prusa integrate this unusual feature into their brand new 32-bit control board? Perhaps more importantly, how is this going to impact those who want to hack their printers? Let’s find out.

Continue reading “Prusa Dares You To Break Their Latest Printer”