Revive That Old Analog Cell Phone With SDR

With the latest and greatest 5G cellular networks right around the corner, it can be difficult to believe that it wasn’t so long ago that cell phones relied on analog networks. They aren’t used anymore, but it might only take a visit to a swap meet or flea market to get your hands on some of this vintage hardware. Of course these phones of a bygone era aren’t just impractical due to their monstrous size compared to modern gear, but because analog cell networks have long since gone the way of the floppy disk.

But thanks to the efforts of [Andreas Eversberg] those antique cell phones may live again, even if it’s only within the radius of your local hackerspace. His software allows the user to create a functioning analog base station for several retro phone networks used in Europe and the United States, such as AMPS, TACS, NMT, Radiocom, and C450. You can go the old school route and do it with sound cards and physical radios, or you can fully embrace the 21st century and do it all through a Software Defined Radio (SDR); in either event, calls to the base station and even between multiple mobile devices is possible with relatively inexpensive hardware.

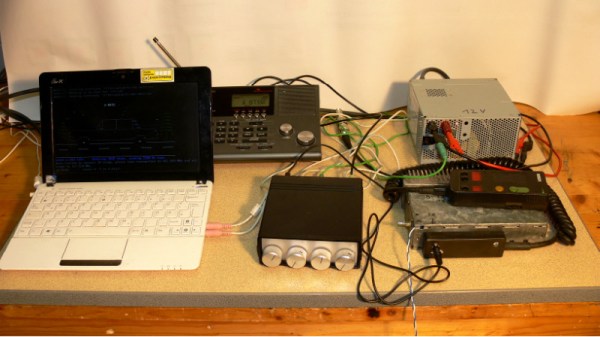
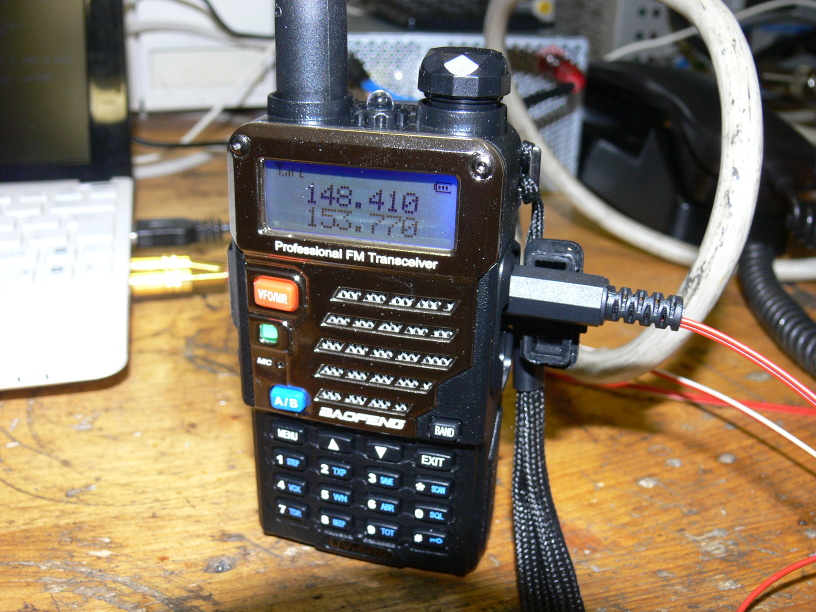
[Andreas] has put together exceptional documentation for this project, which starts with a walk through on how you can setup your DIY cell “tower” with traditional radios. He explains that amateur radios are a viable option for most of the frequencies used, and that he had early success with modifying second-hand taxi radios. He even mentions that the popular BaoFeng handheld radios can be used in a pinch, though not all the protocols will work due to distortion in the radio.

If you want to take the easy way out, [Andreas] also explains how to replace the radios with a single SDR device. This greatly simplifies the installation, and turns a whole bench full of radios and wires into something you can carry around in your pack if you were so inclined. His software has specific options to use the LimeSDR and LimeSDR-Mini, but you should be able to use other devices with a bit of experimentation.

We’ve previously reviewed the LimeSDR-Mini hardware, as well as covered its use in setting up DIY GSM networks.

Eight Player GameCube Adapter Is Ready For Smash

With the release of Smash Ultimate fast approaching for the Nintendo Switch, [Patrick Hess] wanted to get ahead of the game and make sure his squad had the equipment they’d need. Namely, support for the GameCube controllers that serious Smash Bros players demand. But it wasn’t enough to have one or two of them hooked up, or even four. Not even six GameCube controllers could satiate his desire. No, he needed to have support for eight simultaneous GameCube controllers, and he wanted to look good doing it too.

Enter his meticulously designed eight player GameCube to USB adapter. Made out of dual official Nintendo GameCube to USB adapters (intended for the Wii U) merged together in a 3D printed case, the final result looks like something that could earn the coveted Nintendo Seal of Approval. Or at least, something that might pop up on the import sites in the next month or two for a few bucks.

[Patrick] started the project by recreating the official adapter PCBs and their housings in 3D using a pair of calipers. After a couple of test prints to make sure he had all the dimensions right, he could then move on to designing his final enclosure knowing he had accurate data to model around.

In addition to the two adapter boards, there’s also a four port USB hub inside the device’s case. Each adapter has two USB leads, here shortened to fit inside the case, which connect up to the hub. The integrated hub allows connecting all eight GameCube controllers through only a single USB connection. All controllers worked as expected during intense testing on the Wii U’s version of Smash Bros, though at this point [Patrick] can only assume it will work when the Switch version is released.

If there’s a downside to this project, it’s that the design for the 3D printed case is so intricate that [Patrick] was only able to print it on a machine that supported water-soluble PVA supports. A somewhat tall order for the average hacker; it would be interesting to see if somebody could make a second pass on the enclosure that is geared more towards printability than aesthetics.

While the design of the GameCube controller remains somewhat controversial after all these years, there’s no denying it retains an impressive following. Whether turning them into USB devices, shrinking them to preposterously small dimensions, or just finding increasingly creative ways to use them on Nintendo’s latest console, hackers are definitely in love with the gonzo little controller that’s now pushing 20 years old.

This Cup Holder Crystal Ball Tells Your MPG Future

Hybrid vehicles, which combine an eco-friendly electric motor with a gasoline engine for extended range, are becoming more and more common. They’re a transitional technology that delivers most of the advantages of pure electric vehicles, but without the “scary” elements of electric vehicle ownership which are still foreign to consumers such as installing a charger in their home. But one element which hybrids are still lacking is a good method for informing the driver whether they’re running on petroleum or lithium; a way to check at a glance how “green” their driving really is.

[Ben Kolin] and his daughter [Alyssa] have come up with a clever hack that allows retrofitting existing hybrid vehicles with an extremely easy to understand indicator of real-time vehicle efficiency. No confusing graphics or arcade-style bleeps and bloops, just a color-changing orb which lives in the cup holder. An evolved version which takes the form of a smaller “dome light” that sits on the top of the dashboard could be a compelling aftermarket accessory for the hybrid market.

The device, which they are calling the ecOrb, relies on an interesting quirk of hybrid vehicles. The OBD II interface, which is used for diagnostics on modern vehicles, apparently only shows the RPM for the gasoline engine in a hybrid. So if the car is in motion but the OBD port is reporting 0 RPM, the vehicle must be running under electric power.

With a Bluetooth OBD adapter plugged into the car, all [Ben] and [Alyssa] needed was an Arduino Nano clone with a HC-05 module to read the current propulsion mode in real-time. With some fairly simple conditional logic they’re able to control the color of an RGB LED based on what the vehicle is doing: green for driving on electric power, purple for gas power, and red for when the gas engine is at idle (the worst case scenario for a hybrid).

Check out our previous coverage of OBD hacking on the Cadillac ELR hybrid if you’re looking to learn more about what’s possible with this rapidly developing class of vehicle

Continue reading “This Cup Holder Crystal Ball Tells Your MPG Future”

Adaptive Layer Height On The Monoprice Select Mini

If you’ve used a desktop 3D printer, you’re likely familiar with the concept of layer heights. Put simply: thicker layers will print faster, and thinner layers will produce better detail. Selecting your layer height is making a choice between detail and speed, which usually works well enough. For example, prints which are structural and don’t have much surface detail can be done in higher layer heights to maximize speed with no real downside. Conversely, if you’ve got a model with a lot of detail you’ll have to just deal with the increased print time of thinner layers.

At least, that’s how it’s been up till now. Modern slicer software is starting to test the waters of adaptive layer heights, which change the layer height during the print. So the software will raise or lower the layer height depending on the level of detail required for the current area being printed. [Dylan Radcliffe] wanted to experiment with this feature on his Monoprice Select Mini, but it took some tweaking and the dreaded mathematics to get Cura’s adaptive layer height working on the entry-level printer. He’s documented his settings for anyone who wants to check out this next-generation 3D printing technology without forking out the cash for a top of the line machine.

While Cura is a popular slicer, the fact of the matter is that it’s developed by Ultimaker primarily for their own line of high-end printers. It will control machines from other manufacturers, but it makes no promises that all the features in the software will actually work as expected on lesser printers. In the case of the Monoprice Mini, the issue is the rather unusual Z hardware. The printer uses a 7.5° 48-step motor coupled to 0.7 mm thread pitch M4 rod. This is a pretty suspect arrangement that was no doubt selected to keep costs down, and results in an unusual 0.04375 mm step increment. For the best possible print quality, layer heights should be a multiple of this number. That’s where the math comes in.

After enabling adaptive layers in Cura’s experimental settings, you need to define the value which Cura will add or subtract to the base layer height. In theory you could enter 0.04375 mm here, but while that’s the minimum on paper, the machine itself is unlikely to be able to pull off such a small variation. [Dylan] recommends doubling that to 0.0875 for the “variation step size” parameter, and setting the base layer height to 0.175 mm (4 x 0.04375 mm).

[Dylan] reports these settings reduced the print time on his topographical map pieces from 12 hours to 7 hours, while still maintaining high detail on the top surface. Of course print time reduction is going to be highly dependent on the model being printed, so your mileage may vary.

If Cura isn’t your style, our very own [Brian Benchoff] gave us a tour of “variable layer height”, the Slic3r version of this technique. Perfect for that Prusa i3 MK3 you finally spent the cash on.

Mini LEGO Technic Tank Patrols Your Desk Under ESP32 Control

We probably don’t have to tell the readers of Hackaday that LEGO isn’t just for kids; we’ve seen plenty of projects that live in an enclosure made of the multi-color bricks, and let’s not even get started on the Mindstorms builds we’ve seen over the years. But while LEGO (and especially the Technic product line) is fine for prototyping and putting together quick projects, the stock electronic components aren’t exactly top of the line. Which is why [Jason Kirsons] has been working on bridging the gap between LEGO and “real” parts.

His LEGO Technic tank is a perfect example of this principle. While the tank design itself is standard LEGO fare, he’s gone all in on the electronics. With an Adafruit Feather ESP32, custom motor controller board, and NEMA 8 steppers with 3D printed Technic adapters, this little tank has a lot more going on under the hood than you might expect. While this project is more a proof of concept than anything, the methods [Jason] demonstrates might be something to consider the next time you’re building with Billund’s best.

[Jason] chose the Feather ESP32 because of its small size, but you could get away with a generic board if you’re not trying to compress everything down into such a small footprint. Of course, if you go with another board you won’t be able to use the PCB he’s designed which attaches to the Feather and holds four Pololu DRV8835 motor drivers.

Easily the most broadly applicable element of this project is the work [Jason] has done designing adapter plates that let you use NEMA 8 motors with LEGO Technic parts. He’s put the adapters up on Thingiverse, for anyone looking for a drop-in solution to give their Technic creations a bit more oomph (technical term).

LEGO has a long history with hackers and makers. We’ve covered some absolutely incredible projects built with the famous construction set, and we don’t see any sign of it slowing down in the future.

Continue reading “Mini LEGO Technic Tank Patrols Your Desk Under ESP32 Control”

Corporate Badgelife: Oracle’s Code Card

We tend to think of elaborate electronic conference badges as something limited to the hacker scene, but it looks like the badgelife movement is starting to hit the big time. Now even the “big boys” are getting into the act, and pretty soon you won’t be able to go to a stuffy professional conference without seeing a sea of RGB LEDs firing off. We’ll let the good readers of Hackaday determine if this means it’s officially post-cool or not.

[Noel Portugal] writes in to tell us about how he created the “Code Card” during his tenure with the Oracle Groundbreakers Team. Featuring an ESP8266 and an e-ink screen, the Code Card serves not only as swanky way of identifying yourself, but as a real-world demonstration of physical devices pulling content from Oracle’s Cloud. Gotta keep those corporate overlords happy.

The Code Card is a fairly simple piece of hardware as far as badges go these days, but then the goal was never to be flashy. It does feature dual four-pin Grove System connectors on the backside though, so you can plug in additional sensors and gadgets for the customary badge hacking sessions.

To maximize runtime on the rechargeable coin cell battery, the Code Card only turns on the ESP after the user has pressed one of the buttons on the front. Once the ESP has finished performing whatever task the user requested, its powered back off completely rather than put into standby. Combined with the e-ink screen, power consumption while the device isn’t actively updating the display or pulling down new content is negligible.

[Noel] really went all-out on the software side, going as far as developing a web application which let conference attendees configure their Code Cards from their smartphones. Different functions could be assigned to short and long presses on the badge’s two buttons, and users could even select icons for the various functions from a list of images included in the firmware. A feature where attendees could upload their own images didn’t make the cut, but that surely won’t stop people from hacking around in the published Arduino source code and figuring out how to do it manually.

If you think the Code Card looks a bit familiar, it’s perhaps because it was designed in conjunction with Squarofumi, creators of the Badgy. So even if you aren’t hitting up any of Oracle’s upcoming conferences, you’re not completely out of luck if you want an e-ink badge to play with.

Kepler Closes Eyes After A Decade Of Discovery

Since its launch in March 2009, the Kepler Space Telescope has provided us with an incredible amount of data about exoplanets within our galaxy, proving these worlds are more varied and numerous than we could ever have imagined. Before its launch we simply didn’t know how common planets such as ours were, but today we know the Milky Way contains billions of them. Some of these worlds are so hot they have seas of molten rock, others experience two sunsets a day as they orbit a pair of stars. Perhaps most importantly, thousands of the planets found by Kepler are much like our own: potentially playing host to life as we know it.

Kepler lived a fruitful life by any metric, but it hasn’t been an easy one. Too far into deep space for us to repair it as we did Hubble, hardware failures aboard the observatory nearly brought the program to a halt in 2013. When NASA announced the spacecraft was beyond hope of repair, most assumed the mission would end. Even by that point, Kepler was an unqualified success and had provided us with enough data to keep astronomers busy for years. But an ingenious fix was devised, allowing it to continue collecting data even in its reduced capacity.

Leaning into the solar wind, Kepler was able to use the pressure of sunlight striking its solar panels to steady itself. Kepler’s “eyesight” was never quite the same after the failure of its reaction wheels, and it consumed more propellant than originally intended to maintain this careful balancing act, but the science continued. The mission that had already answered many of our questions about our place in the galaxy would push ahead in spite of a failure which should have left it dead in space.

As Kepler rapidly burned through its supply of propellant, it became clear the mission was on borrowed time. It was a necessary evil, as the alternative was leaving the craft tumbling through space, but mission planners understood that the fix they implemented had put an expiration date on Kepler. Revised calculations could provide an estimate as to when the vehicle would finally run its tanks dry and lose attitude control, but not a definitive date.

For the last several months NASA has known the day was approaching, but they decided to keep collecting data until the vehicle’s thrusters sputtered and failed. So today’s announcement that Kepler has at long last lost the ability to orient itself came as no surprise. Kepler has observed its last alien sunset, but the search for planets, and indeed life, in our corner of the galaxy doesn’t end today.

Continue reading “Kepler Closes Eyes After A Decade Of Discovery”