Perfecting The Solar Powered Web Server

Running a server completely off solar power seems like it would be a relatively easy thing to do: throw up a couple of panels, tack on a charge controller and a beefy battery, and away you go. But the reality is somewhat different. Most of us hackers are operating on a relatively limited budget and probably don’t have access to the kind of property you need to put out big panels; both pretty crippling limitations. Doing solar on a small-scale is hard, and unless you really plan ahead your setup will probably be knocked out on its first cloudy day.

So when [Kris de Decker] wanted to create a solar-powered version of his site “Low-tech Magazine”, he went all in. Every element of the site and the hardware it runs on was investigated for potential power savings, and luckily for us, the entire process was written up in meticulous detail (non-solar version here). The server still does go down from time to time if the weather is particularly poor, but in general it maintains about 90% uptime in Barcelona, Spain.

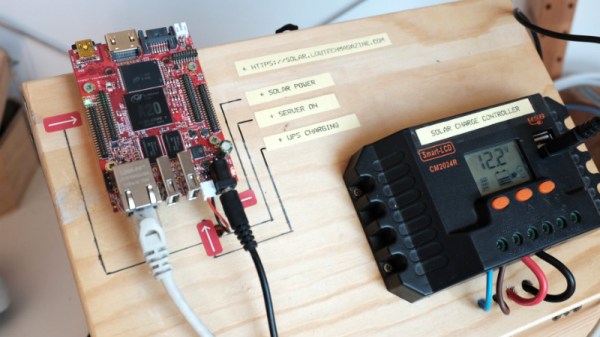
The solar side of the equation is fairly simple. There’s a 50 watt photovoltaic panel charging a 12V 7Ah lead-acid battery though a 20A charge controller. With an average of 4 to 6 hours of sunlight a day, the panel generates 300 Wh of electricity in the best case scenario; which needs to be split between charging the battery and running the server itself.

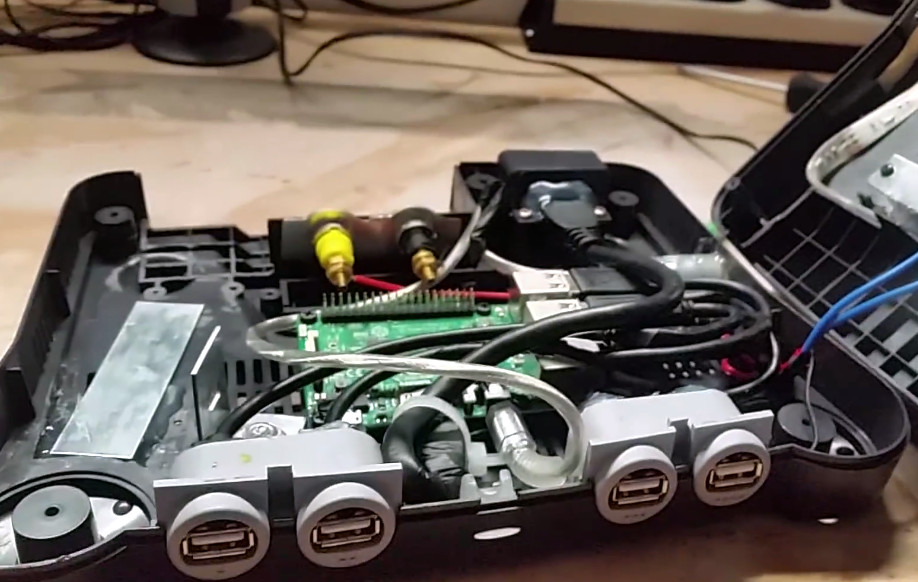
As for the server, [Kris] chose the Olimex Olinuxino A20 Lime 2 in part because of it being open source hardware, but also because it’s very energy-efficient and includes a AXP209 power management chip. Depending on processor load, the Olimex board draws between 1 and 2.5 watts of power, which combined with charging losses and such means the system can run through two days of cloudy weather before giving up the ghost. A second battery might be added in the future to help improve the run time during low-light conditions, but for now its been working pretty well.

Perhaps the most interesting part of the whole project are the lengths to which the website itself was optimized to keep resource utilization as low as possible. Images are compressed using dithering to greatly reduce their file sizes, and the site eschews modern design in favor of a much less processor intensive static layout. There’s even a battery capacity display integrated into the page through some clever use of CSS. Even if you aren’t looking to set up your own sun worshiping website, there are tips here for building efficient web pages that could absolutely be put to use in other projects.

If you’re interested in solar projects, we’ve got you covered. From an open source charge controller to building DIY photovoltaic panels, there’s plenty of prior art you should find very…illuminating. Please clap.

ESP8266 Clock Puts Time In A Jar

Ironically, with the wide availability of modular electronic components today, the hardest part of constructing your latest gadget might just end up being able to find a decent looking enclosure for it. Project boxes will only get you so far, and let’s be honest, they aren’t exactly the most attractive things in the world. But if you’re willing to think outside the box (get it?) there are some unconventional options out there that might fit the bill.

Take for example this ESP8266 clock by [ZaNgAbY] that’s housed in a glass pasta jar. With the addition of some window tint film for the LED display to shine through, the final result could nearly pass as modern art. Even if you don’t need an extra clock around the house, this same general principle could be used to create a slick-looking ticker for all sorts of information, from the weather to server uptime with just some adjustments to the code.

Inside the jar there’s six 8×8 MAX7219 LED matrix modules tacked together to create one long strip, with a NodeMCU board stuck to the back with double-sided tape. There’s also a DS3231 RTC module so the clock can keep halfway decent time, but depending on how aggressively you are willing to pull down the current time from NTP, that may or may not be required. A simple barrel jack is popped through the metal lid of the jar for power, and represents the only physical connection the internals have to the outside world.

For the next iteration [ZaNgAbY] is thinking of adding a temperature and humidity sensor, and a light sensor that can dim the LED display depending on the ambient light. While the environmental sensors will have to go on the outside of the lid if there’s any hope of pulling useful readings from them, the clear glass will allow him to keep the light sensor internal to the clock.

Believe it or not, this isn’t the first time we’ve seen somebody give their electronics the pickle treatment. We’ve previously played host to a server that “preserves” files in a Mason jar, as well as a gorgeous display of an iPod under glass.

Continue reading “ESP8266 Clock Puts Time In A Jar”

Amplifier Controlled Motorized Display

It’s easy to get jaded by gadgets like the Chromecast or Sonos, which let the user control AV equipment remotely from a mobile device or computer. You can pick something to play from your phone and send it off to your speakers via the magic of Wi-Fi. But it’s still nice to have a display to look at for music visualizations and that sort of thing, at least occasionally.

To address this only occasional desire to have a display on your media setup, you could follow in the footsteps of [Steven Elliott] and create a DIY motorized display which only pops up when needed. Inspired by seeing videos of TVs rising out of cabinets and other such trickery, he decided to create his own version using an old computer monitor he had lying around.

The monitor is lifted with a beefy linear actuator, which has been placed inside of a square metal fence post to keep from rotating. It already had a power supply and control board with relays for extending and retracting, so [Steven] just needed to find a convenient way of firing them off.

The answer came from a somewhat unconventional source: his amplifier. [Steven] explains that many amplifiers feature a “Trigger Output”, which uses a standard stereo 3.5mm connector and sends a 12V pulse to connected device. This is generally used to turn on downstream devices when the amplifier switches to the respective input. It’s too short and not nearly powerful enough to close the actuators relays, but it’s easy enough to detect.

[Steven] uses a LeoStick microcontroller to wait for the pulse from the amplifier, and then use that to raise or lower the display depending on the selected input. There’s also a SPST momentary switch which can be used to trigger the actuator manually. Beyond the fact the linear actuator is a bit loud, he says the setup works very well and prevents him from having to start up his projector if he just wants to take a quick glance at what’s playing or program his DVR.

We don’t see many motorized display lifts like this anymore, not since wall mounted LCDs became popular anyway. But it’s still a cool effect, and today made quite a bit easier thanks to the fact that TVs and monitors no longer weigh as much as a small car.

[Thanks to Baldpower for the tip.]

Tiny Plotter Is Made Of Strings And Cardboard

If you’ve been hanging around Hackaday for any length of time, you’ve undoubtedly seen the work of [Niklas Roy]. A prolific maker of…everything, we’ve covered his projects for over a decade now. He’s one of an elite group of hackers who can say they’ve been around since Hackaday was still using black & white pictures. Yet sometimes projects fall through the cracks.

Thanks to a tip sent in from one of our beloved readers, we’re just now seeing this incredible cardboard plotter [Niklas] made for a workshop he ran at the University of Art and Design Offenbach several years ago. The fully manual machine is controlled with two rotary dials and a switch, and it even comes with a book that allows you to “program” it by dialing in specific sequences of numbers.

Not that it detracts from the project, but its worth mentioning that the “cardboard” [Niklas] used is what is known as Finnboard, a thin construction material made of wood pulp that looks similar to balsa sheets. The material is easy to work with and much stronger than what we’d traditionally think of as cardboard. Beyond the Finnboard, the plotter uses welding rods as axles and slide rails, with glue, tape, and string holding it all together.

The dials on the control panel correspond to the X and Y axes: turning the X axis dial moves the bed forward and backward, and the Y dial moves the pen left and right. The switch above the dial lowers and raises the pen so it comes into contact with the paper below. With coordination between these three inputs, the operator can either draw “freehand” or follow the sequences listed in the “Code Book” to recreate stored drawings and messages.

Believe it or not, this isn’t the first time we’ve seen somebody made a plotter out of cardboard. Though previous entries into this specific niche did use servos to move around.

Continue reading “Tiny Plotter Is Made Of Strings And Cardboard”

Easy Access Point Configuration On ESP8266

One of the biggest advantages of using the ESP8266 in your projects is how easy it is to get WiFi up and running. Just plug in the WiFi library, put the SSID and encryption key in your source code, and away you go. It authenticates with your network in seconds and you can get on with building your project. But things get a little trickier if you want to take your project someplace else, or distribute your source code to others. Quickly we learn the downside of using static variables for authentication.

While there are already a few solutions to this problem out there, [Martin Raynsford] wasn’t too thrilled with them. Usually they put the ESP8266 in Access Point mode, allow the user to connect, and then ask which network they should authenticate with. But he didn’t want his projects to require an existing network, and figured he could do just as well making a field-configurable AP.

Using it is simple. Once the ESP8266 starts up it will create a new network in the form of “APConfig XXXXXX”, which should be easy enough to find from your client side device. Once connected, you can go to a simple administration page which allows you to configure a new AP name and encryption key. You even have the option to create an open AP by leaving the “Password” field blank. Once rebooted, the ESP8266 will create a new network with the defined parameters.

[Martin] has also included a “backdoor” to let anyone with physical access to the ESP8266 board create a new open AP that can be used to reconfigure the network settings. During boot up there is a brief period, indicated with specific blinks of the LED, wherein you can hit the reset button and trigger the open AP. This keeps you from getting locked out of your own project if you forget what key you gave it.

If you’re not one to go the austere route, take a look at some of the more robust solutions we’ve seen for easier end-user setup of the ESP8266.

Keep ‘Em Flying With This Monster DIY Battery

If you’ve spent an afternoon at the sticks of a remote-controlled aircraft, you’re probably well aware of the great limiter for such exploits: battery life. In the days when most RC aircraft were gas powered it was easy to cart along some extra fuel to keep the good times rolling, but now that everything except big scale models are using electric motors, RC pilots are looking for better ways to charge their batteries in the field.

Though it might seem counter-intuitive, [Adam Pyschny] is of the opinion that the best way to keep his quadcopter batteries charged is to simply use another, much bigger, battery. Rather than mess around with inverters or generators, he can simply use a DC-to-DC battery charger and his huge custom-built battery pack to keep flying.

The pack contains 36 Samsung INR18650-35E 3500mAh cells, which gives it a total capacity of 454Wh. At 1965 grams (4.3 lbs) the pack isn’t exactly a featherweight, but it’s significantly lighter than carting a small generator or even a lead-acid battery to the field.

[Adam] designed a slick case in FreeCAD and printed it in Minadax ASA-X filament, which is specifically designed for outdoor use. A particularly nice detail in the case is that the balance connector (used to charge the cells) is cleanly integrated into the side of the pack, rather than just flapping around in the breeze; which annoyingly seems the norm even on commercially produced batteries.

An interesting next step for this project would be the addition of a solar panel and charge controller to help recover in-between charges. Beyond an automated platform to swap the batteries for you, a DIY pack like this might be the easiest way to maximize the amount of time your RC aircraft are in the air where they belong.

A New Take On Building A Portable N64

When home consoles go mobile, whether in the form of modded original hardware or emulation, they usually take a pretty standard shape. A screen in the middle, with buttons either on the sides or below it. Basically the same layout Nintendo popularized with born-handheld systems such as the Game & Watch series and original Game Boy. Like the saying goes, if it ain’t broke…

But [Le Nerdarto] had a different idea. He came across a broken N64 and wanted to turn it into a portable console, but not necessarily a handheld one. Noticing the cartridge was about the perfect size to contain a small LCD and in an ideal position, he set out to make what is arguably the most literal interpretation of “portable N64” we’ve ever seen. It might not be the most practical iteration of this concept, but it definitely gets extra points for style.

After he stripped the N64 of its original hardware, he installed a Raspberry Pi 3 and an RC battery eliminator circuit (BEC) to get 5V out of the internal 6200 mAh 7.4V battery. [Le Nerdarto] says this provides power for the Pi, the LCD, and the various lighting systems for up to 10 hours. He’s also added USB ports in the front of the system for controllers, and an HDMI port on the back so he can still connect the system up to a TV when not on the move.

The 3.5 inch LCD in the cartridge is arguably the centerpiece of the build, and while it might be on the small side, we can’t deny it’s a clever idea. [Le Nerdarto] had the good sense to tilt the it back a few degrees to put the display at a more comfortable angle, but otherwise it looks stock since he was able to fit everything in without cutting the back of his donor cartridge out. For those who might be wondering, the “cartridge” can’t be removed, but we’ll admit that would have been a killer feature to add especially with the HDMI port on the back.

Of course, since it’s running emulators on a Raspberry Pi, this isn’t only a portable N64. The front mounted USB ports allow him to plug in all sorts of controllers and emulate classics from pretty much any console that’s older than the N64 itself. Ironically the Raspberry Pi 3 isn’t exactly an ideal choice for N64 emulation, but a good chunk of titles are at least playable.

If you’re more of a purist and want a true portable N64, we’ve covered plenty of those over the years to get you inspired.

Continue reading “A New Take On Building A Portable N64”