Steampunk Geiger Counter Is A Mix Of Art And Science

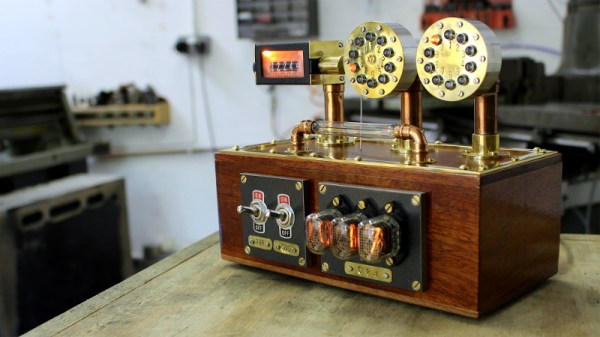
It took nearly a year for [Chris Crocker-White] to assemble this glorious mahogany and brass Geiger counter, but we think you’ll agree with us that it was time well spent. From the servo-actuated counter to the Nixie tubes and LED faux-decatrons, this project is an absolute love letter to antiquated methods of displaying information. Although for good measure, the internal Raspberry Pi also pushes all the collected radiation data into the cloud.

[Chris] says the design of this radiation monitor was influenced by his interest in steampunk and personal experience working on actual steam engines, but more specifically, he also drew inspiration from a counter built by [Richard Mudhar].

Based on a design published in Maplin back in 1987, [Richard] included a physical counter and LED “dekatron” displays as an homage to a 1960s era counter he’d used back in his school days. [Chris] put a modern spin on the electronics and added the glowing display of real-time Counts Per Minute (CPM) as an extra bonus; because who doesn’t like some Nixies in their steampunk?

Internally, the pulses generated by a common Geiger counter board are picked up by some custom electronics to drive the servo and LEDs. Triggered by those same pulses, the Raspberry Pi 3A+ updates the Nixie display and pushes the data out to the cloud for analysis and graphing. Note that the J305β Geiger tube from the detector has been relocated to the outside of the machine, with two copper elbows used as connectors. This improves the sensitivity of the instrument, but perhaps even more importantly, looks awesome.

We’ve seen some very high-tech DIY radiation detection gear over the years, but these clever machines that add a bit of whimsy to the otherwise mildly terrifying process of ionizing radiation are always our favorite.

Continue reading “Steampunk Geiger Counter Is A Mix Of Art And Science”

This Week In Security: F5, Novel Ransomware, Freta, And Database Woes

The big story of the last week is a problem in F5’s BIG-IP devices. A rather trivial path traversal vulnerability allows an unauthenticated user to call endpoints that are intended to be restricted to authenticated. That attack can apparently be as simple as:

'https://[F5 Host]/tmui/login.jsp/..;/tmui/locallb/workspace/tmshCmd.jsp?command=list+auth+user+admin'

A full exploit has been added to the metasploit framework. The timeline on this bug is frighteningly quick, as it’s apparently being actively exploited in the wild. F5 devices are used all over the world, and this vulnerability requires no special configuration, just access to the opened management port. Thankfully F5 devices don’t expose the vulnerable interface to the internet by default, but there are still plenty of ways this can be a problem.

Freta

Microsoft has made a new tool publicly available, Freta. This tool searches for rootkits in uploaded memory snapshots from a Linux VM. The name, appropriately, is taken from the street where Marie Curie was born.

The project’s namesake, Warsaw’s Freta Street, was the birthplace of Marie Curie, a pioneer of battlefield imaging.

The impetus behind the project is the realization that once a malicious actor has compromised a machine, it’s possible to compromise any security software running on that machine. If, instead, one could perform a security x-ray of sorts, then a more reliable conclusion could be reached. Freta takes advantage of the VM model, and the snapshot capability built into modern hypervisors.

Continue reading “This Week In Security: F5, Novel Ransomware, Freta, And Database Woes”

Making PCBs The Easy Way

Building a PCB at home can be fraught. If you’re etching, there are chemicals and the nuances of toner transfer. If you’re milling, getting the surface height just right, and not breaking those pointy little v-cutters is always a challenge. [Robin] has tips for both of these cases, and solves a lot of the common hassles by using a milling machine.

Whether he’s scraping away etch resist or entire copper isolation lines, [Robin] uses a non-spinning scratching tool instead of a v-bit: they’re more robust and cut every bit as well. He’s got tips for using FlatCam and KiCAD to make scratched-out traces. His registration system allows him to get double-sided boards with a minimum of hassle. And as a bonus, he’s doing some experimentation with embedding SMT parts inside the boards as well. Be sure that you check out his whole guide, or just watch the video embedded below.

We’re pretty sure you’ll pick up a trick or two, and maybe you’ll be convinced to bite the bullet and invest in a nice mill. If you’d like a more traditional take on PCB milling, try out our own [Adil Malik]’s guide.

Continue reading “Making PCBs The Easy Way”

An NEC V20 For Two Processors In One SBC

In the days when the best an impoverished student could hope to find in the way of computing was a cast-off 1980s PC clone, one upgrade was to fit an NEC V20 or V30 processor in place of the Intel 8088 or 8086. Whether it offered more than a marginal advantage is debatable, but it’s likely that one of the chip’s features would never have been used. These chips not only supported the 8086 instruction set, but also offered a compatibility mode with the older 8080 processor. It’s a feature that [Just4Fun] has taken advantage of, with V20-MBC, a single board computer that can run both CP/M-86 and CPM/80.

If this is starting to look a little familiar then it’s because we’ve featured a number of [Just4Fun]’s boards before. The Z80-MBC2 uses the same form factor, and like this V20 version, it has one of the larger ATMega chips taking place of the acres of 74 chips that would no doubt have performed all the glue logic tasks of the same machine had it been built in the early 1980s. There is a video of the board in action that we’ve placed below the break, showing CP/M in ’80, ’86, and even ’80 emulated in ’86 modes.

The only time a V20 has made it here before, it was in the much more conventional home of a home-made PC.

Continue reading “An NEC V20 For Two Processors In One SBC”

A Wearable That Jives To The Beat Of Your Heart

We’re always searching for the coolest biohacking projects all over the web, so imagine our excitement when we ran across [marcvila333’s] wearable biometric monitor on Instructables. This was a combined effort between [Marc Vila], [Guillermo Stauffacher], and [Pau Carcellé] as they were wrapping up the semester at their university. Their goal was to develop an integrated device that could modulate the wearer’s heart, and subsequently their mood and stress levels, using music.

Their device includes an LCD screen for user feedback, buttons for user input, an MP3 module, and a heart rate sensor module. The user can measure their heart rate and use the buttons to select the type of music they desire based on whether they would like to decrease or increase their heart rate. The science behind this phenomenon is still unknown, but the general sense is that different music can trigger different chemical signals in your brain, subsequently affecting your mood and other subtle physiological effects. I guess you can say that we tend to jive to the beat of our music.

It would be really cool to see their device automatically change the song to either lower or raise the user’s heart rate, making them calmer or more engaged. Maybe connect it to your tv? Currently, the user has to manually adjust the music, which might be a bit more inconvenient and could possibly lead to the placebo effect.

Either way; Cool project, team. Thanks for sharing!

EasyOCR Makes OCR, Well, Easy

Working on embedded systems used to be easier. You had a microcontroller and maybe a few pieces of analog or digital I/O, and perhaps communications might be a serial port. Today, you have systems with networks and cameras and a host of I/O. Cameras are strange because sometimes you just want an image and sometimes you want to understand the image in some way. If understanding the image involves reading text in the picture, you will want to check out EasyOCR.

The Python library leverages other open source libraries and supports 42 different languages. As the name implies, using it is pretty easy. Here’s the setup:


import easyocr
reader = easyocr.Reader(['th','en'])
reader.readtext('test.jpg')

The results include four points that define the bounding box of each piece of text, the text, and a confidence level. The code takes advantage of the GPU, but you can run it in a CPU-only mode if you prefer. There are a few other options, including setting the algorithm’s scanning behavior, how it handles multiple processors, and how it converts the image to grayscale. The results look impressive.

According to the project’s repository, they incorporated several existing neural network algorithms and conventional algorithms, so if you want to dig into details, there are links provided to both code and white papers. If you need some inspiration for what to do with OCR, maybe this past project will give you some ideas. Or you could cheat at games.

3D Printing A Macro Pad, Switches And All

Building a macro pad inside of a 3D printed enclosure is hardly news these days. Neither is adding 3D printed keycaps to the mix. But if you go as far as [James Stanley] has, and actually print the switches themselves, we’ve got to admit that’s another story entirely.

Now you might be wondering how [James] managed to print a mechanical keyboard switch that’s the size of your garden variety Cherry. Well, the simple answer is that he didn’t. While his printed switches have the same footprint as traditional switches, they are twice as tall.

The switches could probably made much smaller if it wasn’t for the printed spring, but using a “real” one would defeat the purpose. Though we do wonder if the mechanical design could be simplified by making it an optical switch.

But can printed switches really stand up to daily use? [James] wondered the same thing, so he built a testing rig that would hit the switches and count how many iterations before they stopped working. This testing seems to indicate that the keys will either fail quickly due to some mechanical defect, or last for hundreds of thousands of presses. So assuming you weed out the duds early, you should be in pretty good shape.

Naturally, there are a few bits of copper inside each printed switch to act as the actual contacts. But beyond that, all you need to build one of these printable pads yourself is a USB-HID capable microcontroller like the Arduino Pro Micro. If you used the ESP32, you could even make it Bluetooth.

Continue reading “3D Printing A Macro Pad, Switches And All”