A wall clock made from wires and electronic components

Form Follows Function In This Circuit Sculpture Clock

Electronic components are strictly functional objects: their appearance is determined by the function they’re meant to fulfil. But that doesn’t mean there’s no beauty in them. In fact, a whole discipline called circuit sculpture exists that aims to make beautiful shapes out of nothing more than electronic components and wires. Today we can show you [Maarten Tromp]’s latest work in this field: a wall-mounted clock that he’s christened the Clock Sculpture.

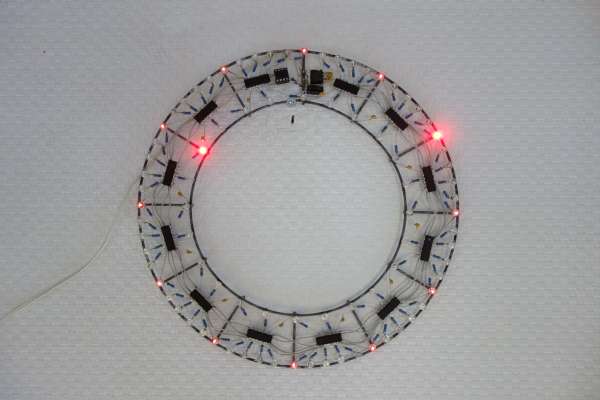
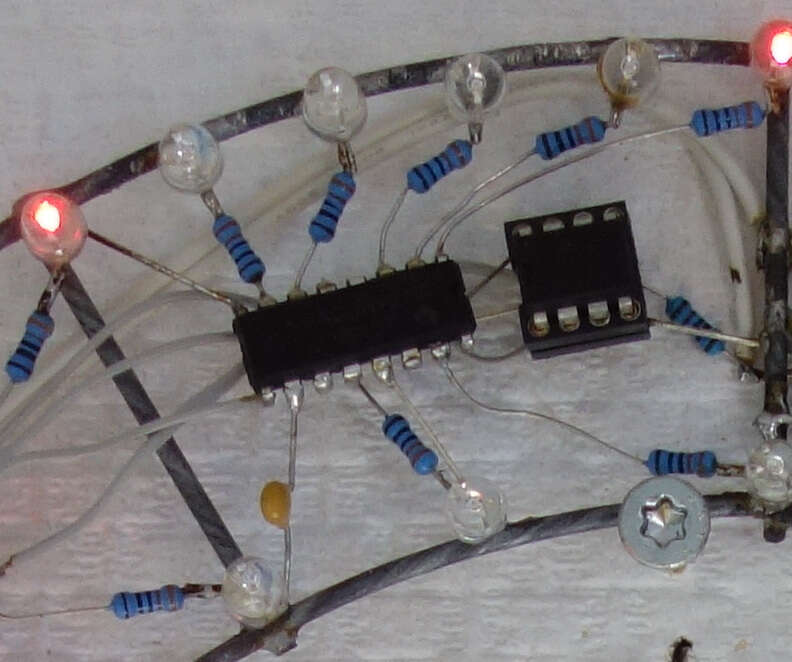
The clock’s main structure consists of two concentric rings made from galvanized steel wire, held together by twelve spokes. All components are soldered directly onto those two rings, with no additional mechanical support. Steel isn’t the greatest material for soldering to, but [Maarten] managed to make it work with a high-wattage soldering iron and a bit of plumbers’ flux.

The overall design is simple but clever: the outer ring holds 60 LEDs to indicate the minutes, with every fifth LED always illuminated dimly in order to provide a background reference in dark conditions. There are 24 LEDs on the inner ring to indicate the twelve hours as well as the “half-hours” in between. Without these, the dial would look a bit odd at 30 minutes past the hour.

Detail of a circuit sculpture clockA mains transformer, plus a single diode, a buffer capacitor and a 7805 regulator form a simple DC power supply, with its negative terminal connected to the steel frame. Time is kept by an ATtiny13A that counts mains frequency pulses. There’s no way to adjust the time: you’ll have to plug in the clock exactly at noon or midnight in order to synchronize it with the outside world. A crude method perhaps, but one that fits well with the clock’s bare-bones aesthetic.

The individual LEDs are driven by a set of twelve 74HC595 shift registers, all mounted dead-bug style between the two rings. Signals and power are carried between the chips by inconspicuous grey wires taken from old IDE cables; this gives the clock a clean, uncluttered appearance. [Maarten] has had the sculpture clock in his office for several months and while it apparently took some time to get used to, he claims it’s easy to read in bright and dark conditions.

Circuit sculpture has formed the basis for several stunning clock projects: this Tie Fighter-shaped clock for instance, or this insanely complex LED clock. Our 2020 Circuit Sculpture contest yielded many breathtaking designs, too.

Wear Your Fave Cassette Tapes As A Necklace With This 3D Printed Adapter

While packing merch for a recent gig, I realised I had the opportunity to do something a little fun. I’d released an album on tape, and spent a little extra to ensure the cassette itself was a thing of beauty. It deserved to be seen, rather than hidden away in a case on a shelf. I wanted to turn this piece of musical media into a necklace.

Of course, cassette tapes aren’t meant to be used in this way. Simply throwing a chain through the cassette would lead to tape reeling out everywhere. Thus, I fired up some CAD software and engineered a solution to do the job! Here’s how I built an adapter to turn any cassette tape into a cool necklace.

Find the design on Thingiverse, and more details below!

Continue reading “Wear Your Fave Cassette Tapes As A Necklace With This 3D Printed Adapter”

Film Is Dead. Long Live Film, Say Pentax

If your answer to the question “When did you last shoot a roll of film” is “Less than two decades ago”, the chances are that you’re a camera enthusiast, and that the camera you used was quite old. Such has been the switch from film to digital, that the new film camera is a rarity. Pentax think there may be an opening in the older format though, as they’ve announced in the videos below the break that they’re working on a fresh range of film cameras to serve the enthusiast market.

We don’t know the economics of the camera business, but we’re certainly interested to see what they come up with. In a world that’s still awash with cheap film cameras from a few decades ago, whatever they produce will have to be good, but given that it’s Pentax who are making the announcement we’re guessing the quality will be of a high standard.

Perhaps more interesting in the revival of interest in film is that it comes at a point when designing and making your own camera has almost never been easier. If you’re bored waiting for the new Pentax, make your own!

Continue reading “Film Is Dead. Long Live Film, Say Pentax”

Shopping Cart Does The Tedious Work For You

Thanks to modern microcontrollers, basic home automation tasks such as turning lights on and off, opening blinds, and various other simple tasks have become common DIY projects. But with the advent of artificial intelligence and machine learning the amount of tasks that can be offloaded to computers has skyrocketed. This shopping cart that automates away the checkout lines at grocery stores certainly fits into this category.

The project was inspired by the cashierless Amazon stores where customers simply walk into a store, grab what they want, and leave. This is made possible by the fact that computers monitor their purchases and charge them automatically, but creator [kutluhan_aktar] wanted to explore a way of doing this without a fleet of sensors and cameras all over a store. By mounting the hardware to a shopping cart instead, the sensors travel with the shopper and monitor what’s placed in the cart instead of what’s taken from a shelf. It’s built around the OpenMV Cam H7, a microcontroller paired with a camera specifically designed for these types of tasks, and the custom circuitry inside the case also includes WiFi connectivity to make sure the shopping cart can report its findings properly.

[kutluhan_aktar] also built the entire software stack from the ground up and trained the model on a set of common products as a proof-of-concept. The idea was to allow smaller stores to operate more efficiently without needing a full suite of Amazon hardware and software backing it up, and this prototype seems to work pretty well to that end. If you want to develop a machine vision project on your own with more common hardware, take a look at this project which uses the Raspberry Pi instead.

Showing a board with a Pi Pico plugged into it, a USB-A socket marked "USB host", and a character display that says "PASSED" referring to the board being the brains of a testing jig.

USB Host On RP2040 – With PIO

Folks from [Adafruit] are showing off a neat hack – USB host on RP2040, using the now-famous PIO peripheral. [Adafruit] builds a lot of RP2040 boards, and naturally, you gotta test them before you ship them to customers. They’ve been using very specific Teensies for that, and at some point, those became unobtainium. Based on the work of [sekigon-gonnoc] and with help of [Thach], they’ve made their TinyUSB library support bitbanging of USB over PIO, and successfully ported their test jig firmware to it!

The base Pico-PIO-USB repo by [sekigon-gonnoc] shows a pretty impressive state of affairs – with low-speed and full-speed USB host and full-speed USB device modes supported, and quite a few examples to get you started. [Adafruit]’s work integrates this code into their TinyUSB stack, specifically focusing on MST (mass storage) features – as this is what you need to program a RP2040. Of course, they also provide a mass storage example to boot!

Test jigs are pretty important to have when making multiple pieces of a board, and with RP2040 supporting more and more interfaces thanks to PIO, it sounds like the perfect chip for your next production testing-intended PCB. With the jig brains taken care of, you’ll want to look into building no less important mechanical part, and we’ve covered quite a few ways to sort that out – here’s an OpenSCAD script that generates lasercutting files out of KiCad boards, or a jig built out of scrap copperclad FR4, and a pretty extensive tutorial on making your own lasercuttable jigs, to boot.

Continue reading “USB Host On RP2040 – With PIO”

Building A New Commodore 64 In 2022 With All New Components

Call it fake or simply new, but when [DusteD] set out to build a brand-new Commodore 64 with only new parts, it resulted in Project MaxFake64 that is electrically and binary compatible with any genuine C64 out there. While not really ‘fake’ in the sense that a C64 emulator is fake, it is in the sense that it uses no parts produced before this millennium. This might actually be easier than getting a used C64 in fully working condition these days.

In total, the project contains an aftermarket C64 power supply by Electroware, a brand new C64C case, a C64 (ASSY NO 250407) mainboard based on the genuine board, a generic RF modular module, an FPGA-based Kawari VIC-II replacement, a 6502 MPU using a 6502-to-6510 adapter by Monotech PCs, a dual-GAL-based PLA replacement, EPROMs for the kernal, character and BASIC ROMs (with in-socket hacks), and a SinSID Nano as (temporary) SID replacement.

Issues discovered during the process include some cracking on the (transparent) C64C case and lack of availability on CIA replacements like the J6526. The keyboard will also be replaced at some later point, and items like the joystick ports were salvaged from an old C64 rather than purchased brand new. None of which are fundamental problems, and might actually make financial sense when it comes to finding replacement parts in the future.

Showing the vintage PC, painted in 50s color scheme, matching custom-built keyboard and mouse next to it

Workbench PC With A 50s Twist

[HolGer71] had a Mini-ITX Intel Atom-powered mainboard that he found useful for its vintage interfaces like COM and LPT. On a whim, he decided to give it even more vintage of a look – transforming it into a device more akin to a 50s home appliance, complete with a fitting monitor, mouse and keyboard. The project, dubbed Legacy-PC Computer Case, imitates the sheet metal construction masterfully in its 3D-printed design. That’s not all there is to it, either – everything is open-source, and there is enough documentation that you can build your own!

[HolGer71] starts with general printing and finishing advice, and goes through every part of the setup from there. The mainboard-holding case builds around a small miniITX case frame, enclosing it and adding extensions for connectors and lightbulbs. For the monitor, he built a new frame around an old VGA-equipped 17″ desktop screen – most certainly easy to find. The keyboard‘s an inexpensive one yet equipped with mechanical switches, and the mouse‘s an old Fujitsu-Siemens, but of the kind you’d see manufactured under different labels. All in all, this combines quite generic components into a trusty and stylish device for your workshop needs.

Equipped with Windows 7 as, apparently, the earliest supported version, this machine is now on desk duty – ready to run obscure software for old programming dongles, and look absolutely fabulous while doing so. It’s rare that we see such effort put into creating designs from scratch and sharing them with the community – most of the time, we see PCs built into already existing devices, like this vintage radio, or a benchtop logic analyzer.