James Bruton's openDog inverse kinematics

[James Bruton] Is Making A Dog: OpenDog Project

There was a time when a two-legged walking robot was the thing to make. But after seeing years of Boston Dynamic’s amazing four-legged one’s, more DIYers are switching to quadrupeds. Now we can add master DIY robot builder [James Bruton] to the list with his openDog project. What’s exciting here is that with [James’] extensive robot-building background, this is more like starting the challenge from the middle rather than the beginning and we should see exciting results sooner rather than later.

James' motor and ball screws
James’ motor and ball screws

Thus far [James] has gone through the planning stage, having iterated through a few versions using Fusion 360, and he’s now purchased the parts. It’s going to be about the same size as Boston Robotic’s SpotMini and uses three motors for each leg. He considered going with planetary gearboxes on the motors but experienced a certain amount of play, or backlash, with them in his BB-9E project so this time he’s going with ball screws as he did with his exoskeleton. (Did we mention his extensive background?)

Each leg is actually made up of an upper and lower leg, which means his processing is going to have to include some inverse kinematics. That’s where the code decides where it wants the foot to go and then has to compute backwards from there how to angle the legs to achieve that. Again drawing from experience when he’s done it the hard way in the past, this time he’s designed the leg geometry to make those calculations easy. Having written up some code to do the calculations, he’s compared the computed angles with the measurements he gets from positioning the legs in Fusion 360 and found that his code is right on. We’re excited by what we’ve seen so far and bet it’ll be standing and walking in no time. Check out his progress in the video below.

Continue reading “[James Bruton] Is Making A Dog: OpenDog Project”

Pocket Projector Uses Raspberry Pi

Who doesn’t want a pocket protector projector? Nothing will impress a date more than being able to whip out a PowerPoint presentation of your latest trip to the comic book convention. The key to [MickMake] build is the $100 DLP2000EVM evaluation module from Texas Instruments. This is an inexpensive light engine, and perfect for rolling your own projector. You can see the result in the video below.

If you don’t need compactness, you could drive the module with any Rasberry Pi or even a regular computer. But to get that pocket form factor, a Pi Zero W fits the bill. A custom PCB from [MickMake] lets the board fit in with the DLP module in a very small form factor.

Continue reading “Pocket Projector Uses Raspberry Pi”

Fail Of The Week: 3D Printed Worm Gear Drive Project Unveils Invisible Flaw

All of us would love to bring our projects to life while spending less money doing so. Sometimes our bargain hunting pays off, sometimes not. Many of us would just shrug at a failure and move on, but that is not [Mark Rehorst]’s style. He tried to build a Z-axis drive for his 3D printer around an inexpensive worm gear from AliExpress. This project was doomed by a gear flaw invisible to the human eye, but he documented the experience so we could all follow along.

We’ve featured [Mark]’s projects for his ever-evolving printer before, because we love reading his well-documented upgrade adventures. He’s not shy about exploring ideas that run against 3D printer conventions, from using belts to drive the Z-axis to moving print cooling fan off the print head (with followup). And lucky for us, he’s not shy about document his failures alongside the successes.

He walks us through the project, starting from initial motivation, moving on to parts selection, and describes how he designed his gearbox parts to work around weaknesses inherent to 3D printing. After the gearbox was installed, the resulting print came out flawed. Each of the regularly spaced print bulge can be directly correlated to a single turn of the worm gear making it the prime suspect. Then, to verify this observation more rigorously, Z-axis movement was measured with an indicator and plotted against desired movement. If the problem was caused by a piece of debris or surface damage, that would create a sharp bump in the plot. The sinusoidal plot tells us the problem is more fundamental than that.

This particular worm gear provided enough lifting power to move the print bed by multiplying motor torque, but it also multiplied flaws rendering it unsuitable for precisely positioning a 3D printer’s Z-axis. [Mark] plans to revisit the idea when he could find a source for better worm gears, and when he does we’ll certainly have the chance to read what happens.

Rotating Lithophane Box Turns With Time

If you wanted to make a rotating display box, what would you use to make it spin? A servo? A stepper motor? [ChrisN219] didn’t need his to move quickly by any means, and this opened up his options to something we probably wouldn’t have thought to use: a clock movement. Specifically, the hour minute part of the shaft.

Rotating lithophanes of your loved ones makes for a pretty cool project, and there isn’t a whole lot to this build to make it difficult. Much of it is 3D printed, including the tube in the center that the LED strip is wrapped around. The base is just big enough to hold the clock movement and the LED strip controller, so it would fit nicely on a desk or a mantel.

This is version two of [Chris]’ lithophane box, which gave him a chance to perfect the frame and design a thicker center post to withstand the heat from the LED strip. All the files are available if you want to print your own panels and take them for a spin. Since it’s so easy to change them out, you may end up with a big pile to choose from.

Servos Do The Plucking In This MIDI Music Box

It started with a cheap, punch-card programmable manual music box. Thirty-one hobby servos later, it ended as an automated MIDI music box, with a short pit stop as a keyboard-driven MIDI device.

If you think you’ve seen the music box in [Mitxela]’s video below before, you’re right. [Martin], musician, inventor, and father of the marvelous marble music machine, took an interest in these music boxes and their programming a while back. Like [Martin], [Mitxela] started his music box project with punch card programming, but he quickly grew tired of the bothersome process, even after automating production with a laser cutter. He decided to do away with the punch cards completely and devised a method to pluck all 30 notes using a few large handfuls of hobby servos. One servo, converted to continuous rotation, spins the drum, with the rest linked to small laser-cut acrylic plectrums via stiff brass wire. The fingers imitate the punched holes passing over the drum and pluck the notes according to MIDI messages. The whole thing can draw quite a bit of current, so in addition to a beefy power supply, [Mitxela] optimized the code to minimize power requirements. This had the happy consequence of reducing the latency enough to allow the music box to be played from a MIDI keyboard in real time.

A lot of work went into this one, but [Mitxela] isn’t resting on his laurels; he has a full slate of improvements that he wants to tackle, not least of which is SD card support for MIDI files to turn this into a jukebox. We’re looking forward to the updates.

Continue reading “Servos Do The Plucking In This MIDI Music Box”

Building A Lightweight Softbox For Better Photography

If you want to take good photographs, you need good light. Luckily for us, you can get reels and reels of LEDs from China for pennies, power supplies are ubiquitous, and anyone can solder up a few LED strips. The missing piece of the puzzle is a good enclosure for all these LEDs, and a light diffuser.

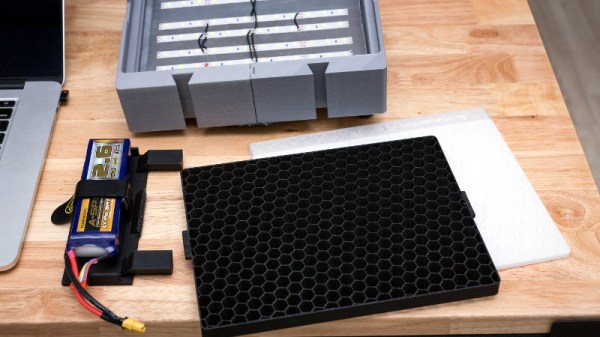
[Eric Strebel] recently needed a softbox for some product shots, and came up with this very cheap, very good lighting solution. It’s made from aluminum so it should handle the rigors of photography, and it’s absolutely loaded with LEDs to get all that light on the subject.

The metal enclosure for this softbox is constructed from sheet aluminum that’s about 22 gauge, and folded on a brake press. This is just about the simplest project you can make with a brake and a sheet of metal, with the tabs of the enclosure held together with epoxy. The mounting for this box is simply magnets super glued to the back meant to attach to a track lighting fixture. The 5000 K LED strips are held onto the box with 3M Super 77 spray adhesive, and with that the only thing left to do is wire up all the LED strips in series.

But without some sort of diffuser, this is really only a metal box with some LEDs thrown into the mix. To get an even cast of light on his subject, [Eric] is using drawing vellum attached to the metal frame with white glue. The results are fairly striking, and this is an exceptionally light and sturdy softbox for photography.

Continue reading “Building A Lightweight Softbox For Better Photography”

Comic Boxes Reflect Owner’s Skills

We are the culmination of our experiences. We build with the tools we’re familiar. We design with the decorations we like. Sometimes this thinking leads to a project that looks like a kindergartener who has dressed in a pink tutu and a camo shirt. Sometimes our experience leads us to make something functional and elegant. [jordanlund] combined his work experience in a library, 3D modeling skills, and love of comic books to turn a hodgepodge pile of scribbled-upon boxes into an orderly collection of comic books in boxes adorned with brass drawer pulls.

3D printing bridged the gap between the brass card catalog drawer pulls he knew well from the library and the crates of comics he kept at home. Custom brackets allowed the drawer pulls, which were meant to be screwed into wooden drawer faces, to work with cardboard boxes. The drawer pulls have a slot for labels so there will be no need to rip off sticky labels later or scrawl with a permanent marker. Perhaps [jordanlund] is merely a bibliophile with a 3D printer but if we didn’t know better, we might think those boxes were meant to have the drawer pulls installed.

Engage your own love of literature with this wordplay riddled appeal for libraries. or make your home library a little more fantasical with a secret door.