If you think you’re having a bad day at work, pity the poor sysadmin at Victoria University of Wellington in Australia New Zealand, who accidentally nuked the desktops of pretty much everyone at the university. This apparently happened last week and impacted everyone connected to the university network with a Windows machine, which had any files stored on their desktops deleted and also appears to have reset user profiles to the default state. This caused no end of consternation, especially among those who use their desktop folder to organize work in progress; we’d imagine more than one student at VUW is hating life right now for not storing work on a backed-up network drive. The problem seems to have started with an attempt to clean up files and profiles left behind by former students; how that escalated to nuking files on the desktop will require some ‘splaining.
Speaking of mea culpas, there was quite a dustup this week in the Cricut community. It started when the maker of CNC cutting machines announced its intention to limit uploads to their online design software unless the user signs up for a $10 a month account. After getting an earful from the users, the CEO of the company announced that these changes would be delayed until the end of 2021. That decision still didn’t sit well with the community, which includes a fair number of users designing PCBs, and two days later, the CEO announced that they were throwing in the towel on the whole plan, and that everything was going back to status quo ante. Story over? We’ll see — it seems like Cricut has tipped its hand here that they’re looking to extract more money from the users, and the need for that likely hasn’t gone away just because they relented. As Elliot Williams pointed out when we discussed the whole debacle, it’s easy to see how Cricut could start adding new features to the paid version of their software, basically abandoning the free user base. We’ll have to see how the obviously vociferous community responds to something like that.
Much interesting news from Mars this week, where the Perseverance rover is getting used to its new home and getting itself ready to roll. Late last week, Perseverance successfully dropped the “belly pan” that was covering the sensitive instruments under the rover, including the Adaptive Sample Caching system that will seal up Martian core samples and drop them out onto the surface for later pickup. This seemingly simple task was a critical one; had the pan not cleanly separated, the mission could have been severely impacted. Perseverance also did a little test drive this week, and recorded what it sounds like to drive on Mars. The audio clip is 16 minutes long, and the noises coming from the billion-dollar rover are just awful at times. We hear clunks and clanks and squeals galore, and while we’re sure they all have a good explanation and will provide valuable engineering data, they sound somewhat alarming to us.
But not so alarming as the sounds that must have come from a Jeep that suffered a bad tow job recently. The cringe-making story starts with a brand-new Jeep being towed on its wheels behind a motorhome, which allows the RV owners to park their rig and still have something to drive around in while they camp. The towed vehicle, or “pusher”, is normally equipped with a manual transmission, as towing with the wheels on the ground for extended distances is easier with them. Unfortunately, the Jeep’s owner set up the shift levers wrong and left the transmission in first gear, with the transfer case in low range. The linked article estimates the gearing ratios meant that the poor Jeep’s engine was being spun at something like 54,000 RPM; chances are good the engine exploded long before that point. The damage shown in the video accompanying the article is just brutal — the oil pan and bell housing are gone, the bottom of the crankcase is blown out, and at least two pistons and their share of the crankshaft are missing in action. We feel sorry for the owner, but really wish the Jeep had had a belly cam like the one on Perseverance.

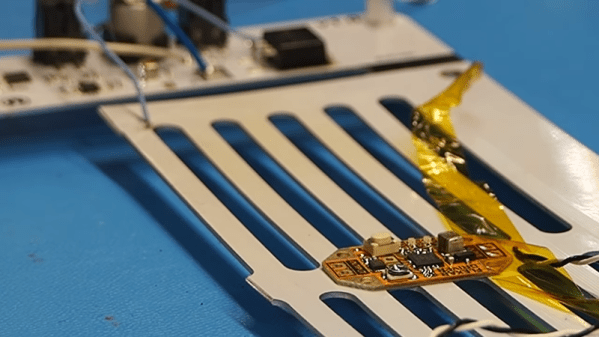
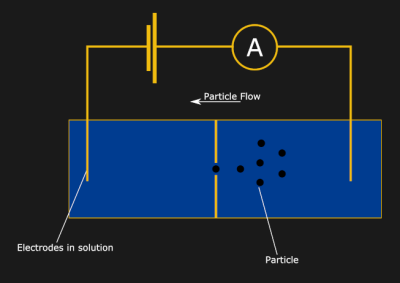 Now, drop an insulating divider in the middle of the container, and the current will stop flowing. Finally, poke a small hole (or nanopore) in the divider. Huzzah! The current is flowing again… but how does this let us measure particle sizes? Well, now think about a tiny particle moving through the hole in the divider. As the particle passes through, the hole will be partially blocked, and the current flow will be partially interrupted. It turns out, the resulting dip in current is proportional to the volume of the particle — a fun property known as the