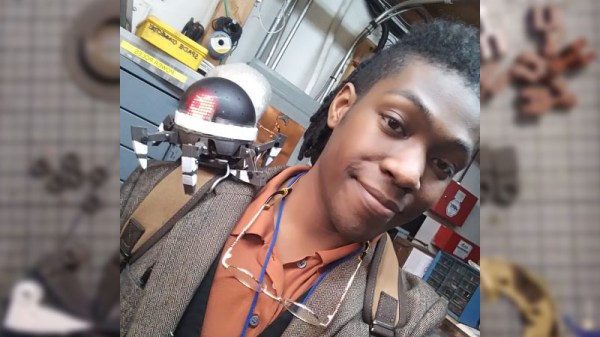
The Largest Aircraft Ever Built Will Soon Launch Rockets To Space

Deep in the mojave, the largest aircraft ever made will soon be making test flights. This is the Stratolaunch, and it’s measured the largest to ever fly based on wingspan. The Stratolaunch was constructed out of two 747s, and is designed for a single purpose: as a mobile launch platform for orbital rockets.

There are a couple of ways to measure the size of an aircraft. The AN-225 Mriya has the highest payload capacity, but only one of those was ever built (though that might change soon). The Spruce Goose was formerly the largest aircraft by wingspan, but it only flew once, and only in ground effect. The Stratolaunch is in another category entirely. This is an aircraft that contains some of the largest composite structures on the planet. Not only can you park a school bus between the fuselages of the Stratolaunch, you can strap that school bus to the plane and carry it up to 30,000 feet.

But why build this astonishing aircraft? The reasons go back more than a decade, and the end result is a spaceplane.

Continue reading “The Largest Aircraft Ever Built Will Soon Launch Rockets To Space”

Power Steering Pump Repurposed For Great Speed

Electric bikes are getting a lot of attention lately. Pretty much anyone can buy a kit online and get a perfectly street legal ride with plenty of range. But if you don’t want to take the kit route, and you’d rather take a tack that will get you noticed more around these parts, take some notes from [Jule553648]’s recent build that definitely isn’t using any parts from a kit.

The motor from the build is an electric power steering pump from a junkyard car. This gets mounted on a one-off rear bike rack and drives the rear tire with help from some gears from a pocket bike gearbox from eBay. A lot of the parts in this build were designed and built using CAD and a machine shop, and the parts for the battery and the power controller were sourced via China to save on cost.

The whole build has a homemade vibe that we find irresistible. The bike can go 35 km/h on level ground without breaking a sweat and has about 40 km of range which is nothing to scoff at. It might even be street legal depending on the wattage of the motor and whether or not you live in Europe (where throttles are generally not allowed on electric bikes). If you’re lacking a machine shop, though, we featured a very well-built kit ebike a while back that you could use as a model to get your feet wet.

Continue reading “Power Steering Pump Repurposed For Great Speed”

Raspberry Pi As 433 MHz To MQTT Gateway

Many low-cost wireless temperature and humidity sensors use a 433 MHz transmitter to send data back to their base stations. This is a great choice for the manufacturer of said devices because it’s simple and the radios are cheap, but it does limit what we as the consumer can do with it a bit. Generally speaking, you won’t be reading data from these sensors on your computer unless you’ve got an SDR device and some experience with GNU Radio and reading the Nexus protocol.

But [Aquaticus] has developed a very comprehensive piece of software that should make integrating these type of sensors into your home automation system much easier, as long as you’ve got a spare Raspberry Pi lying around. Called nexus433, it uses a cheap 433 MHz receiver connected to the Pi’s GPIO pins to receive data from environmental sensors using the popular Nexus communication protocol. A few known compatible sensors are listed in the project documentation, one of which can be had for as little as $5 USD shipped.

In addition to publishing the temperature, humidity, and battery level values from the sensors to MQTT, it even tracks connection quality for each individual sensor and when they go on and offline. To be sure, this is no simple hack. In nexus433, [Aquaticus] has created a mature Linux service with enough flexibility that you shouldn’t have any problems working it into your automation setup, whether it’s Home Assistant or something you’ve put together yourself.

We’ve seen a number of home automation hacks using these ubiquitous 433 MHz radios,  from controlling them with an ESP8266 to hacking a popular TP-LINK router into a low-cost home automation hub.

A CNC Woodworking Tool That Does The Hard Parts

Drawn along in the wake of the 3d printing/home shop revolution has been the accessibility of traditional subtractive CNC equipment, especially routers and mills. Speaking of, want a desktop mill? Try a Bantam Tools (née Othermachine) Desktop Milling Machine or a Carvey or a Carbide 3D Nomad. Tiny but many-axis general purpose mill? Maybe a Pocket NC. Router for the shop? Perhaps a Shapeoko, or an X-Carve, or a ShopBot, or a… you get the picture. [Rundong]’s MatchSticks device is a CNC tool for the shop and it might be classified as a milling machine, but it doesn’t quite work the way a more traditional machine tool does. It computer controls the woodworker too.

Sample joints the MatchSticks can cut

At a glance MatchSticks probably looks most similar to a Pocket NC with a big Makita router sticking out the side. There’s an obvious X-axis spoilboard with holes for fixturing material, mounted to a gantry for Z-axis travel. Below the big friendly handle on top is the router attached to its own Y-axis carriage. The only oddity might be the tablet bolted to the other side. And come to think of it the surprisingly small size for such an overbuilt machine. What would it be useful for? MatchSticks doesn’t work by processing an entire piece of stock at once (that what you’re for, adaptable human woodworker) it’s really a tool for doing the complex part of the job – joinery – and explaining to the human how to do the rest.

The full MatchSticks creation flow goes like this:

  1. Choose a design to make on the included interface and specify the parameters you want (size, etc).
  2. The MatchSticks tool will suggest what material stocks you need, and then ask you to cut them to size and prepare them using other tools.
  3. For any parts which require CNC work the tool will help guide the user to fixture the stock to its bed, then do the cutting itself.
  4. Once everything is ready for final assembly the MatchSticks will once again provide friendly instructions for where to pound the mallet.

In this way [rundong], [sarah], [jeremy], [ethan], and [eric] were able to build a much smaller machine tool without sacrificing much practical functionality. It’s almost software-like in it’s focus on a singular purpose. Why reinvent what the table saw can do when the user probably already has access to a table saw that will cut stock better? MatchSticks is an entire machine bent around one goal, making the hard stuff easier.

It’s worth noting that MatchSticks was designed as an exploration into computer/human interaction for the ACM Conference on Human Factors in Computing Systems so it’s not a commercial product quite yet (we’re eagerly waiting!). For a much more in depth look at the project and its goals and learnings the full research paper is available here. Their intro video is down after the break.

Thanks [ethan] for the tip!

Continue reading “A CNC Woodworking Tool That Does The Hard Parts”

NASA Shows Off Its Big Computer In 1986

Sometimes it is hard to remember just how far computers have come in the last three or four decades. An old NASA video (see below) has been restored with better sound and video recently that shows what passed for a giant computer in 1986. The Cray 2 runs at 250 MHz and had two gigabytes of memory (256 megabytes of million 64-bit words).

Despite the breathless praise, history hasn’t been kind to the Cray 2. Based on ECL, it had 4 processors and –in theory — could reach 1,900 megaFLOPs/second (a FLOP is a floating point operation). However, practical problems made it difficult to get to that theoretical maximum.

Continue reading “NASA Shows Off Its Big Computer In 1986”

Empty Can Upcycled Into Portable Speaker

We aren’t suggesting you go digging through the trash looking for empty cans, but if you’ve already got some empty cans in the privacy of your own home, you could certainly do worse than turning them into unique enclosures for your electronics projects. Better than sitting in the landfill, surely.

This hack from [Robin Hartley] turns an empty Cadbury hot chocolate can into a portable speaker that’s sure to get some attention. But don’t be fooled: a surprisingly amount of engineering went into this project in the form of a 3D printed structure on the inside of the can. Even if you aren’t big on the idea of putting your next project into a piece of literal trash, there’s something to be said for how professionally everything fits together in this build.

The key to this build is the 3D printed “skeleton” that holds the speaker and circuit board in place. An especially nice touch is how [Robin] designed the mount for the speaker: as it had no flange to attach to, he made a two piece clamp that screws together around the rear of the speaker and holds it in place.

You may wonder why somebody who’s clearly as well versed in CAD and 3D printing as [Robin] is might want to use an empty can as an enclosure; surely he could just design and print a case? Undoubtedly. But the goal here is to reuse what would otherwise be trash, and that occasionally means taking the “scenic” route as it were.

To take this concept to the next level, check out the upcycled speaker box we recently covered. We’ve seen some gorgeous home audio builds that started as a curbside find, but depending on how lucky you are, it’s almost like cheating.

Continue reading “Empty Can Upcycled Into Portable Speaker”

Recreating The Amiga 1200 PCB From Pictures

In the past we’ve talked about one of the major downsides of working with vintage computer hardware, which of course is the fact you’re working with vintage computer hardware. The reality is that these machines were never designed to be up and running 20, 30, or even 40-odd years after they were manufactured. Components degrade and fail, and eventually you’re going to need to either find some way to keep your favorite classic computer up and running or relegate it to becoming a display piece on the shelf.

If you’re like [John Hertell], you take the former option. Knowing that many an Amiga 1200 has gone to that great retrocomputing museum in the sky due to corroded PCBs, he decided to recreate the design from scans of an unpopulated board. While he was at it, he tacked on a few modern fixes and enhancements, earning his new project the moniker: “Re-Amiga 1200”.

To create this updated PCB, [John] took high quality scans of an original board and loaded them up into Sprint Layout, which allows you to freely draw your PCB design over the top of an existing image. While he admits the software isn’t ideal for new designs, the fact that he could literally trace the scan of the original board made it the ideal choice for this particular task.

After the base board was recreated in digital form, the next step was to improve on it. Parts which are now EOL and hard to come by got deleted in place of modern alternatives, power traces were made thicker, extra fan connectors were added, and of course he couldn’t miss the opportunity to add some additional status blinkenlights. [John] has released his Gerber files as well as a complete BOM if you want to make your own Re-Amiga, and says he’ll also be selling PCBs if you don’t want to go through the trouble of getting them fabricated.

It seems as if Amiga fans never say never, as this isn’t the first time we’ve seen one brought back from the brink of extinction by way of a modernized motherboard. Whatever it takes to keep the vintage computing dream alive.

[Thanks to Anders for the tip.]

Continue reading “Recreating The Amiga 1200 PCB From Pictures”