Strumbot: The Guitar That Strums Itself

[Clare] isn’t the most musically inclined person, but she can strum a guitar. Thanks to a little help from an Arduino, she doesn’t even have to do that.

She built the strumbot, which handles the strumming hand duties of playing the guitar. While [Claire] does believe in her strumbot, she didn’t want to drill holes in her guitar, so hot glue and double-sided foam tape were the order of the day.

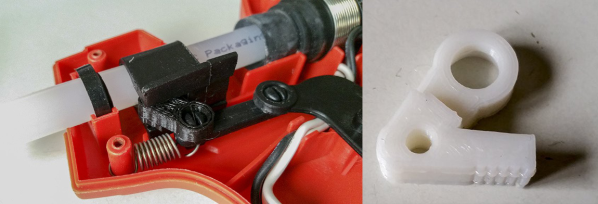
The business end of the strumbot is a micro servo. The servo moves two chopsticks and draws the pick across the strings. The tiny servo surprisingly does a great job getting the strings ringing. The only downside is the noise from the plastic gears when it’s really rocking out.

Strumbot’s user interface is a 3D-printed case with three buttons and three LEDs. Each button activates a different strum pattern in the Arduino’s programming. The LEDs indicate the currently active pattern. Everything is powered by a USB power pack, making this a self-contained hack.

[Clare] was able to code up some complex strum patterns, but the strumbot is still a bit limited in that it only holds three patterns. It’s good enough for her rendition of “Call Me Maybe”, which you can see in the video after the break. Sure, this is a simple project, not nearly as complex as some of the robotic guitar mods we’ve seen in the past. Still, it’s just the ticket for a fun evening or weekend project – especially if you’re introducing the Arduino to young coders. Music, hacking, and modding – what more could you ask for?

Continue reading “Strumbot: The Guitar That Strums Itself”

What Is This, A Controller For Ants?!

What’s the smallest controller you’ve ever used? [BitBuilt] forum user [Madmorda] picked up a cool little GameCube controller keychain with semi-working buttons at her local GameStop. As makers are wont to do, she figured she could turn it into a working controller and — well — the rest is history.

This miniaturized controller’s original buttons were essentially one piece of plastic and all the buttons would depress at once — same goes for the D-pad. Likewise, the original joystick and C-stick lacked springs and wouldn’t return to a neutral position after fidgeting with them. To get the ball rolling, [Madmorda] picked up a GC+ board — a custom GameCube controller board — just small enough to fit this project, eleven hard tact switches for the various buttons, and two squishy tact switches to replicate the original controller’s L and R button semi-analog, semi-digital functionality.

Continue reading “What Is This, A Controller For Ants?!”

Kids Kitchen That Says BEEP

Children have always liked to learn by copying the adults around them, and thus have always desired toys that emulate the tools which their older forebears use on a daily basis. [rhoalt]’s daughter wished for an oven to play with, so a trip to IKEA was in order to get started.

The build begins with the IKEA Duktig, a beautiful fun-sized oven. [rhoalt] then breaks out the hacker staple foods of 7-segment displays, swanky backlit buttons and an Arduino Nano. Through some careful handiwork, the wooden panels that make up the toy oven are drilled and routed out to fit the components.

The electronics are all used to create an oven with a digital timer, and the final effect achieved is rather nice. The glowy buttons can be used to set and reset the timer, while an LED strip inside lights up to simulate cooking. [rhoalt] shares all the construction details along with some parent-friendly tips, like taping over the buzzer to reduce the volume, and ensuring the timer is limited to 10 minutes to avoid any late-night surprises.

It’s a tidy project with a strong sense of fun, and the presentation is top-notch. Even we older, jaded hackers light up for a good glowy-buttoned project, so we’re sure [rhoalt]’s daughter loves her new toy. For more toy oven action, check out this Easy Bake converted to USB. Video after the break.

Continue reading “Kids Kitchen That Says BEEP”

Cell Phone Surveillance Car

There are many viable options for home security systems, but where is the fun in watching a static camera feed from inside your place? The freedom to really look around might have been what compelled [Varun Kumar] to build a security car robot to drive around his place and make sure all is in order.

Aimed at cost-effectiveness and WiFi or internet accessibility, an Android smartphone provides the foundation of this build — skipping the need for a separate Bluetooth or WiFi module — and backed up by an Arduino Uno, an L298 motor controller, and two geared DC motors powering the wheels.

Further taking advantage of the phone’s functionality, the robot is controlled by DTMF tones. Using the app DTMF Tone Generator and outputting through the 3.5mm jack, commands are interpreted by a MT8870DE DTMF decoder module.While this control method carries some risks — as with many IoT-like devices — [Kumar] has circumvented one of DTMF’s vulnerabilities by adding a PIN before the security car will accept any commands.

He obtains a live video feed from the phone using AirDroid in concert with VNC server, and assisted by a servo motor for the phone is enabled to sweep left and right for a better look. A VNC client on [Kumar]’s laptop is able to access the video feed and issue commands. Check it out in action after the break!

Continue reading “Cell Phone Surveillance Car”

Smell That? It’s Time.

Steampunk is beautiful. There is something about the exposed metal and primitive looking artifacts that visually appeal to the brain of a maker and engineer alike. Makers have been busy the last decade building clocks with this theme because hey, everyone needs a clock. [Fuselage] has put together a Steam Punk Clock that releases actual steam(actually steam oil smoke) for its hourly chime. How cool is that?

The clock is designed around the Conrad C-Control Unit (translated) which has the Motorola 68HC08 and [Fuselage] uses BASIC to write the routines for the system. Unlike a lot of steampunk clocks that use Nixie Tubes, this one uses 4 Numitron displays for the hours and minutes display. An analog dial panel display is employed for the seconds’ and is driven by a PWM signal. The absence of the RTC module was not obvious until we saw that the BOM includes a DCF77 receiver. For the uninitiated, DCF77 is a longwave time signal and standard-frequency radio station in Mainflingen, Germany. If you are anywhere within a 2000 km range of that location, you can pick up a 24-hr time signal for free which is excellent if you plan to make say… a radio clock.

The steam/smoke generator is a subproject of sorts. The custom machine is designed to have a separate oil reservoir and pump in addition to the actual generator so that the system does not run out of fuel as quickly. Clearly [Fuselage] did his homework which is explained in brief in his project logs. The final design has a brass tube as the main heating and also serves as the outlet chamber. The oil is pumped from under the heating filament in the brass tube, and excess fluid drains off back into the reservoir. A piece of nichrome wire serves as the filament that vaporizes the liquid to gaseous form. Sensors make sure of the oil levels in the reservoir as well as the steam tube. Servo motors and fans add the effect of the opening the exhaust rain cap, and a small LED helps illuminate the exhaust to complete the impression of real steam.

The project is a great example of a simple but effective implementation and for those who are wondering about Numitron Tubes, check out this tutorial on the subject. Of course, there is the Giant Electro-mechanical Clock for those looking at more sizable works of art.

Continue reading “Smell That? It’s Time.”

Repairs You Can Print: Broken Glue Gun Triggers Replacement

Picture this: you need to buy a simple tool like a glue gun. There’s usually not a whole lot going on in that particular piece of technology, so you base your decision on the power rating and whether it looks like it will last. And it does last, at least for a few years—just long enough to grow attached to it and get upset when it breaks. Sound familiar?

[pixelk] bought a glue gun a few years ago for its power rating and its claims of strength. Lo and behold, the trigger mechanism has proven to be weak around the screws. The part that pushes the glue stick into the hot end snapped in two.

It didn’t take much to create a replacement. [pixelk] got most of the measurements with calipers and then got to work in OpenSCAD. After printing a few iterations, it fit well enough, but [pixelk] saw a chance to improve on the original design and added a few teeth where the part touches the glue stick. The new part has been going strong for three months.

We think this entry into our Repairs You Can Print contest is a perfect example of the everyday utility of 3D printers. Small reproducible plastic parts are all around us, just waiting to fail. The ability to not only replace them but to improve on them is one of the brightest sides of our increasingly disposable culture.

Still haven’t found a glue gun you can stick to? Try building your own.

Making The Case For Open Source Medical Devices

Engineering for medical, automotive, and aerospace is highly regulated. It’s not difficult to see why: lives are often at stake when devices in these fields fail. The cost of certifying and working within established regulations is not insignificant and this is likely the main reason we don’t see a lot of work on Open Hardware in these areas.

Ashwin K. Whitchurch wants to change this and see the introduction of simple but important Open Source medical devices for those who will benefit the most from them. His talk at the Hackaday Superconference explores the possible benefits of Open Medical devices and the challenges that need to be solved for success.

Continue reading “Making The Case For Open Source Medical Devices”