Drill The Wet Side Wet And The Dry Side Dry

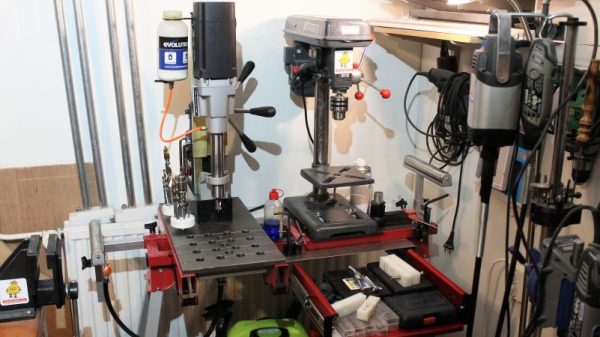
Working mostly in metal as he does, [Tuomas Soikkeli] has invested in some nice tools. So when his sweet magnetic-base drill was in need of a new home, he built this two-in-one drilling station to maximize shop space and add some versatility to boot.

For the non-metalworkers out there, a mag-base drill is basically a portable drill press where the base is replaced with a strong electromagnet like the one shown here. They’re often used in the construction trades to drill holes in steel beams or columns, and often include nice features like a built-in coolant system.

[Tuomas] effectively turned his mag-base drill into a very beefy drill press by mounting it to a disused miter saw stand. A thick piece of plate steel forms the base, and with holes and drain channels machined into it, used coolant can be captured in a drain pan below for reuse. A second base for a benchtop drill press means he’s got a dry drilling station too, and the original support arms on the miter stand are ready for drilling long stock. The drawer below the dry side is a nice touch too.

There’s a lot to learn about fabrication from [Tuomas]’ video and the others on his channel, which is well worth checking out. And if you want to convert your drill press into a mag-base drill, why not check out this microwave oven transformer to electromagnetic crane project for inspiration?

Continue reading “Drill The Wet Side Wet And The Dry Side Dry”

3D Printed WiFi Reflectors Custom Designed For The Building

Are you a wizard at antenna design? Chances are you’ve never even given it a try, but this tool could change that. Most home-made WiFi signal boosting antenna plans around the Internet share one feature: they are directional antennas or reflectors. But WiPrint is a tool for designing custom WiFi reflectors that map to the specific application.

If we want to increase the signal strength in two or three different locations the traditional solution is an omnidirectional antenna. The problem is, although a good omnidirectional antenna increases the signal power in those locations we want, it also increases the signal power where we don’t want.

A team of researchers led by Dartmouth College created WiPrint to allow users to input a floor plan, the location of the WiFi access point and a desired signal map into the system. The software uses an optimization algorithm to produce a custom reflector shape for that floor plan. The reflector can then be fabricated and placed next to the access point antenna to reflect and concentrate the signal in the specified area, while decreasing signal strength outside of it. The best thing is: you can actually 3D print the reflector and just glue tin foil on it!

The results show that optimized reflectors can weaken or enhance signals in target areas by up to 10 or 6 dB, respectively, and resulting in throughput changes by up to -63.3% or 55.1%. That is not the only advantage, as the researchers point out:

Our approach provides four benefits. First, it provides strong physical security by limiting the physical reach of wireless signals, hence creating a virtual wall for wireless signals. Second, it relies on a low-cost ($35), reproducible 3D reflector, which can be easily replaced upon substantial changes in the environment or coverage requirement. Third, it offers an easily accessible and easy-to-configure solution to non-expert users. Users only need to specify coverage requirements and a coarse environment model, with which our system computes a reflector shape tailored to the built environment. Finally, it is applicable to commodity low-end Wi-Fi APs without directional or multiple antennas.

The sad part is that, for now, no software is available. The study and results have just been presented at ACM’s BuildSys 2017. It would be great to see something like this open-sourced. Meanwhile, this is further proof that [Brian Benchoff] knew what he was doing when he told you to use duct tape for superior WiFi range.

MiSTer Upgrades Vintage Computer Recreations

The MiST project provides an FPGA-based platform for recreating vintage computers. We recently saw an upgraded board — MiSTer — with a similar goal but with increased capability. You can see a video of the board acting like an Apple ][ playing Pac Man, below.

The board isn’t emulating the target computer. Rather, it uses an FPGA to host a hardware implementation of the target. There are cores for Apple, Atari, Commodore, Coleco, Sega, Sinclair and many other computers. There are also many arcade game cores for games like Defender, Galaga, and Frogger.

Continue reading “MiSTer Upgrades Vintage Computer Recreations”

Problems That Plagued An Edible Marble Machine

Prolific creator [Martin Raynsford] recently created a plus-sized edible version of his laser-cut Marble Machine for a Cake International exhibit and competition; it seemed simple to do at first but had quite a few gotchas waiting, and required some clever problem-solving.

Gears are three layers, stacked and cemented with sugar glue, and coated with a hard edible shine.

The original idea was to assemble laser-cut gingerbread parts to make the machine. Gingerbread can be laser-cut quite well, and at first all seemed to be going perfectly well for [Martin]. However, after a few days the gingerbread was sagging badly. Fiddling with the recipe and the baking was to no avail, and it was clear [Martin] needed to find something other than gingerbread to work with. After experimenting, he settled on a modified sugar paste which kept its shape and dried hard enough to work with. (While appearing to stretch most people’s definition of “cake” past the breaking point, the category [Martin] entered in the competition allows it.) The parts were cut by hand using laser-cut wood parts as a guide, then finished in a food dehydrator overnight.

The next problem was how to create the large spiral which forms the main ramp. The answer was to laser-cut a custom support structure that supported the piece while it dried out, and doubled as a way to transport the piece safely. High stress points got extra layers cemented with sugar glue, and some parts were reinforced internally with strands of uncooked spaghetti. Everything was sealed with an edible shine, which [Martin] says acts as a kind of varnish for cakes. A video demonstration is embedded below. Continue reading “Problems That Plagued An Edible Marble Machine”

Becoming Your Own ISP, Just For Fun

When moving into a new house, it’s important to arrange for the connection of basic utilities. Electricity, water, and gas are simple enough, and then it’s generally fairly easy to set up a connection to an ISP for your internet connection. A router plugs into a phone line, or maybe a fiber connection and lovely packets start flowing out of the wall. But if you’re connected to the internet through an ISP, how is the ISP connected? [Kenneth] answers this in the form of an amusing tale.

It was during the purchase of data centre rack space that [Kenneth]’s challenge was laid down by a friend. Rather then simply rely on the connection provided by the data centre, they would instead rely on forging their own connection to the ‘net, essentially becoming their own Internet Service Provider.

This is known as creating an Autonomous System. To do this involves several challenges, the first of which is understanding just how things work at this level of networking. [Kenneth] explains the vagaries of the Border Gateway Protocol, and why its neccessary to secure your own address space. There’s also an amusing discussion on the routing hardware required for such a feat and why [Kenneth]’s setup may fall over within the next two years or so.

It’s not for the faint hearted, and takes a fair bit of paperwork, but [Kenneth] has provided an excellent guide to the process if you really, really just need to own your own corner of the internet. That said, there are other networking tricks to cut your teeth on if you’d like a simpler challenge, like tunneling IP over ICMP.


Upgraded Hotel Room Coffee

The secret of cold-brew coffee is out. Department stores are selling gimmicks to make it at home or you can make it with a mason jar in good old-fashioned DIY style. This method is for the on-the-go hacker who may not have even the most spartan of equipment to brew a cold cup of Joe. Many hotel rooms are outfitted with a cheap percolating coffee machine and proprietary pods. The pods are just a sachet of filter paper with ground coffee inside.

Leave that percolating fire hazard unplugged and brew those pods overnight in a glass of water. In eight hours, you have a cup of rocket fuel. Compost the spent pod and away you go. Don’t heat your brew in the coffee maker, that’ll probably wreck it. Nuke it if you need it hot.

If coffee implements are your bag, here’s a 3D printed coffee bean grinder but be sure to read up on 3D printing and food safety. If coffee isn’t your cup of tea, how about a perfectly timed cup of tea?

Raspberry Pi Compute Module 3 In A GameBoy Original

[Kite] has been making custom PCBs for GameBoys for a long time. Long enough, in fact, that other people have used his work to build even more feature-rich GameBoy platforms. Unfortunately some of their work had stagnated, so [Kite] picked it up and completed a new project: a GameBoy that uses a Raspberry Pi running on his upgraded GameBoy PCB.

At its core the build uses a Raspberry Pi 3, but one that has been shrunk down to the shape of a memory module, known as the Compute Module 3. (We featured the original build by [inches] before, but [Kite] has taken it over since then.) The upgrade frees up precious space in the GameBoy case to fit the custom PCB that was originally built by [Kite], and also eliminates the need to cut up a Raspberry Pi and solder it to the old version of his PCB. The build is very clean, and runs RetroPie like a champ. It has some additional features as well, such as having an HDMI output.

For anyone looking for that retro GameBoy feel but who wants important upgrades like a backlit color screen, or the ability to play PSP games, this might be the build for you. The video below goes into details about how it all fits together. If you’re looking for more of a challenge in your GameBoy hacks, though, there’s an ongoing challenge to build the tiniest GameBoy possible as well.

Continue reading “Raspberry Pi Compute Module 3 In A GameBoy Original”