Here on Hackaday, we’re generally designers of hacks that live in the real world. Nevertheless, I’m convinced that some of the most interesting feats are at the mercy of what’s possible in software, not hardware. Without the right software, no 3D printer could print and no quadcopter could fly. The source code that drives these machines may take months of refinement to flesh out their structure. In a nutshell, these software packages are complicated, and they don’t happen overnight.
So how do they happen; better yet: how could we make that happen? How do we write software that’s flexible enough to coexist peacefully on all sorts of hardware variations?
What separates the big open-source software projects like ROS, LinuxCNC, and Multiwii from the occastional hackathon code are the underlying principles that govern how they’re written. In object-oriented programming, these principles are called design patterns. In the next couple posts, I’m going to crack the lid on a few of these. What’s more, I’ll package them into real-world examples so that we can see these patterns interact with real hardware. The next time you pop open the source code for a big open source hardware project, I hope you can tease out some of these patterns in the code. Better yet, I hope you carry these patterns into your next robot and machine project. Let’s get started.
For readability, all of the examples run in Python3. The snippets below are truncated for brevity, but the real examples in the repository will work if you’ve got a similar hardware setup.
Given the incredibly low prices on some of the models currently on the market, it’s more than likely a number of Hackaday readers have come out of the holiday season with a shiny new desktop 3D printer. It’s even possible some of you have already made the realization that 3D printing is a bit harder than you imagined. Sure the newer generation of 3D printers make it easier than ever, but it’s still not the same “click and forget” experience of printing on paper, for instance.
In light of this, I thought it might be nice to start off the new year with some advice for those who’ve suddenly found themselves lost in a forest of PLA. Some of this information may seem obvious to those of us who’ve spent years huddled over a print bed, but as with many technical pursuits, we tend to take for granted the knowledge gained from experience. For my own part, the challenges I faced years ago with my first wooden 3D printer were wholly different than what I imagined. I assumed that the real challenge would be getting the machine assembled and running, but the time it took to build the machine was nothing in comparison to the hours and hours of trial and error it took before I gained the confidence to really utilize the technology.
Of course, everyone’s experience is bound to be different, and we’d love to hear about yours in the comments. Grand successes, crushing defeats, and everything in between. It’s all part of the learning process, and all valuable information for those who are just starting out.
What do you do, when you need a random number in your programming? The chances are that you reach for your environment’s function to do the job, usually something like rand() or similar. This returns the required number, and you go happily on your way.
A shift register configured as a pseudo-random number generator. [by KCAuXy4p CC0 1.0]Except of course the reality isn’t quite that simple, and as many of you will know it all comes down to the level of randomness that you require. The simplest way to generate a random number in software is through a pseudo-random number generator, or PRNG. If you prefer to think in hardware terms, the most elementary PRNG is a shift register with a feedback loop from two of its cells through an XOR gate. While it provides a steady stream of bits it suffers from the fatal flaw that the stream is an endlessly repeating sequence rather than truly random. A PRNG is random enough to provide a level of chance in a computer game, but that predictability would make it entirely unsuitable to be used in cryptographic security for a financial transaction.
There is a handy way to deal with the PRNG predictability problem, and it lies in ensuring that its random number generation starts at a random point. Imagine the shift register in the previous paragraph being initialised with a random number rather than a string of zeros. This random point is referred to as the seed, and if a PRNG algorithm can be started with a seed derived from a truly unpredictable source, then its output becomes no longer predictable.
Selecting Unpredictable Seeds
Computer systems that use a PRNG will therefore often have some form of seed() function alongside their rand() function. Sometimes this will take a number as an argument allowing the user to provide their own random number, at other times they will take a random number from some source of their own. The Sinclair 8-bit home computers for example took their seed from a count of the number of TV frames since switch-on.
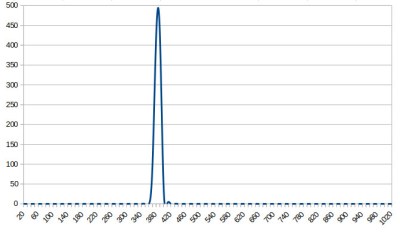
The not-very-random result of a thousand analogRead() calls.
The Arduino Uno has a random() function that returns a random number from a PRNG, and as you might expect it also has a randomSeed() function to ensure that the PRNG is seeded with something that will underpin its randomness. All well and good, you might think, but sadly the Atmel processor on which it depends has no hardware entropy source from which to derive that seed. The user is left to search for a random number of their own, and sadly as we were alerted by a Twitter conversation between @scanlime and @cybergibbons, this is the point at which matters start to go awry. The documentation for randomSeed() suggests reading the random noise on an unused pin via analogRead(), and using that figure does not return anything like the required level of entropy. A very quick test using the Arduino Graph example yields a stream of readings from a pin, and aggregating several thousand of them into a spreadsheet shows an extremely narrow distribution. Clearly a better source is called for.
Noisy Hardware or a Jittery Clock
As a slightly old-school electronic engineer, my thoughts turn straight to a piece of hardware. Source a nice and noisy germanium diode, give it a couple of op-amps to amplify and filter the noise before feeding it to that Arduino pin. Maybe you were thinking about radioactive decay and Geiger counters at that point, or even bouncing balls. Unfortunately though, even if they scratch the urge to make an interesting piece of engineering, these pieces of hardware run the risk of becoming overcomplex and perhaps a bit messy.
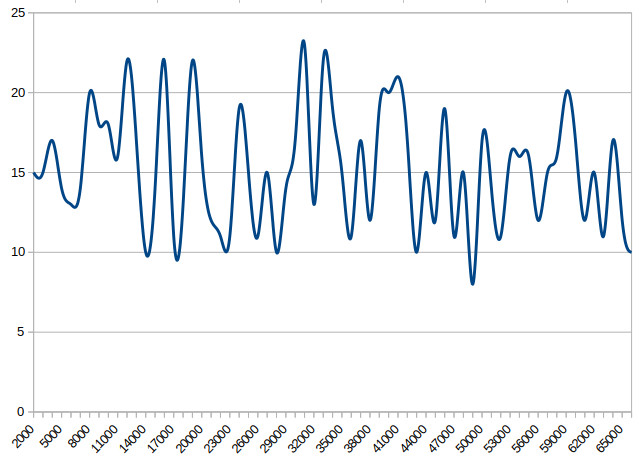
The significantly more random result of a thousand Arduino Entropy Library calls.
The best of the suggestions in the Twitter thread brings us to the Arduino Entropy Library, which uses jitter in the microcontroller clock to generate truly random numbers that can be used as seeds. Lifting code from the library’s random number example gave us a continuous stream of numbers, and taking a thousand of them for the same spreadsheet treatment shows a much more even distribution. The library performs as it should, though it should be noted that it’s not a particularly fast way to generate a random number.
So should you ever need a truly random number in your Arduino sketch rather than one that appears random enough for some purposes, you now know that you can safely disregard the documentation for a random seed and use the entropy library instead. Of course this comes at the expense of adding an extra library to the overhead of your sketch, but if space is at a premium you still have the option of some form of hardware noise generator. Meanwhile perhaps it is time for the Arduino folks to re-appraise their documentation.
Sometimes a gadget like Alexa or Google Home is a solution looking for a problem. Then the problem you’ve been looking for hits you square in the face. I’ve confessed before that I have an oscilloscope problem. I also have a microcontroller development board habit. It appears now I have too many 3D printers. I recently finished building my latest one, an Anet A8 I picked up on Black Friday. While calibrating it, I found myself juggling a screwdriver, a pair of pliers, and trying to operate the thing all at one time. I realized I had to come up with a better way.
I don’t know if it qualifies as an addiction yet, but I also have an Alexa in every room (although I call it “Computer” because I’m a Star Trek fan) and a Google Home device almost everywhere. Why can’t I get one of these assistants to operate my printer for me? What are assistants for, after all, other than telling Dad jokes?
You’d think adding voice control to a 3D printer would a bit difficult. With the right tools, it is actually pretty easy. Luckily those tools aren’t anything special… if you want a set up like mine, where Alexa controls your 3D printer, read on.
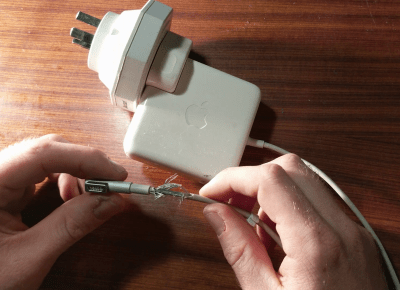
Laptop chargers face a hard life. They’re repeatedly plugged and unplugged, coiled up, stuffed into bags, thrown around, and just generally treated fairly poorly. Combine this with fairly lightweight design and it’s not uncommon for a laptop charger to fail after a few years. It’s usually the connector that goes first. Such was the case when I found myself face to face with a failed Macbook charger, and figured it’d be a simple fix. Alas, I was wrong.
Unlike most PC manufacturers, who rely on the humble barrel jack and its readily available variants, Apple liked to use the Magsafe connector on its Macbook line. This connector has many benefits, such as quick release in the event someone trips over the cable, and the fact that it can be plugged in without regard to orientation. However, it’s not the easiest to fix. When the charger began failing, I noticed two symptoms. The first was that the charger would only function if the cable was held just so, in exactly the right orientation. The other, was that even when it would charge, the connector would become very hot. This led me to suspect an intermittent connection was the culprit, and it was quite a poor one at that; the high resistance leading to the heat issue.
Our starting point – a badly worn and frayed Macbook charger. I found it interesting to see that the shield was in two layers, wound in alternate directions.
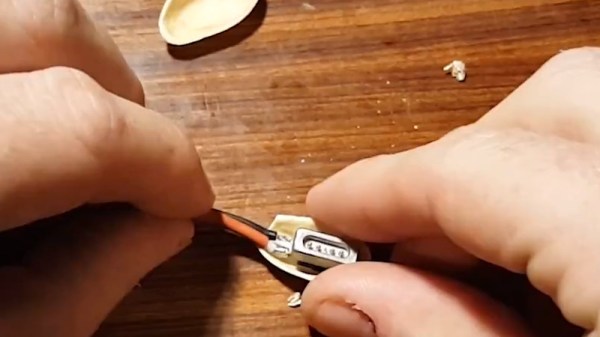
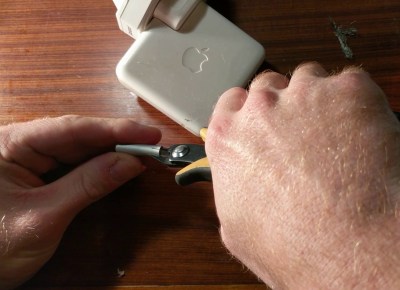
Sidecutters weren’t the best tool for the job, but they’re what I had lying around. The soft metal is fairly easy to cut with hand tools.
It’s at this point with any other charger that you get out your trusty sidecutters, lop the end off, and tap away at Digikey to get a replacement part on the way. With Magsafe? No dice. Replacement parts simply aren’t available — a common problem with proprietary connectors. I endeavoured to fix the problem anyway. I began to strip away the metal shell around the back of the connector with my sidecutters, and eventually an angle grinder. A Dremel would have been the perfect tool for the job, actually, but I persevered regardless. After much consternation, I had the connector peeled back and was able to identify the problem.
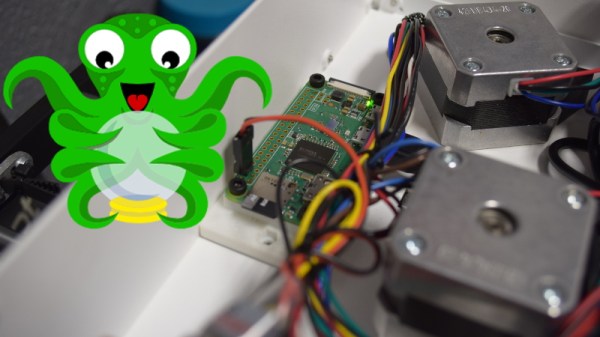
If you’ve been hanging around 3D printing communities, or reading the various 3D printing posts that have popped up here on Hackaday, you’ve almost certainly heard of OctoPrint. Created and maintained by Gina Häußge, OctoPrint allows you to turn an old computer (or more commonly a small ARM board like the Raspberry Pi or BeagleBone) into a network-accessible control panel for your 3D printer. Thanks to a thriving collection of community developed plugins, it can even control other hardware such as lights, enclosure heaters, smart plugs, or anything else you can think to hook onto the GPIO pins of your chosen ARM board. The project has become so popular that the new Prusa i3 MK3 has a header on the control board specifically for connecting a Pi Zero W running OctoPrint.
Even still, I never personally “got” OctoPrint. I was happy enough with my single printer connected to my computer and controlled directly from my slicer over USB. The majority of the things I print are of my own design, so when setting up the printer it only seemed logical that I would have it connected to the machine I’d be doing my designing on. If I’m sitting at my computer, I just need to rotate my chair to the right and I’m at my printer. What do I need to control the thing over WiFi for?
But things got tricky when I wanted to set up a second printer to help with speeding up larger projects. I couldn’t control them both from the same machine, and while I could print from SD on the second printer if I really had to, the idea seemed painfully antiquated. It would be like when Scotty tried talking into the computer’s mouse in “Voyage Home”. Whether I “got it” or not, I was about to dive headfirst into the world of OctoPrint.
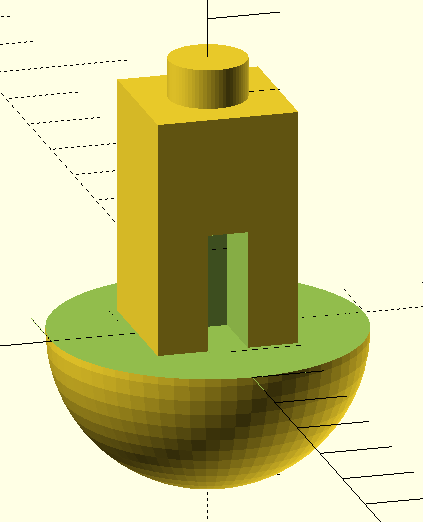
Have a look at the object to the right. Using a conventional fused deposition printer, how would you print the object? There’s no flat surface to lay on the bed without generating a lot of overhangs. That usually requires support.
In theory, you might be able to print the bottom of the sphere down, but it is difficult to get that little spot to adhere to the bed. If you have at least two extruders and you are set up to print support material, that might even be the best option. However, printing support out of the same material you are printing with makes it hard to get a good clean print. There is another possibility. It does require some post-processing, but then again, not as much as hacking away a bunch of support material.
A Simple Idea
The idea is simple and — at first — it will sound like a lot of trouble. The basic idea is to cut the model in half at some point where both halves would be easy to print and then glue them together. Stick around (no pun intended), though, because I’ll show you a way to make the alignment of the parts almost painless no matter how complex the object might be.
The practical problem with gluing together half models is getting the pieces in the exact position, but that turns out to be easy if you just make a few simple changes to your model. Another lesser problem is clamping a piece while gluing. You can use a vise, but some oddly-shaped parts are not conducive to traditional vise jaws.
In Practice
Starting with an OpenSCAD object, it is easy to cut the model in half. Actually, you could cut it anywhere. Then it is easy to rotate half of it so the cut line is at the bottom of each part. That doesn’t solve the alignment problem nor does it help you clamp when you glue.
The trick is to build a flange around each part. The flanges mate with a few screws after printing so alignment is perfect and bolts through the flange holes can keep the parts together and immobilized while your glue of choice sets. The kicker is that I even have an automated process to make the design side of this trick very easy.