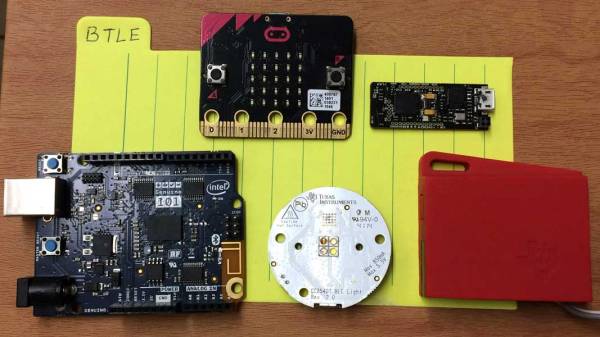
The Magic That Goes Into Magnets

Every person who reads these pages is likely to have encountered a neodymium magnet. Most of us interact with them on a daily basis, so it is easy to assume that the process for their manufacture must be simple since they are everywhere. That is not the case, and there is value in knowing how the magnets are manufactured so that the next time you pick one up or put a reminder on the fridge you can appreciate the labor that goes into one.

[Michael Brand] writes the Super Magnet Man blog and he walks us through the high-level steps of neodymium magnet production. It would be a flat-out lie to say it was easy, but you’ll learn what goes into them and why you don’t want to lick a broken hard-drive magnet and why it will turn to powder in your mouth. Neodymium magnets are probably unlikely to be produced at this level in a garage lab, but we would love to be proved wrong.

We see these magnets everywhere, from homemade encoder disks, cartesian coordinate tables, to a super low-power motor.

The PT2399 Delay/Echo Chip Data Sheet You Never Had

If you are fortunate enough to have had the opportunity to play with an analogue-reel-to-reel tape recorder in a well-equipped studio, you probably looped the tape around to create an echo, or a delay in the audio. It was a desirable effect to have, but not a practical one for a guitar pedal or similar portable accessory. Silicon alternatives for creating delays have been in production since the 1960s, first the so-called bucket brigade delay lines that used a switched chain of on-chip capacitors, and more recently all-digital chips that process the delay by storing samples in RAM. One of the more popular of those is the Princeton Technology PT2399, but it comes with something of a snag for the experimenter in the form of a sparse data sheet. Thankfully the folks at [Electrosmash] have come to the rescue on that front with a thorough technical examination of the chip that should fill in any gaps in the official documentation.

After a brief examination of the range of chips of which the 2399 is a part, they dive right into the chip’s internals by rearranging the internal circuit diagram from the data sheet to the point at which it makes more sense. At which point the difference between the chip’s delay and echo functions becomes obvious, through the inclusion of a feedback path.

We then are taken through the pins, examining what lies behind the power supply and analog inputs and outputs. We are somewhere between a data sheet and an app note here, as some of this is information rarely present even in really good data sheets. Finally, we are taken through the chip’s performance, with real-world distortion and noise measurements. Armed with this page, the would-be PT2399 designer really can say they know what they are working with.

Surprisingly few PT2399s have appeared on these pages, however one did pop up in the Synthbike.

DIY Socket For Prosthetics Contains Power Supply, Charger

Innovation in prosthetics is open to anyone looking to enhance the quality of life, but there’s an aspect of it that is sometimes under-served. The DIY Prosthetic Socket entry to the Hackaday Prize is all about the foundation of a useful prosthesis: a custom, form-fitting, and effective socket with a useful interface for attaching other hardware. While [atharvshringaregt] is also involved with a project for a high-tech robotic hand with meaningful feedback, socket fitting and design is important enough to be its own project.

The goal is not just to explore creating these essential parts in a way that’s accessible and affordable to all, but to have them include a self-contained rechargeable power supply that can power attachments. Thoughtful strap placement and a power supply design that uses readily available components with a 3D printed battery housing makes this DIY prosthetic socket a useful piece of design that keeps in mind the importance of comfort and fitting when it comes to prosthetics; even the fanciest robot hand isn’t much good otherwise.

Circuit VR: Simple Buck Converters

The first thing I ever built without a kit was a 5 V regulated power supply using the old LM309K. That’s a classic linear regulator like a 7805. While they are simple, they waste a lot of energy as heat, especially if the input voltage goes higher. While there are still applications where linear regulators make sense, they are increasingly being replaced by switching power supplies that are much more efficient. How do switchers work? Well, you buy a switching power supply IC, add an inductor and you are done. Class dismissed. Oh wait… while that might be the best way to do it from a cost perspective, you don’t really learn a lot that way.

In this installment of Circuit VR, we’ll look at a simple buck converter — that is a switching regulator that takes a higher voltage and produces a lower voltage. The first one won’t actually regulate, mind you, but we’ll add that in a future installment. As usual for Circuit VR, we’ll be simulating the designs using LT Spice.

Interestingly, LT Spice is made to design power supplies so it has a lot of Linear Technology parts in its library just for that purpose. However, we aren’t going to use anything more sophisticated than an op amp. For the first pass, we won’t even be using those.

Continue reading “Circuit VR: Simple Buck Converters”

Wrangling RC Servos Becoming A Hassle? Try Serial Bus Servos!

When we need actuators for a project, a servo from the remote-control hobby world is a popular solution. Though as the number of servos go up, keeping their wires neat and managing their control signals become a challenge. Once we start running more servos than we have fingers and toes, it’s worth considering the serial bus variety. Today we’ll go over what they are and examine three products on the market.

Continue reading “Wrangling RC Servos Becoming A Hassle? Try Serial Bus Servos!”

These Capacitors Are A Cheap Gimmick

If you search through an electrical engineering textbook, you probably aren’t going to find the phrase “gimmick capacitor” but every old ham radio operator knows about them. They come in handy when you need a very small capacitor of unknown value. For example, if you are trying to balance the stray capacitance in a circuit, you might not know exactly what value you need, but you know it won’t be very much. That’s when you want a gimmick capacitor.

A gimmick capacitor is made by taking two strands of insulated wire and twisting them together; the length and the tightness of the twist determine the capacitance. Tightening or loosening the twist, or trimming some of the wire off, makes it tunable.

These are most commonly found in RF equipment or high-speed logic because of the small capacitance involved — usually about 1 to 2 pF per inch of twist or so. The thicker the insulation, the less capacitance you’ll get, so it is common to use magnet wire or something else with a thin insulating layer. You can take this one step further and decrease the spacing by stripping down one wire as long as it isn’t going to touch anything else.

Obviously, the insulation needs to be good enough for the voltage on them, an important consideration in tube circuits, for instance. But other than that, a gimmick capacitor is a straightforward tool to have in your box of design tricks. Can we take this further? Continue reading “These Capacitors Are A Cheap Gimmick”

Coolest Way To Watch 3D Printing: Lights, Camera, Octolapse!

Octoprint is a household name for anyone into 3D printing and anyone regularly reading Hackaday. Described by creator Gina Häußge as “the snappy web interface for your 3D printer”, Octoprint allows you to control effectively any desktop 3D printer over the local network or Internet. It even has webcam support so you can watch your printer while it works, meaning you can finally put that video baby monitor back into the crib with Junior.

While the core functionality of Octoprint is fantastic alone, its true power is unlocked through the plugin system and the community that’s sprung up around it. With plugins, Octoprint can do everything from control RGB light strips in your printer’s enclosure to sending status messages via Discord. One particularly popular plugin that has been making the rounds lately is Octolapse by [FormerLurker]. This plugin provides a comprehensive intelligent system for creating time-lapse videos of prints.

What does that mean? Well, instead of simply taking a picture every few seconds like you’d do traditionally, Octolapse actually keeps track of the printer’s motions while its running. It can then take a picture at the opportune moment to create a number of user-selected effects. More importantly, it can even take control of the printer directly; moving the hotend away from the print before taking a picture. The effect is that the print simply “grows” out of the bed.

I thought it would be interesting to take a closer look at Octolapse and see just what it takes to create one of those awesome time-lapse videos. It turned out to be somewhat trickier than I anticipated, but the end results are so fantastic I’d say it’s a technique worth mastering.

Continue reading “Coolest Way To Watch 3D Printing: Lights, Camera, Octolapse!”