Is That A Word Clock In Your Pocket?

Word clocks are one of those projects that everyone seems to love. Even if you aren’t into the tech behind how they work, they have a certain appealing aesthetic. Plus you can read the time without worrying about those pesky numbers, to say nothing of those weird little hands that spin around in a circle. This is the 21st century, who has time for that?

Now, thanks to [Gordon Williams], these decidedly modern timepieces just got a lot more accessible. His word clock is not only small enough to fit in the palm of your hand, but it’s the easiest-to-build one we’ve ever seen. If you were ever curious about these gadgets but didn’t want to put in the the time and effort required to build a full scale version, this diminutive take on the idea might be just what Father Time ordered.

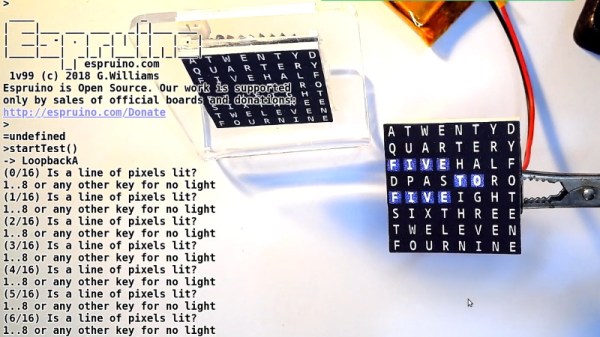
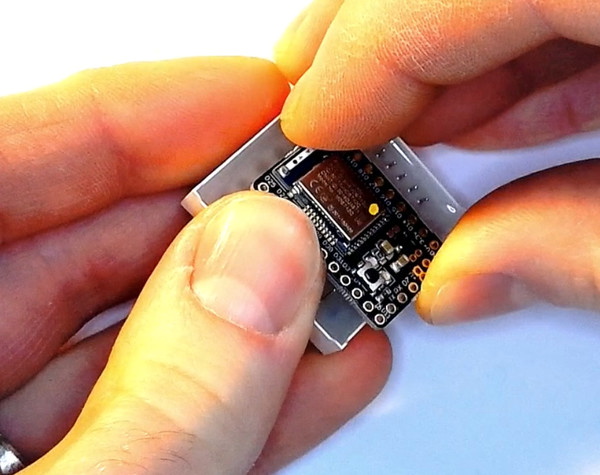
The trick is to attach the microcontroller directly to the backside of an 8 x 8 LED matrix. As demonstrated by [Gordon], the Bluetooth-enabled Espruino MDBT42Q fits neatly between the rows of pins, which need only a gentlest of persuasions to get lined up and soldered into place. Since the time can be set remotely over Bluetooth, there’s not even so much as an additional button required. While driving the LEDs directly off of the digital pins of a microcontroller is never recommended, the specifics of this application (only a few of the LEDs on at a time, and not for very long) means he can get away with it.

Of course, that just gets you an array of square LEDs you blink. It wouldn’t be much of a word clock without, you know, words. To that end, [Gordon] has provided an overlay which you can print on a standard inkjet printer. While it’s not a perfect effect as the light still comes through the ink, it works well enough to get the point across. One could even argue that the white letters on the gray background helps with visibility compared to just the letters alone lighting up.

If you’re not in the market for a dollhouse-sized word clock, fear not. We’ve got no shortage of adult sized versions of these popular timepieces for your viewing pleasure.

Continue reading “Is That A Word Clock In Your Pocket?”

The Empire Strikes Back With The ESP8266

Like many of us, [Matthew Wentworth] is always looking for a reason to build something. So when he found a 3D model of the “DF.9” laser turret from The Empire Strikes Back intended for Star Wars board games on Thingiverse, he decided it was a perfect excuse opportunity to not only try his hand at remixing an existing 3D design, but adding electronics to it to create something interactive.

As the model was originally intended for a board game, it was obviously quite small. So the first order of business was scaling everything up to twice the original dimensions. As [Matthew] notes, the fact that it still looks so good when expanded by such a large degree is a credit to how detailed the original model is. Once blown up to more useful proportions, he modified the head of the turret as well as the barrel to accept the electronics he planned on grafting into the model.

He created a mount for a standard nine gram servo inside the head of the turret which allows it to rotate, and the barrel got an LED stuck in the end. Both of which are controlled with a NodeMCU ESP8266 development board, allowing [Matthew] to control the direction and intensity of the pew-pew over WiFi. He mentions that in the future he would like to add sound effects that are synchronized to the turret rotation and LED blinking.

For the software side of the project, he used Blynk to quickly build a smartphone interface for the turret. This is the first time he had used Blynk, and reports that outside of a little trial and error, it was some of the easiest code he’s ever written for the Arduino. This is a sentiment we’ve been seeing a lot of recently towards Blynk, and it’s interesting to see how often it shows up in ESP8266 projects now.

Looking ahead [Matthew] says he wants to paint and detail the turret, as the bright orange color scheme probably wouldn’t do terribly well on Hoth. If he can manage the time, he’d also like to add it to the long list of OpenCV-powered turrets that hackers love harassing their friends and family with.

Continue reading “The Empire Strikes Back With The ESP8266”

A Network Attached Radiation Monitor

It started as a joke, as sometimes these things do. [Marek Więcek] thought building a personal radiation detector would not only give him something to work on, but it would be like having a gadget out of the Fallout games. He would check the data from time to time and have a bit of a laugh. But then things got real. When he started seeing rumors on social media that a nearby nuclear reactor had suffered some kind of radiation leak, his “joke” radiation detector suddenly became serious business.

With the realization that having his own source of detailed environmental data might not be such a bad idea after all, [Marek] has developed a more refined version of his original detector (Google Translate). This small device includes a Geiger counter as well as sensors for more mundane data points such as temperature and barometric pressure. Since it’s intended to be a stationary monitoring device, he even designed it to be directly plugged into an Ethernet network so that it can be polled over TCP/IP.

[Marek] based the design around a Soviet-era STS-5 Geiger tube, and outfitted his board with the high voltage electronics to provide it with the required 400 volts. Temperature, barometric pressure, and humidity are read with the popular Bosch BME280 sensor. If there’s no Ethernet network available, data from the sensors can be stored on either the built-in SPI flash chip or a standard USB flash drive.

The monitor is powered by a PIC32MX270F256B microcontroller with an Ethernet interface provided by the ENC28J60 chip. In practice, [Marek] has a central Raspberry Pi that’s polling the monitors over the network and collecting their data and putting it into a web-based dashboard. He’s happy with this setup, but mentions he has plans to add an LCD display to the board so the values can be read directly off of the device. He also says that a future version might add WiFi for easier deployment in remote areas.

Over the years we’ve seen a fair number of radiation monitors, from solar-powered WiFi-connected units to the incredible work [Radu Motisan] has done building his global network of radiation detectors. It seems hackers would rather not take somebody else’s word for it when it comes to the dangers of radiation.

Tiny Amplifier With ATtiny

Small microcontrollers can pack quite a punch. With the right code optimizations and proper use of the available limited memory, even small microcontrollers can do things they were never intended to. Even within the realm of intended use, however, there are still lots of impressive uses for these tiny cheap processors like [Lukasz]’s audio amplifier which uses one of the smallest ATtiny packages around in the video embedded below.

Since the ATtiny is small, the amplifier is only capable of 8-bit resolution but thanks to internal clock settings and the fast PWM mode he can get a sampling rate of 37.5 kHz. Most commercial amplifiers shoot for 42 kHz or higher, so this is actually quite close for the limited hardware. The fact that it is a class D amplifier also helps, since it relies on switching and filtering to achieve amplification. This allows the amplifier to have a greater efficiency than an analog amplifier, with less need for heat sinks or oversized components.

All of the code that [Lukasz] used is available on the project site if you’ve ever been curious about switching amplifiers. He built this more as a curiosity in order to see what kind of quality he could get out of such a small microcontroller. It sounds pretty good to us too! If you’re more into analog amplifiers, though, we have you covered there as well.

Continue reading “Tiny Amplifier With ATtiny”

Little FPV Bot Keeps It Simple With An ESP32

When it comes to robots, it seems the trend is to make them as complicated as possible – look at anything from Boston Dynamics if you’ve any doubt of that. But there’s plenty to be said for simple robots too, such as this adorable ESP32-driven live-streaming bot.

Now it’s true that [Max.K]’s creation is more remote controlled car than robot, and comparing it to one of the nightmare-fuelling creations of Boston Dynamics is perhaps unfair. But [Max.K]’s new project is itself a simplification and reimagining of his earlier, larger “ZeroBot“. As the name implies, ZeroBot was controlled by a Raspberry Pi Zero, an obvious choice for a mobile platform designed to stream FPV video. The ESP32 bot eschews the Pi platform in favor of, well, an ESP32. To save as much space as possible, [Max.K] did a custom PCB for the microcontroller and its supporting components. The 3D-printed case is nicely designed to hold the board along with two motors, a small VGA camera, and a battery pack. At 160×120 resolution, the video isn’t amazing, but the fact that it can be streamed from the ESP32 at a decent enough framerate to drive the bot using a simple web interface is impressive.

This was a fun project and a very clean, smooth build. We like the lines of this little bot, and wouldn’t mind building one as a quick weekend project ourselves.

Continue reading “Little FPV Bot Keeps It Simple With An ESP32”

An Arduino From The Distant Past

Arduinos are a handy tool to have around. They’re versatile, cheap, easy to program, and have a ton of software libraries to build on. They’ve only been around for about a decade and a half though, so if you were living in 1989 and wanted to program a microcontroller you’d probably be stuck with an 8-bit microprocessor with no built-in peripherals to help, reading from a physical book about registers and timing, and probably trying to get a broken ribbon cable to behave so it would actually power up. If you want a less frustrating alternate history to live in, though, check out the latest project from [Marek].

He discovered some 6502 chips (Polish language, Google Translate link) that a Chinese manufacturer was selling, but didn’t really trust that they were legitimate. On a lark he ordered some and upon testing them he found out that they were real 6502s. Building an 8-bit computer is something he’d like to do, but in the meantime he decided to do a project using one of these chips as a general-purpose microcontroller similar to a modern Arduino. The project has similar specs as an Arduino too, including 8kB of RAM memory, 8kB of I/O address space, and various EPROM capabilities. [Marek] went on to build a shield board for it as well, for easy access to some switches and LEDs. It’s a great build that anyone interested in microcontrollers should check out.

Keep in mind that an ATtiny45 has 8 bits like the 6502 but only costs around $1 USD, whereas a 6502 would have cost around $200 in today’s dollars. It’s really only in modern times that we can appreciate the 6502 as a cheap 8-bit microcontroller for that reason alone, but we can also appreciate how it ushered in a computer revolution since competing Intel and Motorola chips cost around six times more before it showed up. They became so popular in fact that people still regularly use them to build retrocomputers of all kinds.

Back To Video Basics With An ESP32 VGA Display

In a world where standards come and go with alarming speed, there’s something comforting about VGA. It’s the least common denominator of video standards, and seeing that chunky DB15 connector on the back of a computer means that no matter what, you’ll be able to get something from it, if you can just find a VGA cable in your junk bin.

But that’s the PC world; what about microcontrollers? Can you coax VGA video from them? Yes, you can, with an ESP32, a handful of resistors, and a little bit of clever programming. At least that’s what [bitluni] has managed to do in his continuing quest to push the ESP32 to output all the signals. For this project, [bitluni] needed to generate three separate signals – red, green, and blue – but with only two DACs on board, he had to try something else. He built external DACs the old way using R/2R voltage divider networks and addressed them with the I2S bus in LCD mode. He needed to make some compromises to fit the three color signals and the horizontal and vertical sync pulses into the 24 available bits, and there were a few false starts, but the video below shows that he was able to produce a 320×240 signal, and eventually goosed that up to a non-native 460×480.

It’s a pretty impressive hack, and we learned a lot about both the ESP32 and the VGA standard by watching the video. He’s previously used the ESP32 to build an AM radio station and to output composite PAL video, and even turned his oscilloscope into a vector display with it. They’re all great learning projects too.

Continue reading “Back To Video Basics With An ESP32 VGA Display”