Raspberry Pi’s Power Over Ethernet Hardware Sparks False Spying Hubbub

Have you ever torn open an Ethernet jack? We’d bet the vast majority of readers — even the ones elbow-deep into the hardware world — will answer no. So we applaud the effort in this one, but the conclusion landed way off the mark.

In the last few days, a Tweet showing a Raspberry Pi with its Ethernet socket broken open suggested the little PCB inside it is a hidden bug. With more going on inside than one might expect, the conclusion of the person doing the teardown was that the Raspberry Pi foundation are spying upon us through our Ethernet traffic. That’s just not the case. But we’re still excited about what was found.

Continue reading “Raspberry Pi’s Power Over Ethernet Hardware Sparks False Spying Hubbub”

A Li-Ion Booster Pack, Done Right

We’re all used to battery booster packs containing a Li-ion or Li-poly cell and a little inverter circuit, they are a standard part of 21st century daily survival for those moments when smartphone battery lives don’t perform as advertised. But how many of us have considered what goes into them, and further how many of us have sought to produce the best one possible rather than a unit built at the lowest price?

It’s a course [Peter6960] has followed, producing a PCB that sits on the back of an 18650 cell holder. It follows the work of [GreatScott] in particular in its use of the TP4056 charger, MT3608 boost converter, and FS312F protection ICs. Many commercial modules omit any protection circuit, and the FS312F is of particular interest because it has a low 2.9V cut-off voltage that should lengthen the life of the cell. Files for the PCB can be found in a zip file hosted on Google Drive.

You might think that there was nothing new that could be learned about a Li-ion battery booster, but it’s always worth a look at a well-executed piece of work. We noticed he refers to Li-poly cells while using what appears to be a Li-ion 18650 cell. Most likely this is merely an oversight.

There is a lot to know about the characteristics and safety of the lithium-chemistry rechargeables, you may find [Sean Boyce]’s article on the subject to be an interesting read.

A Classy SDR Chip, Decapped

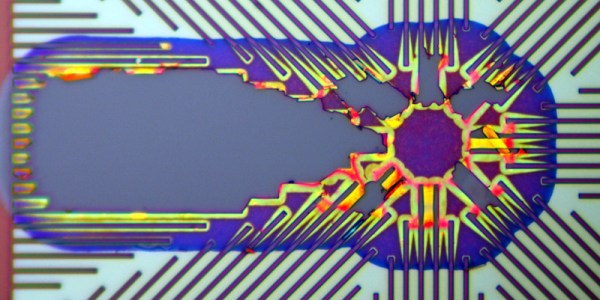
If you are a regular searcher for exotic parts among the virtual pages of semiconductor supplies catalogs, you will have probably noticed that for a given function it is most often the part bearing the Analog Devices logo that is the most interesting. It may have more functionality, perhaps it will be of a higher specification, and it will certainly have a much higher price. [Zeptobars] has decapped and analyzed an AD chip that holds all three of those honors, the AD9361 SDR transceiver.

It’s placed under a slightly inflammatory title, “when microchips are more profitable than drugs“, but does make a good job of answering why a semiconductor device at the very cutting edge of what is possible at the time of release can be so expensive. The AD9361 is an all-in-one SDR transceiver with an astonishing bandwidth, and as such was a particularly special device when it reached the market in 2013. We see some particularly fine examples of on-chip inductors and PLL circuitry that must have consumed a significant design effort to preserve both bandwidth and noise characteristics. This is an item of physical beauty at a microscopic scale as well as one of technical achievement.

The financial analysis puts Analog Devices’s gross profit at about $103 of the $275 retail purchase price of an AD9361. The biggest slice at $105 goes to the distributor, and surprisingly the R&D and manufacturing costs are not as large as you might expect. How accurate these figures are is anybody’s guess, but they are derived from an R&D figure in the published financial report, so there is some credence to be given to them.

We’ve featured [Zeptobar’s] work before more than once. A look at fake Nordic Semi parts for example or a Soviet i8080 clone have received their treatment. Always a source to watch out for!

Slipcasting Resin Prototypes

[Eric Strebel] doesn’t need an introduction anymore. If there is a picture of an elegantly designed part with a professional finish on our pages, there is a good chance he has a hand in it. This time he is sharing his method of making a part which looks like it is blow-molded but it is not. Blow-molded parts have a distinctive look, especially made with a transparent material and [Eric’s] method certainly passes for it. This could upgrade your prototyping game if you need a few custom parts that look like solidified soap bubbles.

Mold making is not covered in this video, which can also be seen below the break, but we can help you out with a tip or two. For demonstration’s sake, we see the creation of a medical part which has some irregular surfaces. Resin is mixed and degassed then rolled around inside the mold. Then, the big reveal, resin is allowed to drain from the mold. Repeat to achieve the desired thickness.

This is a technique adapted from ceramics called slipcasting. For the curious, an elegant ceramic slipcasting video demonstration can be seen below as well. For an added finishing touch, watch how a laquer logo is applied to the finished part; a touch that will move the look of your build beyond that of a slapdash prototype.

More education from this prolific maker can be seen in his video on painting with a professional-looking finish and his tips for working with foam-core.

Continue reading “Slipcasting Resin Prototypes”

Flashing An LED The Widlar Way

Regular Hackaday readers will be familiar with the work of Boldport’s [Saar Drimer] in creating beauty in printed circuit board design. A recent work of his is the Widlar, a tribute to the legendary integrated circuit designer [Bob Widlar] in the form of a development board for his μA723 voltage regulator chip.

The μA723 is a kit of parts from which almost any regulator configuration can be made, but for [tardate]  it represented a challenge. The μA723 is so versatile that what you can create is only limited by the imagination of the builder. Having done the ordinary before, [tardate] looked toward something unconventional.

The result is modest, a simple LED flasher using the error amplifier as a not-very-good op-amp, building an oscillator at a frequency of about 2 Hz. This is pretty neat and if you are used to the NE555 as the universal integrated circuit, perhaps it’s time to set it aside for the obviously far-more-useful μA723.

Here at Hackaday we harbour at least one fan of the μA723, not to mention also of artful PCBs. If the Widlar looks familiar, we featured the switch mode regulator from the μA723 data sheet on it a few months ago.

Disclosure: [Jenny List] wrote the documentation for Boldport’s Widlar kit.

Biasing That Transistor: The Common Base Amplifier

We’ve previously remarked upon a generation lucky enough to be well-versed in microcontrollers and computersised electronics through being brought up on the Arduino or the Raspberry Pi but unlucky enough to have missed out on basic electronics such as how to bias a transistor, and to address that gap we’ve taken a look at the basics of transistor biasing.

All the circuits we worked with in the previous article had the transistor’s emitter taken to ground, took their input from the base, and their output from the collector. This configuration, called a Common Emitter amplifier is probably the most common, but it is far from the only way to use a transistor. Once you have set up the bias voltage as we described to the point at which the transistor is in its linear region, there are several other ways in which the device can be used as an amplifier. The subject of this article is one of these configurations, so described because it takes the transistor’s base to the ground instead of the emitter, as a Common Base amplifier. Continue reading “Biasing That Transistor: The Common Base Amplifier”

Is It On Yet? Sensing The World Around Us, Starting With Light

Arduino 101 is getting an LED to flash. From there you have a world of options for control, from MOSFETs to relays, solenoids and motors, all kinds of outputs. Here, we’re going to take a quick look at some inputs. While working on a recent project, I realized the variety of options in sensing something as simple as whether a light is on or off. This is a fundamental task for any system that reacts to the world; maybe a sensor that detects when the washer has finished and sends a text message, or an automated chicken coop that opens and closes with the sun, or a beam break that notifies when a sister has entered your sacred space. These are some of the tools you might use to sense light around you.

Continue reading “Is It On Yet? Sensing The World Around Us, Starting With Light”