Where does your mind jump when you hear the mention of electroshock therapy? The use of electrical current to treat various medical conditions has a long and controversial history. Our fascination with the medical applications of electricity have produced everything from the most alarming of patent medicines to life-saving devices like pacemakers and the Automatic External Defibrillator.
The oldest reference I could find is the use of the torpedo fish to allegedly cure headaches, gout, and so on in 43 CE. Incidentally, Torpedo torpedo is an awesome species name.
Much more recently, there has been interest in transcranial direct current stimulation (tDCS). In essence, it’s a technique by which you pass an electrical current (typically about 2 milliamps) between strategically positioned electrodes on your head. The precise reason to do this is a bit unclear; different journal articles have suggested improvements in cognition, learning, and/or the potential treatment of various diseases.
I think most of us here spend a lot of time studying. The idea that a simple, noninvasive device can accelerate that is very attractive. We’ve covered a few people building their own such devices.
Unfortunately, what we want to be true is irrelevant. Superficially, this looks like a DARPA-funded panacea with no clearly established mechanism of action. Various commercial products are being sold that imply (but as usual, don’t directly state) that tDCS is useful for treating pretty much everything, with ample use of ‘testimonials’.
While tDCS can be prescribed by a physician in some countries to complement a stroke rehabilitation regime, for off-label purposes you may as well just go apply a fish to your face. Let’s dig into the literature and products that are out there and see if we can find the promise hiding amidst the hype.
The Open Source Underwater Glider has just been named the Grand Prize winner of the 2017 Hackaday Prize. As the top winner of the Hackaday Prize, the Open Source Underwater Glider will receive $50,000 USD completes the awarding of more than $250,000 in cash prizes during the last eight months of the Hackaday Prize.
More than one thousand entries answered the call to Build Something That Matters during the 2017 Hackaday Prize. Hardware creators around the globe competed in five challenges during the entry rounds: Build Your Concept, Internet of Useful Things, Wings-Wheels-an-Walkers, Assistive Technologies, and Anything Goes. Below you will find the top five finisher, and the winner of the Best Product award of $30,000.
Grand Prize Winner ($50,000 USD): The Open Source Underwater Glider is an AUV (Autonomous Underwater Vehicle) capable of long-term underwater exploration of submarine environments. Where most AUVs are limited in both power and range, the Open Source Underwater Glider does not use active propulsion such as thrusters or propellers. This submersible glides, extending the range and capabilities of whatever task it is performing.
The Open Source Underwater Glider is built from off-the-shelf hardware, allowing anyone to build their own copy of this very capable underwater drone. Extended missions of up to a week are possible, after which the Glider would return home autonomously.
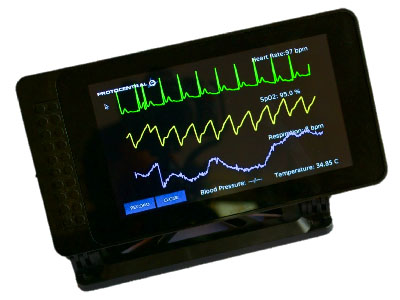
Second Place ($20,000): The Connected Health project aims to bring vital sign monitoring to the masses with a simple, inexpensive unit built around commodity hardware. This monitoring system is connected to the Internet, which enables remote patient monitoring.
Third Place ($15,000): This Assistance System for Vein Detection uses off-the-shelf components and near-IR imaging to detect veins under the skin. This system uses a Raspberry Pi and camera module or a modified webcam and yet is just as reliable as professional solutions that cost dozens of times more than this team’s prototype.
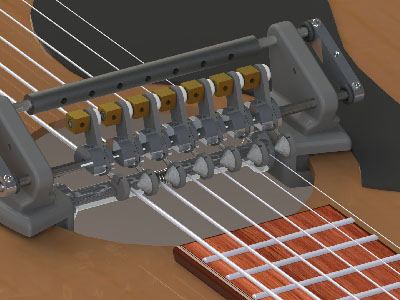
Fourth Place ($10,000): The Adaptive Guitar is an electromechanical system designed to allow disabled musicians to play the guitar with one hand (and a foot). This system strums the strings of a guitar while the musician frets each string.
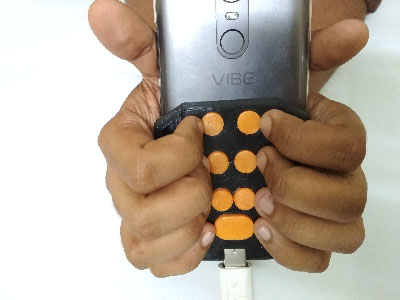
Fifth Place ($5,000): Tipo is effectively a Braille USB keyboard designed for smartphones. The advent of touchscreen-only phones has unfortunately left the visually impaired without a modern phone. Tipo allows for physical interaction with modern smartphones.
The winner of the Best Product is Tipo : Braille Smartphone Keypad. Tipo is the solution to the problem of the increasingly buttonless nature of modern smartphones. A phone that is only a touchscreen cannot be used by the visually impaired, and Tipo adds a Braille keypad to the back of any phone. It is effectively a USB keypad, designed for Braille input, that attaches to the back of any phone.
The Best Product competition ran concurrently with the five challenge rounds and asked entrants to go beyond prototype to envision the user’s needs, manufacturing, and all that goes into getting to market. By winning the Best Product competition, the creators of Tipo will refine their design, improve their mechanical build, start looking at injecton molding, and turn their 3D printed prototype into a real product that has the ability to change lives.
Congratulations to all who entered the Hackaday Prize. Taking time to apply your skill and experience to making the world better is a noble pursuit. It doesn’t end with the awarding of a prize. We have the ability to change lives by supporting one another, improving on great ideas, and sharing the calling to Build Something that Matters.
Linux can have a somewhat split personality. If you use it as a desktop OS, it has a lot of GUI tools, although sometimes you still need to access the command line. If you use it as a headless server, though, you probably ought to know your way around the command line pretty well. This is especially true if you don’t want to litter up your hard drive (and CPU) with X servers and other peculiarities of the graphical user interface.
Personally, I like the command line, but I am realistic enough to know that not everyone shares that feeling. I’ll also admit that for some tasks — especially those you don’t do very often — it is nice to have some helpful buttons and menus. There are several administration tools that you might be interested in using to handle administration tasks on your Linux machines. I’m going to look at two of them you might want to experiment with that both use a Web browser to provide their interface.
When men were men, and oscilloscopes were oscillographs.
Do you remember your first oscilloscope? Maybe we have entered the era in which younger readers think of a sleek model with an LCD screen, but for the slightly older among us the image that will come to mind is likely to be a CRT-based behemoth. Mine was a 2MHz bandwidth Cossor from the 1950s, wildly outdated by the 1980s, but it came to me at no cost. It proudly proclaims itself as a “Portable Oscillograph”, but requires its owner to be a weightlifter to move it. I still have it, as a relic and curio.
For most of us a new ‘scope is still a significant investment. Even affordable current models such as the extremely popular Rigol instruments are likely to cost several hundred dollars, but offer measurement functions undreamed of by those 1950s engineers who would have looked on the Cossor as an object of desire.
Oscilloscope buyers on a budget may not have the cash for a Rigol, a Hantek, or any of the other affordable ‘scopes. Someone starting on the road of electronic engineering can scout around for a cheap or free second-hand CRT model, but thanks to the ever advancing march of technology they also have another option. Modern microprocessors and microcontrollers have analogue-to-digital converters and processor cores that are fast enough to provide the functions of a simple oscilloscope, and to that end a variety of very cheap ‘scopes and ‘scope kits have come on the market. These invariably have a rather small LCD screen and a relatively low bandwidth, but since they can be had for almost pocket-money prices their shortcomings can be overlooked in the name of value. It’s been a matter of curiosity for some time then: are these instruments any good? For around £16 ($21) and the minor effort of an online order from China, we decided to find out.
If you look at most stockists of electronic kits these days, you are likely to find an oscilloscope kit in their range. These are volume produced in China, and the same design trends appear across different models. You can buy surface mount or through-hole, and most of them feature a bare board with maybe a piece of laser-cut Perspex standing in for a case. There are one or two models appearing that come with a case though, and it was one of these that we ordered. The JYE Tech DSO150 is a single-channel ‘scope with a 2.4″ 320×240 pixel colour LCD screen and a 200kHz bandwidth. Its specification is typical of the crop of similar kits, though its smart case sets it apart and made it an easy choice.
In the Box
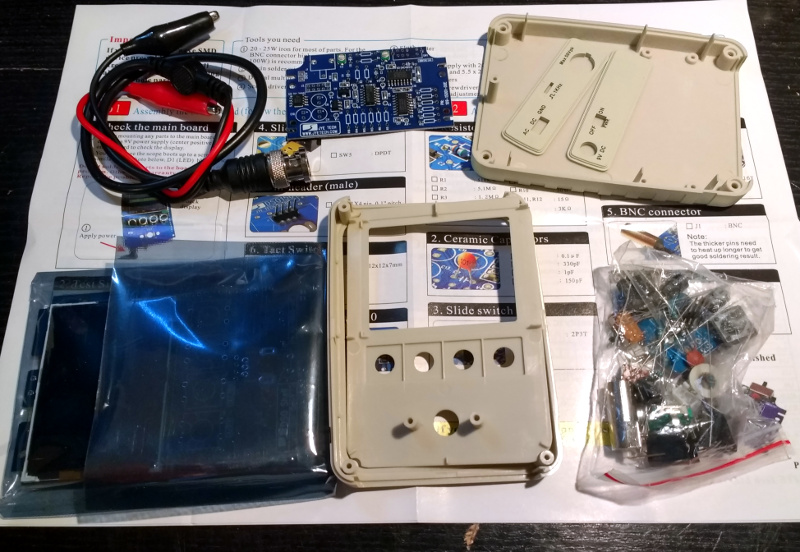
We ordered one, and when it arrived, it was packed in a small cardboard carton that had suffered some crushing in transit, but had protected the internal contents well enough that no harm had been done. A layer of foam protected the LCD, and the case parts appeared rigid enough to protect the rest of the components. There was a bag of discretes, the case parts, two PCBs, a test lead with crocodile clips, and two pages of instructions.
When looking at a kit, it’s best to start with the instructions, because no matter the quality of the kit itself it is the quality of the instructions that make or break a kit. If you can’t build it then it doesn’t matter how good it might be, it’s effectively junk.
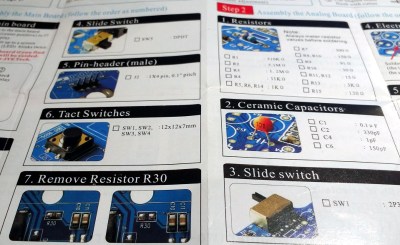
The DSO150 instructions are two sheets of high quality double-sided colour print, with the emphasis on pictures rather than words, The front page introduces the kit and gives a quick soldering guide, then the next two pages step through each stage of construction. The final page has basic instructions for use, specification, and a troubleshooting guide. Our kit had all surface-mount parts already fitted, if we’d known the kit could also be had with SMD parts to fit we’d have bought that version instead.
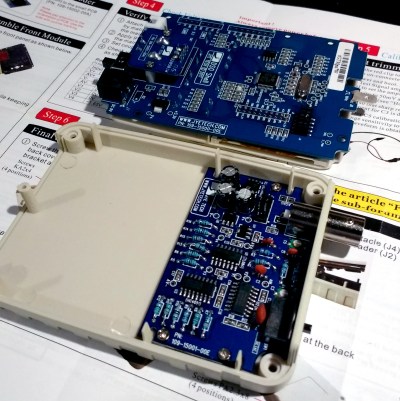
Inside the DSO100.
The instruction steps are long on images and short on text, but there are sometimes few cues as to where the component in question lies on the board. Sometimes some careful examination of board and picture is necessary to ensure correct placement. The first step though doesn’t involve any soldering, wire the main board up to a 9V supply, and watch the LCD boot into the oscilloscope software. There is support via a forum on the JYE Tech website, we presume you’d go there if it failed to boot out of the box. A 9V PSU isn’t included, you’ll need to find one with a 2.1mm centre positive plug. Fortunately a suitable candidate was in the box of wall warts here, formerly being used by a router.
The main board assembly is straightforward enough, being the assembly of larger through-hole parts such as switches and connectors. The analogue board has a brace of small through-hole resistors and ceramic capacitors to fit, of these the resistors were of the tiny variety which made distinguishing between some of their colour stripes a little difficult. Bring your multimeter to check. There is a BNC connector that requires significant heat on there too, so make sure you have a suitably beefy iron to hand. Finally there is a small board for the rotary encoder, then the front of the case can be assembled to the main board, the analogue board attached, and the ‘scope set up. Verify on-board voltages, attach the test clip to the calibration output and adjust the compensation capacitors for a square wave, and the rest of the case can be added to complete the unit.
Functionality
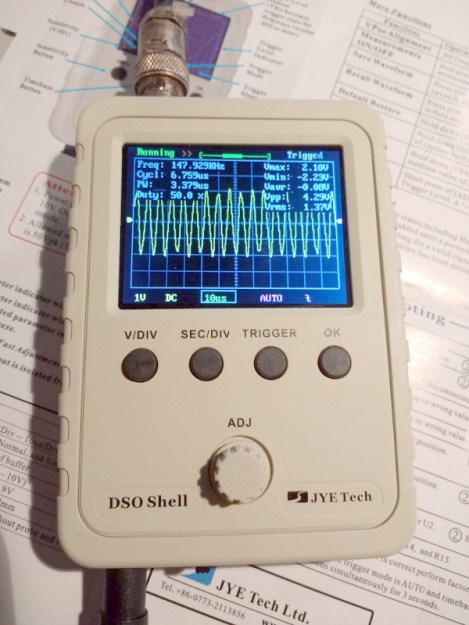
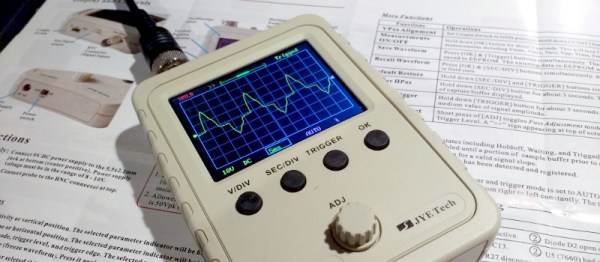
The DSO150 showing the upper end of its bandwidth.
In use, the DSO150 makes a simple and straightforward enough oscilloscope. The usual volts/division and timebase selection is easy enough, and the various trigger modes can quickly be selected. If you’ve used an oscilloscope before then you will have no problems getting started with it. But of course, the DSO150 isn’t just a simple oscilloscope, it’s a digital storage ‘scope. And with 1024 sampling points it can do the usual storage ‘scope thing of allowing the user to examine a stored waveform in great detail, scrolling back and forth through the stored points. Here the instruction sheet falls short, not mentioning that a double tap on the V/div or Sec/div buttons allows you to scroll.
Connecting the signal generator to our DSO150 allowed the exploration of its bandwidth. The claimed 200kHz is pretty spot-on, winding the signal generator far beyond that point showed a tail-off in displayed amplitude. Also the minimum 10µS per division limits the usefulness of a waveform display at these frequencies.
The DSO150 is supplied with a short test lead terminated in a pair of crocodile clips. This is somewhat less useful than the oscilloscope probes we’re used to, though happily it can also be used with a standard 1x/10x probe. Looking at the square wave on the test terminal through a standard probe reveals a sharp corner on the waveform, so there seems not to be any problems between the compensation on-board and that in the probe. It’s likely that either the DSO150 here will be used with a standard probe, or that the crocodile clip will swiftly be replaced with a probe of some kind.
Closing Thoughts
So then, the JYE Tech DSO150 oscilloscope kit. A nice little ‘scope within the limitations of the STM32F103C8 microcontroller that drives it. If you can put up with a 200kHz bandwidth and a 50V peak input voltage then it’s a useful pocket instrument. Its calibration will depend on the STM’s crystal and voltage reference, but as with the rest of its specification, when you consider its pocket-money price those become minor considerations. Add in that its software is open-source, and you have a very nice platform indeed. If we wanted to nitpick we’d ask for a battery compartment and a proper probe, but since both of those would put up the price we wouldn’t make too much noise about it. If you need a pocket ‘scope to supplement your bench scope when working on lower frequencies, or if you have a youngster in the family looking for their first ‘scope, buy one! Our review unit will definitely see some use rather than gathering dust.
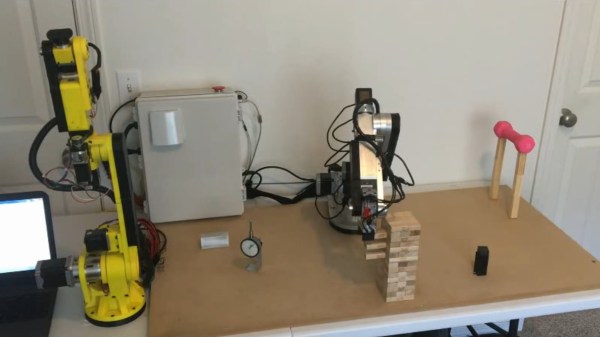
We’ve seen industrial robotic arms in real life. We’ve seen them in classrooms and factories. Before today, we’ve never mistaken a homemade robotic arm for one of the price-of-a-new-home robotic arms. Today, [Chris Annin] made us look twice when we watched the video of his six-axis robotic arm. Most of the DIY arms have a personal flare from their creator so we have to assume [Chris Annin] is either a robot himself or he intended to build a very clean-looking arm when he started.
He puts it through its paces in the video, available after the break, by starting with some stretches, weight-lifting, then following it up and a game of Jenga. After a hard day, we see the arm helping in the kitchen and even cracking open a cold one. At the ten-minute mark, [Chris Annin] walks us through the major components and talks about where to find many, many more details about the arm.
As the saying goes, hindsight is 20/20. It may surprise you that the microchip that we all know and love today was far from an obvious idea. Some of the paths that were being explored back then to cram more components into a smaller area seem odd now. But who hasn’t experienced hindsight of that sort, even on our own bench tops.
Let’s start the story of the microchip like any good engineering challenge should be started, by diving into the problem that existed at the time with the skyrocketing complexity of computing machines.
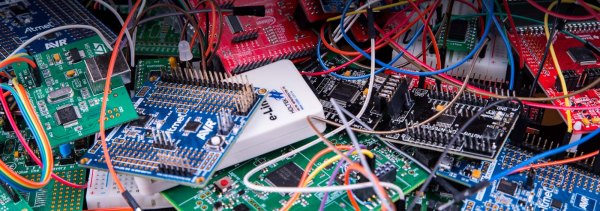
Let’s say you’re working on a project, and you need a microcontroller. Which chip do you reach for? Probably the one you’re most familiar with, or at least the one whose programmer is hiding away in a corner of your desk. Choosing a microcontroller is a matter of convenience, but it doesn’t have to be this way. There are dozens of different ARM cores alone, hundreds of 8051 clones, and weirder stuff including the Cypress PSoC and TI’s MSP430. Which one is best? Which microcontroller that costs under a dollar is best? That’s the question [Jay Carlson] tried to answer, and it’s the best microcontroller shootout we’ve ever read.
[Jay] put together a monster of a review of a dozen or so microcontrollers that cost no more than a dollar. Included in this review are, from Atmel: the ATtiny1616, ATmega168PB, and the ATSAMD10. From Cypress, the PSoC 4000S. From Freescale, the KE04 and KL03. Holtek’s HT-66, and the Infineon XMC1100. From Microchip, the PIC16, PIC24, and PIC32. From Nuvoton, the N76, and M051. The NXP LPC811, Renesas RL-78, Sanyo LC87, and Silicon Labs EFM8. ST’s STM32F0 and STM8. STCMicro’s STC8, and finally TI’s MSP430. If you’re keeping score at home, most of these are either ARM or 8051-style cores, but the AVRs and PICs bump up the numbers for ‘proprietary’ core designs.
This review begins the same as all tech reviews, with a sampling of tech specs. Everything is there, including the amount of RAM to the number of PWM channels. [Jay] is going a bit further with this review and checking out the development environments, compilers, dev tools, and even the performance of different cores in three areas: blinking bits, a biquad filter, and a DMX receiver. There’s an incredible amount of work that went into this, and right now, this is the best resource we’ve seen for a throwdown of microcontrollers.
With all this data and the experience of going through a dozen different microcontroller platforms, what’s [Jay]’s takeaway? The STM32F0 is great, the Atmel/Microchip SAM D10 has great performance but you’ll be relying on some third-party libraries. The pure Microchip parts — the PIC16, PIC24, and PIC32 — have infinite product lifetimes, a wide range of packages, and a huge community but use a clunky IDE, and expensive compilers. The Cypress PSoC was just okay, and the PSoC5 or PSoC6 would be better. Surprises from this test include the Renesas RL-78 and its high performance, low cost, and the most power-efficient 5V part in the test.
With all that said, what’s the best microcontroller? That’s a dumb question, because the best microcontroller will always be the best microcontroller for that application. Or whatever you have sitting around in the parts drawer, we were never quite clear on what the answer actually is. That said, this is a new high water mark for microcontroller reviews, and we hope [Jay] will continue his research into microcontrollers that cost more than a dollar.


 If you look at most stockists of electronic kits these days, you are likely to find an oscilloscope kit in their range. These are volume produced in China, and the same design trends appear across different models. You can buy surface mount or through-hole, and most of them feature a bare board with maybe a piece of laser-cut Perspex standing in for a case. There are one or two models appearing that come with a case though, and it was one of these that we ordered.